
 notepad
![[process]](https://eev.ee/theme/images/category-process.png)
This is a series about Star Anise Chronicles: Cheezball Rising, an expansive adventure game about my cat for the Game Boy Color. Follow along as I struggle to make something with this bleeding-edge console!
GitHub has intermittent prebuilt ROMs, or you can get them a week early on Patreon if you pledge $4. More details in the README!
In this issue, I get a little asset pipeline working and finally have a real map.
Previously: spring cleaning.
Next: resounding failure success?.
Recap
The last post only covered some minor problems (including, I grant you, being totally broken), so the current state of the game is basically unchanged from before.
That grass pattern, the grass sprite itself, and the color scheme are all hardcoded — written directly into the source code, by hand. If this game is going to get very far at all, I urgently need a better way to inject some art.
Constraints
The Game Boy imposes some fairly harsh constraints on the artwork — which is part of the charm! But now I have to figure out how to work within those constraints most effectively. Here’s what I’ve got to work with.
Bear in mind that I intend for the game to be based around 16×16, um, tiles. Okay, it’s extremely confusing that “tile” might refer either to the base size of the artwork or to the Game Boy’s native 8×8 tiles, so I’m going to call the art tiles and the Game Boy’s basic unit a character (which is what the manual does).
-
The background layer is a grid of 8×8 characters, each of which uses one of eight 4-color background palettes.
-
The object layer is a set of 8×16 character pairs, each of which uses one of eight 3-color object palettes. These palettes are 3-color because color 0 is always transparent.
-
No more than 40 objects can appear on screen at the same time. (There is a way to weasel past this limit, but it requires considerable trickery.)
-
No more than 10 objects can appear in the same row of pixels. (I believe this is a hard limit.)
-
There are three blocks of 256 chars each. I can divide this between the background and objects more or less however I want, though neither can have more than two blocks (= 512 chars).
I’m intending for the game to be based around a 16×16 grid, a fairly common size for the Game Boy. That makes me a little concerned about the per-row object limit — each entity will need to have two Game Boy objects side by side, so I’m really limited to only five entities sharing the same row of pixels. I can’t do much about that quite yet (and only have one entity anyway), but it’s likely to affect how I design maps and draw sprites.
The next biggest problem is colors. Each object palette can only have three colors, which in practice means a shadow/outline color, a highlight color, and a base color. This is why every NPC and overworld critter in Pokémon GSC and the Zeldas is basically monochromatic. They pull it off really well by making very effective use of the highlight and shadow colors.
Since 16×16 sprites are composed of multiple Game Boy objects, it’s possible to overcome this limit by giving each part of the sprite a different palette. Unfortunately, objects being 8×16 means the sprites are split vertically, when it would be most useful to have different colors for e.g. the head and body. I wish the Game Boy supported 16×8 objects! That’d help a ton with the per-row limit, too. Alas, a few decades too late to change it now.
As for the number of chars… well, let’s see. The whole screen is only 160×144, which is 20×18 or 360 chars, so I could allocate two blocks to the background and have 512 — more than enough to cover the entire screen in unique chars! (I expect one block to be more than enough for objects, since I can only show 80 object chars at once anyway.)
On the other hand, I’ll need to reserve some of that space for text and UI and whatnot, and each 16×16 tile is composed of four chars. If I very generously allocate a whole block to window dressing (enough for all of ISO-8859-1?), that leaves 256 chars, which is 64 tiles, which is a tileset that fits in an eight-by-eight square.
For comparison’s sake, even fox flux’s relatively limited tileset is a sixteen-tile square — four times as big. This feels a little dire.
But how can it be dire, when I have enough sprite space to fill the screen and then some?
Let’s see here. A pretty good chunk of the fox flux tileset is unused or outright blank. Some of these tiles are art for moving objects that happened to fit in the grid, and those wouldn’t be in the background tileset. And while all of the tiles are distinct, a lot of the basic terrain has some significant overlap:
All of the regions of the same color are identical. These 9 distinct tiles could fit into 20 chars if they shared the common parts, rather than the 36 required to naïvely cutting each one into four dedicated chars.
(The fox flux grid is 32×32, so everything is twice as big as it will be on the Game Boy, but you get the idea.)
I’m feeling a little better about this, especially knowing I do have enough space to cover the whole screen. Worst case, I could draw the map as though it were a single bitmap. I don’t want to have to rely on that if I can get away with it, though — I suspect I’d need to constantly load chars on the fly, and copying stuff around eats into my CPU budget surprisingly quickly.
Research
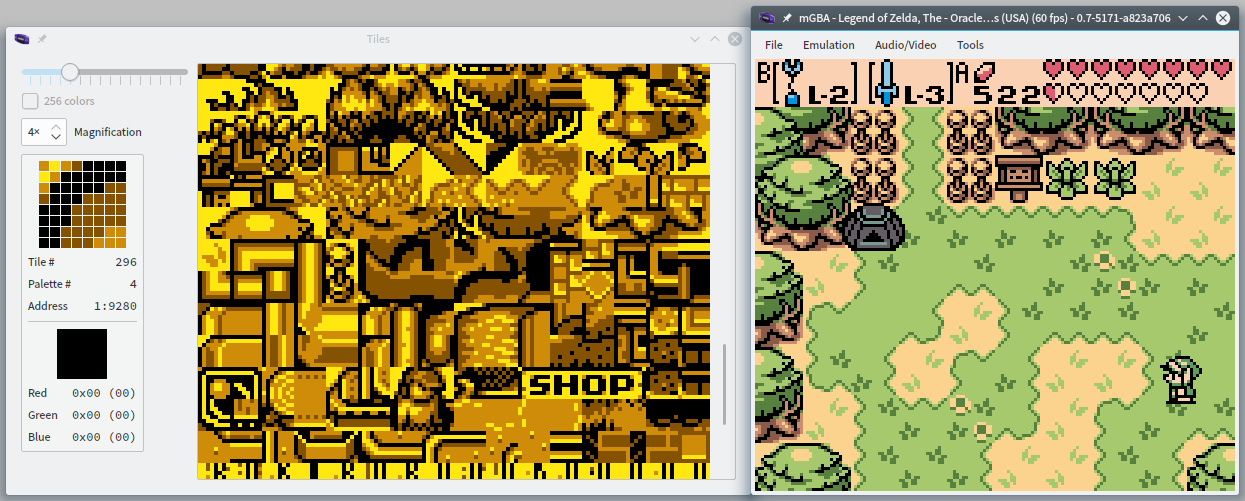
That does get me wondering: what, exactly, do the Oracle games do? I haven’t done any precise measurements, but I’m pretty sure they have more than sixty-four distinct map tiles throughout their large connected worlds. Let’s have a look!
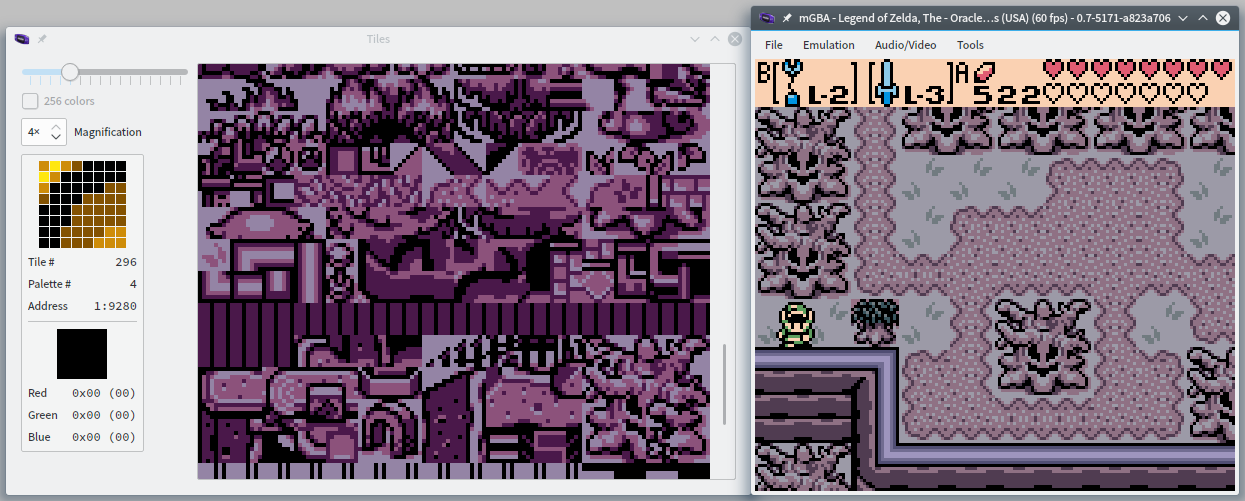
Here I am in the graveyard near the start of Oracle of Ages. The “creepy tree” here is distinct and doesn’t really appear anywhere else, so I found it in the tile viewer (lower right) and will be keeping an eye on it. Note that only the left half of the face is visible; the right half is using the same tiles, flipped horizontally. (The colors are different because the tile viewer shows the literal colors, whereas the game itself is being drawn with a shader.)
Let’s walk left one screen.
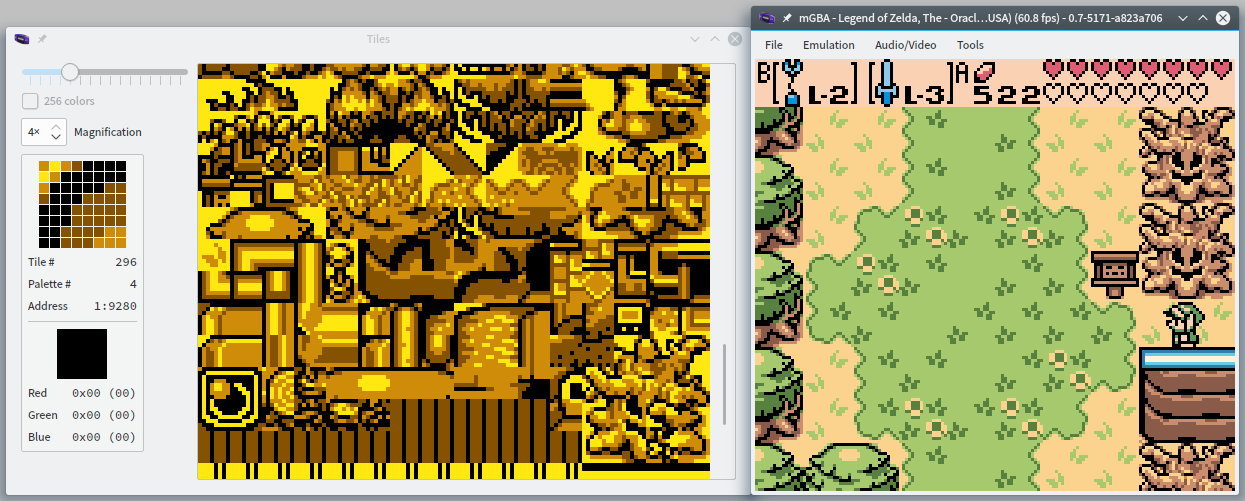
Now, this is interesting. The creepy tree is still on the screen here, so its tiles are naturally still loaded. But a bunch of tiles on the left — parts of the dungeon entrance and other graveyard things — have been replaced by town tiles. I’m several screens away from the town!
The next screen up has no creepy trees, but its tiles remain. Of course, they’d have to, since the creepy tree is still visible during a transition. I have to go left from there before the tree disappears:
Wow! At a glance, this looks like enough tiles to draw the entire town.
This is fascinating. The Oracle games have several transitions between major areas, marked by fade-outs or palette changes — the purple-tinted graveyard is an obvious example. But it looks like there are also minor transitions that update the tileset while I’m still several screens away from where those tiles are used. The screens around the transition only use common tiles like grass and regular trees, so I never notice anything is happening.
That’s cute, clever, and an easy way to make screen transitions work without having to figure out what tiles are becoming unused as they slide off the screen!
At this point I realize I may be getting ahead of myself. Screen transitions? I don’t have a map yet! Hell, I don’t even have a camera. Time to back up and make something I can build on.
Designing a tileset
I’m pretty tired of manually translating art into bits. It’s 2018, dammit. I want to use all the regular tools I would use for this, I want the Game Boy’s limitations to be expressed as simply as possible, and I want minimal friction between the source artwork and the game.
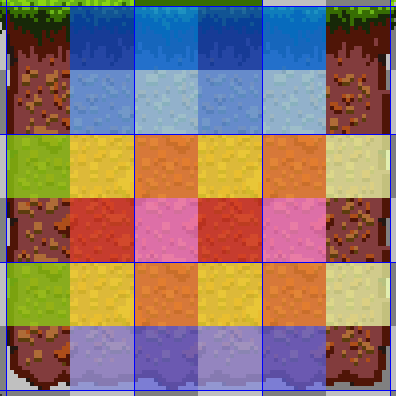
Here’s my idea. I know I only have 8 palettes to work with, so I’m decreeing that tilesets will be stored as paletted PNGs. The first four colors in the image palette will become the first Game Boy palette; the next four colors become the second Game Boy palette; and so on. If I then resize Aseprite’s palette panel to be four colors wide, I’ll have an instant view of all my available combinations of colors.
This already has some problems — for starters, if the same color appears in multiple palettes (which will almost certainly happen, for the sake of cohesion), I’m very likely to confuse the hell out of myself. I also have no idea how to extend this into multiple tilesets, but for now I’ll pretend the entire game world only uses a single tileset.
I could instead dynamically infer the palettes based on what combinations of colors are actually used, but after more than a couple tiles, it would be a nightmare for a human to keep track of what those combinations are. With this approach, all a human needs to do is color-drop a pixel from a particular tile and look at what row the color’s in.
After a quick jaunt into the pixel mines, here are some tiles.

Or, as viewed in Aseprite:
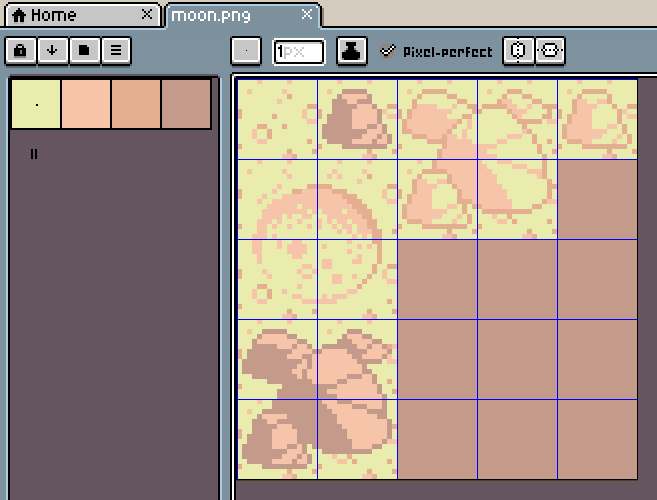
That’s only one palette, but hopefully you can see what I’m going for here. It’s enough to get started.
At this point, I started writing a little Python script that used Pillow to inspect the colors and pixels and dump them out to rgbasm-flavored source code. The script itself is not especially interesting: run through each 8×8 block of pixels, look at each pixel’s palette index, mod 4 to get the index within the Game Boy palette, print out as backtick literals. (I could spit out raw binary data, but I wanted to be able to inspect the intermediate form easily. Maybe later.)
The results:
 1SECTION "Map dumping test", ROM0
 2TEST_PALETTES:
 3    dw %0101011110111101
 4    dw %0101011100011110
 5    dw %0100101010111100
 6    dw %0100011001111000
 7    ; ... enough zeroes to make eight palettes ...
 8; sorry, in the script I was calling them "tiles", not "chars"
 9TEST_TILES:
10    ; tile 0 at 0, 0
11    dw `00001000
12    dw `00000000
13    dw `00100000
14    dw `00000000
15    dw `00000000
16    dw `00000000
17    dw `20000000
18    dw `20000002
19    ; ... etc ...
And hey, I already have code that can load palettes and chars, so all I have to do is swap out the old labels for these ones.
Now I have a tileset I can load into the game, which is very exciting, except that I can’t see any of them because I still don’t have a map. I could draw a test map by hand, I suppose, but the whole point of this exercise was to avoid ever doing that again.
Drawing a map
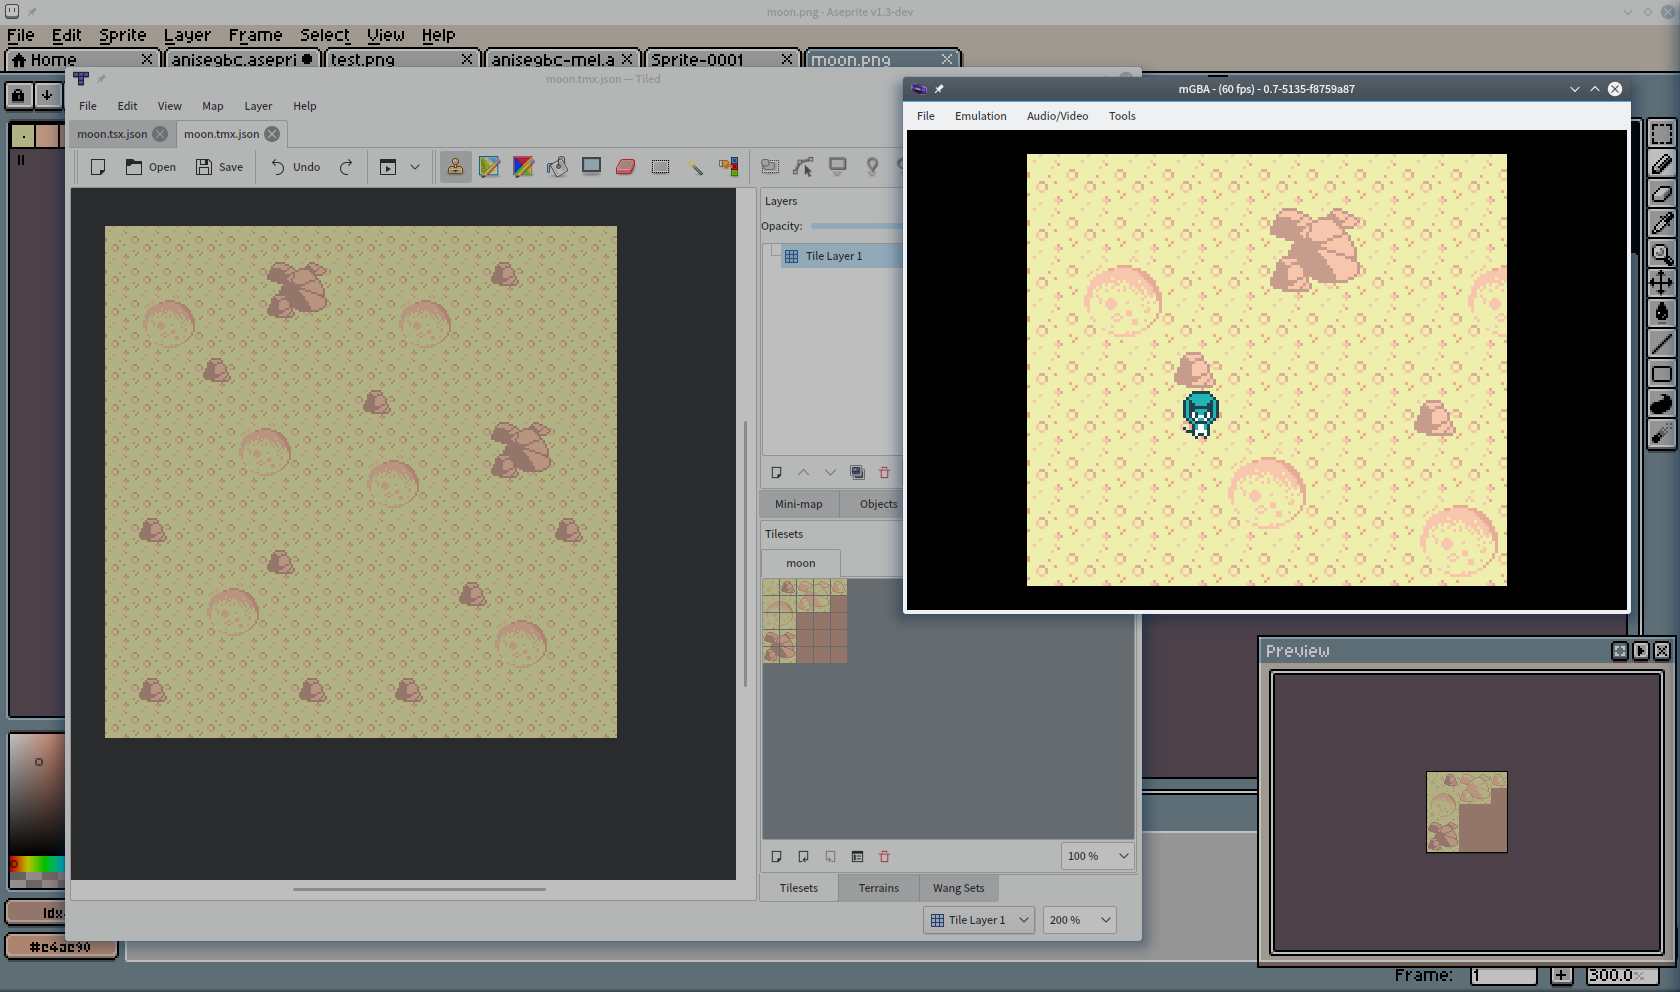
In keeping with the “it’s 2018 dammit” approach, I elect to use Tiled for drawing the maps. I’ve used it for several LÖVE games, and while its general-purposeness makes it a little clumsy at times, it’s flexible enough to express basically anything.
I make a tileset and create a map. I choose 256×256 pixels (16×16 tiles), the same size as the Game Boy screen buffer, and fill it with arbitrary terrain. In retrospect, I probably should’ve made it the size of the screen, since I still don’t have a camera. Oh, well.
Here, I hit a minor roadblock. I want to do as much work as possible upfront, so I want to store the map in the ROM as chars, not tiles. That means I need to know what chars make up each tile, which is determined by the script that converts the image to char data. Multiple maps might use the same tileset, and a map might use multiple tilesets, so it seems like I’ll need some intermediate build assets with this information…
(In retrospect again, I realize that the game may need to know about tiles rather than just chars, since there’ll surely be at least a few map tiles that act like entities — switches and the like — and those need to function as single units. I guess I’ll work that out later.)
This is all looking like an awful lot of messing around (and a lot of potential points of failure) before I can get anything on the dang screen. I waffle for a bit, then decide to start with a single step that simultaneously dumps the tiles and the map. I can split it up when I actually have more than one of either.
You can check out the resulting script if you like, but again, I don’t think it’s particularly interesting. It enforces a few more constraints than before, and adds a TEST_MAP_1 label containing all the char data, row by row. Loading that into VRAM is almost comically simple:
1    ; Read from the test map
2    ld hl, $9800
3    ld de, TEST_MAP_1
4    ld bc, 1024
5    call copy16
The screen buffer is 32×32 chars, or 1024 bytes. As you may suspect, copy16 is like copy, but it takes a 16-bit count in bc.
 1; copy bc bytes from de to hl
 2; NOTE: bc must not be zero
 3copy16:
 4    ld a, [de]
 5    inc de
 6    ld [hl+], a
 7    dec bc
 8    ; dec bc doesn't set flags, so gotta check by hand
 9    ld a, b
10    or a, c
11    jr nz, copy16
12    ret
Hm. It’s a little harder to justify the bc = 0 case as a feature here, since that would try to overwrite every single byte in the entire address space. Don’t do that, then.
Now, at long long last, I have a background with some actual art! It’s starting to feel like something! I’ve even got something resembling a workflow.
All in a day’s work. Good time to call it, right?
Except…
I just wrote this char loading code…
And there’s still one thing still hardcoded…
I wonder if I could do something about that…?
Sprites
Above, I conspicuously did not mention how I integrated the Python script into the build system. And, well, I didn’t do that. I ran it manually and put it somewhere and committed it all as-is. You currently (still!) can’t actually build the game without repeating my steps. You can’t even just put the output in the right place, because you also have to delete some debug output from the middle of the file.
It gets worse! Here’s how.
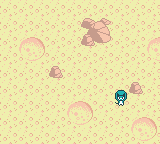
I have some Anise walking sprites, too, drawn in Aseprite. They’re pretty cute and I’d love to have them in the game, now that I have some Real Art™ for the background.

Why not throw these at the same script and hack them into animating?
Unfortunately, this introduces a bit of manual work, as animation often does. (My kingdom for a way to embed a small simple animation in a larger spritesheet in Aseprite!) I’ve typically animated every critter in its own Aseprite file — or stacked several vertically in the same file when their animations are similar enough — and then exported as a sheet with the frames running off horizontally. You can see this at work in fox flux, e.g. on its critter sheet.
But Star Anise introduces a wrinkle that prevents even that slightly clumsy workflow from working.
You may have noticed that the walking sprite above blows the color budget considerably, using a whopping five colors. The secret is that Anise himself fits in a 16×16 square, and then his antenna is a third 8×16 sprite drawn on top. I can’t simply export him as a spritesheet, because the antenna needs to be separate, and it’s not even aligned to the grid. It doesn’t even stay in the same place consistently!
I could maybe hack something together that would automatically pull the incompatible pixels into a separate sprite. I might need to, since — spoiler alert — there are an awful lot of Lunekos in this game. For now, though, I did the dumbest thing that works and copied his frames to their own sheet by hand.

The background is actually cyan, not transparent. I had to do this because my setup expects multiple sets of four colors — the first color in an object palette is still there, even if it’s ignored — and only one color in an indexed PNG can be transparent. (Don’t @ me about PNG pixel formats.) I could’ve adjusted it to work with sets of three colors and put the transparent one at the end so the palette column trick still worked, but… this was easier.
Here’s the best part: I took the main function from my tile loading script, copy-pasted it within the same file, and edited the copy to dump these sprites sans map. So now not only is there no build system, but half of the loading script is inaccessible! Sorry. We’re getting into experiment territory and I am going to start making a lot of messes while I figure out what I actually want.
Using these within the game was just as easy as before — replace some labels with new ones — and the only real change was to use a third OAM slot for the antenna. (The antenna has to appear first; when sprites overlap, the one with the lowest index appears on top.)
That did make updating OAM a little clumsy; you may recall that before, I loaded the x and y positions into b and c, updated them, then wrote them back into OAM:
 1    ; set b/c to the y/x coordinates
 2    ld hl, oam_buffer
 3    ld b, [hl]
 4    inc hl
 5    ld c, [hl]
 6    bit BUTTON_LEFT, a
 7    jr z, .skip_left
 8    dec c
 9.skip_left:
10    bit BUTTON_RIGHT, a
11    jr z, .skip_right
12    inc c
13.skip_right:
14    bit BUTTON_UP, a
15    jr z, .skip_up
16    dec b
17.skip_up:
18    bit BUTTON_DOWN, a
19    jr z, .skip_down
20    inc b
21.skip_down:
22    ld [hl], c
23    dec hl
24    ld [hl], b
25    ld a, c
26    add a, 8
27    ld hl, oam_buffer + 5
28    ld [hl], a
29    dec hl
30    ld [hl], b
The above approach required that I hardcode the 8-pixel offset between the left and right halves. With the antenna in the mix, I would’ve had to hardcode another more convoluted offset, and I didn’t like the sound of that. So I changed it to inc and dec the OAM coordinates directly and immediately:
 1    ; Anise update loop
 2    ; set b/c to the y/x coordinates
 3    ld bc, 4
 4    bit BUTTON_LEFT, a
 5    jr z, .skip_left
 6    ld hl, oam_buffer + 1
 7    dec [hl]
 8    add hl, bc
 9    dec [hl]
10    add hl, bc
11    dec [hl]
12.skip_left:
13    ; ... etc ...
Eventually I should stop doing this and have an actual canonical x/y position for Anise somewhere. But I didn’t do that yet.
I did also take this opportunity to change my LCDC flags so that object chars start counting from zero at $9000, fixing the misunderstanding I had before. That’s nice.
Anyway, tada, Star Anise can slide around, but now with his antenna.
Not good enough.
Animating
It’s time to animate something. And this time around, all I’ve got are bytes to work with. Oh, boy!
Right out of the gate, I have two options. I could load all of Anise’s sprites into VRAM upfront and change the char numbers in OAM to animate him, or I could reserve some specific chars and overwrite them to animate him.
The first choice makes sense for an entity that might exist multiple times at once, like enemies or… virtually anything in the game world, really. But there’s only ever one player, and he’s likely to have a whole lot of spritework, which I would prefer not to have clogging up my char space for the entire duration of the game. So while I might use the other approach for most other things, I’m going to animate Anise by overwriting the actual graphics. Every frame.
First things first. I’m going to need some state, which I’ve been avoiding by relying on OAM. At the very least, I need to know which way Anise is facing — which isn’t necessarily the direction he’s moving, because he should keep his facing when he stops. I also need to know which animation frame he’s on, and how many LCD frames are left until he should advance to the next one.
Let’s refer to the time between vblanks as a “tic” for now, to avoid the ambiguity of a “frame” when talking about animation.
A good start, then, would be some constants.
1FACING_DOWN   EQU 0
2FACING_UP     EQU 1
3FACING_RIGHT  EQU 2
4FACING_LEFT   EQU 3
5
6ANIMATION_LENGTH EQU 5
ANIMATION_LENGTH is the length of every frame. I don’t especially want to give every frame its own distinct duration if I can avoid it; this will be complicated enough as it is. I fiddled with the frame duration in Aseprite for a bit and landed on 83ms as a nice speed, and that’s 5 tics.
I also need a place for this state, so I add some more stuff to my RAM block.
1anise_facing:
2    db
3anise_frame:
4    db
5anise_frame_countdown:
6    db
And initialize it in setup.
1    ld a, FACING_DOWN
2    ld [anise_facing], a
3    ld a, ANIMATION_LENGTH
4    ld [anise_frame_countdown], a
Presumably, one day, I’ll have multiple entities, and they’ll all share a similar structure, which I’ll have to traverse manually. For now, it’s easier to follow the code if I give every field its own label.
I have four levels of hierarchy here: the spriteset (which for now is always Anise’s), the pose (I only have one: walking), the facing, and the frame. I need to traverse all four, but luckily I can ignore the first two for now.
I don’t want to animate Anise when he’s not moving, so I changed the OAM updating code to also ld d, 1 if there’s any movement at all, and skip over all the animation stuff if d is still zero.
 1    ; ... read input ...
 2
 3    ; This was before I knew the 'or a' trick; these two ops
 4    ; could be replaced with 'xor a; or d'
 5    ld a, d
 6    cp a, 0
 7    jp z, .no_movement
 8
 9    ; ... all the animation code will go here ...
10
11.no_movement:
12    ; and after this we repeat the main loop
This does have the side effect that Anise will simply freeze in mid-walk when stopped, rather than returning to his standing pose. I still haven’t fixed that; I could special-case it, but I usually treat “standing” as its own one-frame animation, so it feels like something that ought to come when I implement poses.
Next I decrement the countdown, which is the number of tics left until the frame ought to change. If this is nonzero, I don’t need to do anything.
1    ld a, [anise_frame_countdown]
2    dec a
3    ld [anise_frame_countdown], a
4    jp nz, .no_movement
5    ld a, ANIMATION_LENGTH
6    ld [anise_frame_countdown], a
Again, this isn’t actually right. If Anise’s state changes, such as between standing and walking, then this should be ignored because he’s switching to a new animation. But this is a pose thing again, so I’m deferring it until later.
Next I need to advance the current frame. I don’t have modulo on hand and even simple ifs are kind of annoying, so I was naughty here and used bitops to roll from frame 3 to frame 0. This would obviously not work if the number of frames were not a power of two.
1    ld a, [anise_frame]
2    inc a
3    and a, 4 - 1
4    ld [anise_frame], a
Yet again, if Anise changes direction, the frame should be reset to zero… but it ain’t.
Now, let’s think for a second. I know what frame I want. I have a label for the upper-left corner of the spritesheet, and I want to get to the upper-left corner of the appropriate frame. Each frame has 3 objects; each object has 2 chars; each char is 16 bytes.
 1    ld hl, ANISE_TEST_TILES
 2    ; Skip ahead 3 sprites * the current frame
 3    ld bc, 3 * 2 * 16
 4    ; Remember, zero iterations is also possible
 5    or a
 6    jr z, .skip_advancing_frame
 7.advance_frame:
 8    add hl, bc
 9    dec a
10    jr nz, .advance_frame
11.skip_advancing_frame:
12    ; Copy the sprites into VRAM
13    ; They're consecutive in both the data and VRAM, so only
14    ; one copy is necessary.  And bc is already right!
15    ld d, h
16    ld e, l
17    ld hl, $8000
18    call copy16
Hey, look at that!
Only one small problem: I forgot about facing, so Anise will always face forwards no matter how he moves. Whoops!
Facing
I need to actually track which way Anise is facing, which is a surprisingly subtle question. He might even be facing away from his own direction of movement, if for example he was thrown backwards by some external force.
A decent first approximation is to use the last button that was pressed. (That’s still not quite right — if you hold down, hold down+right, and then release right, he should obviously face down. But it’s a start.)
I don’t yet track which buttons were pressed this frame, but it’s easy enough to add. While I’m at it, I might as well track which buttons were released, too. I amend the input reading code thusly, based on the straightforward insight that a button was pressed this frame iff it is currently 1 and was previously 0.
 1    ; a now contains the current buttons
 2    ld hl, buttons
 3    ld b, [hl]                  ; b <- previous buttons
 4    ld [hl], a                  ; a -> current buttons
 5    cpl
 6    and a, b
 7    ld [buttons_released], a    ; a = ~new & old, i.e. released
 8    ld a, [hl]                  ; a <- current buttons
 9    cpl
10    or a, b
11    cpl
12    ld [buttons_pressed], a     ; a = ~(~new | old), i.e. pressed
I like that cute trick for getting the pressed buttons. I need a & ~b, but cpl only works on a, so I would’ve had to juggle a bunch of registers. But applying De Morgan’s law produces ~(~a | b), which only requires complementing a. (Full disclosure: I didn’t actually try register juggling, and for all I know it could end up shorter somehow.)
Next I check the just-pressed buttons and updating facing accordingly. It looks a lot like the code for checking the currently-held buttons, except that I only use the first button I find.
1    ld hl, anise_facing
2    ld a, [buttons_pressed]
3    bit BUTTON_LEFT, a
4    jr z, .skip_left2
5    ld [hl], FACING_LEFT
6    jr .skip_down2
7.skip_left2:
8    ; ... you get the idea ...
And finally, amend the sprite choosing code to pick the right facing, too.
 1    ld hl, ANISE_TEST_TILES
 2
 3    ; Skip ahead a number of /rows/, corresponding to facing
 4    ld a, [anise_facing]
 5    and a, %11                      ; cap to 4, just in case
 6    jr z, .skip_stride_row
 7    ; This is like before, but times 4 frames
 8    ld bc, 4 * 3 * 2 * 16
 9.stride_row:
10    add hl, bc
11    dec a
12    jr nz, .stride_row
13.skip_stride_row:
14
15    ; Bumping the frame here is convenient, since it leaves the
16    ; frame in a for the next part
17    ld a, [anise_frame]
18    inc a
19    and a, 4 - 1
20    ld [anise_frame], a
21
22    ; ... continue on with picking the frame ...
Hardcoding the number of frames here is… unfortunate. I should probably flip the spritesheet so the frames go down and each column is a facing; then there’ll always be a fixed number of columns to skip over.
But who cares about that? Look at Anise go! Yeah!
Well, yes, there is one final problem, which is that the antenna is misaligned when walking left or right… because its positioning is different than when walking up or down, and I don’t have any easy way to encode that at the moment. It’s still like that, in fact. I’m sure I’ll fix it eventually.
More vblank woes
I didn’t run into this problem until a little while later, but I might as well mention it now. The above code writes into VRAM in the middle of updating entities — updating them very simply, perhaps, but updating nonetheless. If that updating takes longer than vblank, the write will fail.
I expected this, though not quite so soon. It’s a disadvantage of swapping the char data rather than the char references: 32× more writing to do, which will take 32× longer. The solution is similar to what I do for OAM: defer the write until the next vblank. I’m already doing that with Anise’s position, anyway, and it makes no sense to have his position and animation updated on different frames.
I ended up special-casing this for Anise, though it wouldn’t be too hard to extend this into a queue of tiles to copy. It’s nothing too world-shaking; I just store the address of Anise’s current sprite in RAM, then copy it over during vblank, just after the OAM DMA.
I did try doing this with one of the Game Boy Color’s new features, general-purpose DMA, which can copy from basically anywhere in ROM or RAM to basically anywhere in VRAM. It involves five registers: you write the source address in the first two, the destination in the next two, and the length in the fifth, which triggers the copy. The CPU simply freezes until the copy is done, so there are no goofy timing issues here.
 1    ld hl, anise_sprites_address
 2    ld a, [hl+]
 3    ld [rHDMA1], a
 4    ld a, [hl]
 5    ld [rHDMA2], a
 6    ld a, HIGH($0000)
 7    ld [rHDMA3], a
 8    ld a, LOW($0000)
 9    ld [rHDMA4], a
10    ; To copy X bytes, write X / 16 - 1 to this register
11    ld a, (32 * 3) / 16 - 1
12    ld [rHDMA5], a
General-purpose DMA can copy 16 bytes every 8 cycles, or ½ cycle per byte. The fastest possible manual copy would be an unrolled series of ld a, [hl+]; ld [bc], a; inc bc which takes a whopping 6 cycles per byte — twelve times slower! This is a neat feature.
The only gotcha is that the source address has to be 16-byte aligned, so I need the SECTION header to look like:
1SECTION "Anise sprites", ROM0, ALIGN[4]
Each character is 16 bytes, so now I can copy starting from any one of them.
I edited my local copy of the built file to have this annotation, but of course, the script doesn’t know about it yet. Whoops, again! I should really fix the build, ahem.
FYI, it’s also possible to have a copy done piecemeal during hblanks, though that sounds a bit fragile to me.
Future work
I’ve laid some very basic groundwork here, and there’s plenty more to do, which I will get back to later! It’s just me hacking all this together, after all, and I like flitting between different systems.
I will definitely need to figure out how the heck multiple tilesets work and when they get switched out. How do I even use multiple tilesets, each with its own set of palettes? What’s the workflow if I want to use the same tiles with several different palettes, like how the graveyard in Oracle of Ages is tinted purple? And I didn’t even implement character de-duplication yet… which will require some metadata for each tile… aw, geez.
And I still haven’t fixed the build system! Maybe you can understand why I’m hesitant to impose more structure on this idea quite yet.
To be continued
That brings us to commit 59ff18. Except for a commit about the build that I skipped. Whatever. This post has been a little more draining to write, perhaps because it forced me to confront and explain a bunch of hokey decisions.
Next time: resounding failure success!
