
 notepad
![[process]](https://eev.ee/theme/images/category-process.png)
This is a series about Star Anise Chronicles: Cheezball Rising, an expansive adventure game about my cat for the Game Boy Color. Follow along as I struggle to make something with this bleeding-edge console!
GitHub has intermittent prebuilt ROMs, or you can get them a week early on Patreon if you pledge $4. More details in the README!
In this issue, I cannot get a goddamn Game Boy to meow at me!!
Previously: maps and sprites.
Next: text!
Recap
With the power of Aseprite, Tiled, and some Python I slopped together, the game has evolved beyond Test Art and into Regular Art.

I’ve got so much work to do on this, so it’s time to prioritize. What is absolutely crucial to this game?
The answer, of course, is to make Anise meow. Specifically, to make him AOOOWR.
Brief audio primer
What we perceive as sound is the vibration of our eardrums, caused by vibration of the air against them. Eardrums can only move along a single axis (in or out), so no matter what chaotic things the air is doing, what we hear at a given instant is flattened down to a single scalar number: how far the eardrum has displaced from its normal position.
(There’s also a bunch of stuff about tiny hairs in the back of your ear, but, close enough. Also it’s really two numbers since you have two ears, but stereo channels tend to be handled separately.)
Digital audio is nothing more than a sequence of those numbers. Of course, we can’t record the displacement at every single instant, because there are infinitely many instants; instead, we take measurements (samples) at regular intervals. The interval is called the sample rate, is usually a very small fraction of a second, and is generally measured in Hertz/Hz (which just means “per second”). A very common sample rate is 44100 Hz, which means a measurement was taken every 0.0000227 seconds.
I say “measurement” but the same idea applies for generating sounds, which is what the Game Boy does. Want to make a square wave? Just generate a block of all the same positive sample, then another block of all the same negative sample, and alternate back and forth. That’s why it’s depicted as a square — that’s the graph of how the samples vary over time.
Okay! I hope that was enough because it’s like 80% of everything I know about audio. Let’s get to the Game Boy.
Game Boy audio
The Game Boy contains, within its mysterious depths, a teeny tiny synthesizer. It offers a vast array of four whole channels (instruments) to choose from: a square wave, also a square wave, a wavetable, and white noise. They can each be controlled with a handful of registers, and will continually produce whatever tone they’re configured for. By changing their parameters at regular intervals, you can create a pleasing sequence of varying tones, which you humans call “music”.
Making music is, I’m sure, going to be an absolute nightmare. What music authoring tools am I possibly going to dig up that exactly conform to the Game Boy hardware? I can’t even begin to imagine what this pipeline might look like.
Luckily, that’s not what this post is about, because I chickened out and tried something way easier instead.
Before I set out into the wilderness myself, I did want to get an emulator to create any kind of noise at all, just to give myself a starting point. There are an awful lot of audio twiddles, so I dug up a Game Boy sound tutorial.
I became a little skeptical when the author admitted they didn’t know what a square wave was, but they did provide a brief snippet of code at the end that’s claimed to produce a sound:
1NR52_REG = 0x80;
2NR51_REG = 0x11;
3NR50_REG = 0x77;
4
5NR10_REG = 0x1E;
6NR11_REG = 0x10;
7NR12_REG = 0xF3;
8NR13_REG = 0x00;
9NR14_REG = 0x87;
That’s C, written for the much-maligned GBDK, which for some reason uses regular assignment to write to a specific address? It’s easy enough to translate to rgbasm:
 1    ; Enable sound globally
 2    ld a, $80
 3    ldh [rAUDENA], a
 4    ; Enable channel 1 in stereo
 5    ld a, $11
 6    ldh [rAUDTERM], a
 7    ; Set volume
 8    ld a, $77
 9    ldh [rAUDVOL], a
10
11    ; Configure channel 1.  See below
12    ld a, $1e
13    ldh [rAUD1SWEEP], a
14    ld a, $10
15    ldh [rAUD1LEN], a
16    ld a, $f3
17    ldh [rAUD1ENV], a
18    ld a, $00
19    ldh [rAUD1LOW], a
20    ld a, $85
21    ldh [rAUD1HIGH], a
It sounds like this.
Some explanation may be in order. This is a big ol’ mess and you could just as well read the wiki’s article on the sound controller, so feel free to skip ahead a bit.
First, the official names for all of the sound registers are terrible. They’re all named “NRxy” — “noise register” perhaps? — where x is the channel number (or 5 for master settings) and y is just whatever. Thankfully, hardware.inc provides some aliases that make a little more sense, and those are what I’ve used above.
The very first thing I have to do is set the high bit of AUDENA (NR52), which toggles sound on or off entirely. The sound system isn’t like the LCD, which I might turn off temporarily while doing a lot of graphics loading; when the high bit of AUDENA is off, all the other sound registers are wiped to zero and cannot be written until sound is enabled again.
The other important master registers are AUDVOL (NR50) and AUDTERM (NR51). Both of them are split into two identical nybbles, each controlling the left or right output channel. AUDVOL controls the master volume, from 0 to 7. (As I understand it, the high bit is used to enable audio output from extra synthesizer hardware on the cartridge, a feature I don’t believe any game ever actually used.) AUDTERM enables channels/instruments, one bit per channel. The above code turns on channel 1, the square wave, at max volume in stereo.
Then there’s just, you know, sound stuff.
AUD1HIGH (NR14) and AUD1LOW (NR13) are a bit of a clusterfuck, and one shared by all except the white noise channel. The high bit of AUD1HIGH is the “init” bit and triggers the sound to actually play (or restart), which is why it’s set last. The second highest bit, bit 6, controls timing: if it’s set, then the channel will only play for as long as a time given by AUD1LEN; if not, the channel will play indefinitely.
Finally, the interesting part: the lower three bits of AUD1HIGH and the entirety of AUD1LOW combine to make an 11-bit frequency. Or, rather, if those 11 bits are \(n\), then the frequency is \(\frac{131072}{2048-n}\). (Since their value appears in the denominator, they really express… inverse time, not frequency, but that’s neither here nor there.) The code above sets that 11-bit value to $500, for a frequency of 171 Hz, which in A440 is about an F3.
AUD1SWEEP (NR10) can automatically slide the frequency over time. It distinguishes channel 1 from channel 2, which is otherwise identical but doesn’t have sweep functionality. The lower three bits are the magnitude of each change; bit 3 is a sign bit (0 for up, 1 for down), and bits 6–4 are a time that control how often the frequency changes. (Setting the time to zero disables the sweep.) Given a magnitude of \(n\) and time \(t\), every \(\frac{t}{128}\) seconds, the frequency is multiplied by \(1 ± \frac{1}{2^n}\).
Note that when I say “frequency” here, I’m referring to the 11-bit “frequency” value, not the actual frequency in Hz. A “frequency” of $400 corresponds to 128 Hz, but halving it to $200 produces 85 Hz, a decrease of about a third. Doubling it is impossible, because $800 doesn’t fit in 11 bits. This setup seems, ah, interesting to make music with. Can’t wait!
The above code sets this register to $1e, so \(t = 1\), \(n = 6\), and the frequency is decreasing; thus every \(\frac{1}{128}\) seconds, the “frequency” drops by \(\frac{1}{64}\).
Next is AUD1LEN (NR11), so named because its lower six bits set how long the sound will play. Again we have inverse time: given a value \(t\) in the low six bits, the sound will play for \(\frac{64-t}{256}\) seconds. Here those six bits are $10 or 16, so the sound lasts for \(\frac{48}{256} = \frac{3}{16} = 0.1875\) seconds. Except… as mentioned above, this only applies if bit 6 of AUD1HIGH is set, which it isn’t, so this doesn’t apply at all and there’s no point in setting any of these bits. Hm.
The two high bits of AUD1LEN select the duty cycle, which is how long the square wave is high versus low. (A “normal” square wave thus has a duty of 50%.) Our value of 0 selects 12.5% high; the other values are 25% for 1, 50% for 2, or 75% for 3. I do wonder if the author of this code meant to use 50% duty and put the bit in the wrong place? If so, AUD1LEN should be $80, not $10.
Finally, AUD1ENV selects the volume envelope, which can increase or decrease over time. Curiously, the resolution is higher here than in AUDVOL — the entire high nybble is the value of the envelope. This value can be changed automatically over time in increments of 1: bit 3 controls the direction (0 to decrease, 1 to increase) and the low three bits control how often the value changes, counted in \(\frac{1}{64}\) seconds. For our value of $f3, the volume starts out at max and decreases every \(\frac{3}{64}\) seconds, so it’ll stop completely (or at least be muted?) after fifteen steps or \(\frac{45}{64} ≈ 0.7\) seconds.
And hey, that’s all more or less what I see if I record mGBA’s output in Audacity!
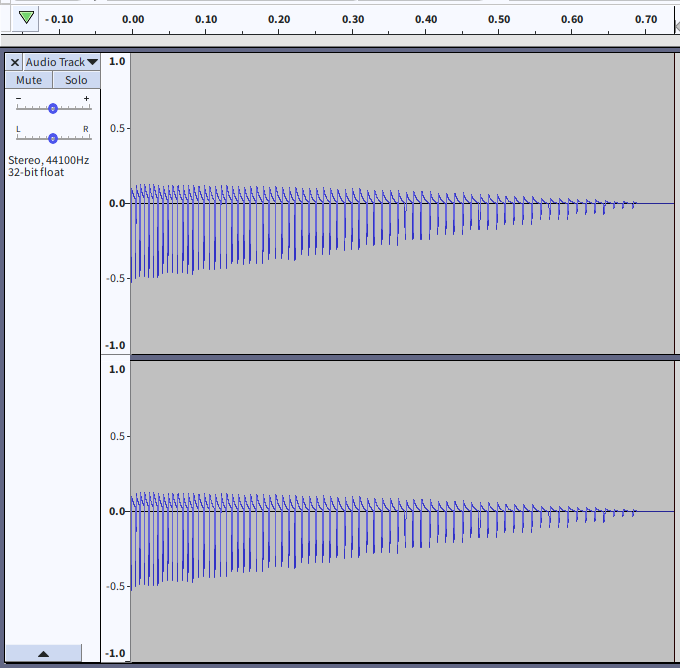
Boy! What a horrible slog. Don’t worry; that’s a good 75% of everything there is to know about the sound registers. The second square wave is exactly the same except it can’t do a frequency sweep. The white noise channel is similar, except that instead of frequency, it has a few knobs for controlling how the noise is generated. And the waveform channel is what the rest of this post is about—
“Hang on!” I hear you cry. “That’s a mighty funny-looking ‘square’ wave.”
It sure is! The Game Boy has some mighty funny sound hardware. Don’t worry about it. I don’t have any explanation, anyway. I know the weird slope shapes are due to a high-pass filter capacitor that constantly degrades the signal gradually towards silence, but I don’t know why the waveform isn’t centered at zero. (Note that mGBA has a bug and currently generates audio inverted, which is hard to notice audibly but which means the above graph is upside-down.)
The thing I actually wanted to do
Right, back to the thing I actually wanted to do.
I have a sound. I want to play it on a Game Boy. I know this is possible, because Pokémon Yellow does it.
Channel 3 is a wavetable channel, which means I can define a completely arbitrary waveform (read: sound) and channel 3 will play it for me. The correct approach seems obvious: slice the sound into small chunks and ask channel 3 to play them in sequence.
How hard could this possibly be?
Channel 3
Channel 3 plays a waveform from waveform RAM, which is a block of 16 bytes in register space, from $FF30 through $FF3F. Each nybble is one sample, so I have 32 samples whose values can range from 0 to 15.
32 samples is not a whole lot; remember, a common audio rate is 44100 Hz. To keep that up, I’d need to fill the buffer almost 1400 times per second. I can use a lower sample rate, but what? I guess I’ll figure that out later.
First things first: I need to take my sound and cram it into this format, somehow. Here’s the sound I’m starting with.
The original recording was a bit quiet, so I popped it open in Audacity and stretched it to max volume. I only have 4-bit samples, remember, and trying to cram a quiet sound into a low bitrate will lose most of the detail.
(A very weird thing about sound is that samples are really just measurements of volume. Every feature of sound is nothing more than a change in volume.)
Now I need to turn this into a sequence of nybbles. From previous adventures, I know that Python has a handy wave module for reading sample data directly from a WAV file, and so I wrote a crappy resampler:
 1import wave
 2
 3TARGET_RATE = 32768
 4
 5with wave.open('aowr.wav') as w:
 6    nchannels, sample_width, framerate, nframes, _, _ = w.getparams()
 7    outdata = bytearray()
 8    gbdata = bytearray()
 9
10    frames_per_note = framerate // TARGET_RATE
11    nybble = None
12    while True:
13        data = w.readframes(frames_per_note)
14        if not data:
15            break
16
17        n = 0
18        total = 0
19        # Left and right channels are interleaved; this will pick up data from only channel 0
20        for i in range(0, len(data), nchannels * sample_width):
21            frame = int.from_bytes(data[i : i + sample_width], 'little', signed=True)
22            n += 1
23            total += frame
24
25        # Crush the new sample to a nybble
26        crushed_frame = int(total / n) >> (sample_width * 8 - 4)
27        # Expand it back to the full sample size, to make a WAV simulating how it should sound
28        encoded_crushed_frame = (crushed_frame << (sample_width * 8 - 4)).to_bytes(2, 'little', signed=True)
29        outdata.extend(encoded_crushed_frame * (nchannels * frames_per_note))
30
31        # Combine every two nybbles together.  The manual shows that the high nybble plays first.
32        # WAV data is signed, but Game Boy nybbles are not, so add the rough midpoint of 7
33        if nybble is None:
34            nybble = crushed_frame + 7
35        else:
36            byte = (nybble << 4) | (crushed_frame + 7)
37            gbdata.append(byte)
38            nybble = None
39
40    with wave.open('aowrcrush.wav', 'wb') as wout:
41        wout.setparams(w.getparams())
42        wout.writeframes(outdata)
43
44with open('build/aowr.dat', 'wb') as f:
45    f.write(gbdata)
This is incredibly bad. It integer-divides the original rate by the target rate, so if I try to resample 44100 to 32768, I’ll end up recreating the same sound again.
I don’t know why I started with 32768, either. The resulting data is too big to even fit in a section! Kicking it down to 8192 is a bit better (5 samples to 1, so the real final rate is 8820), but if I get any smaller, too many samples cancel each other out and I end up with silence! I have no idea what I am doing help.
The aowrcrush.wav file sounds a little atrocious, fair warning.
But it seems to be correct, if I open it alongside the original:
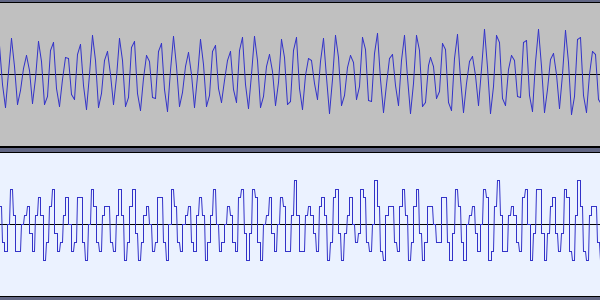
Crushing it to four bits caused the graph to stay fixed to only 16 possible values, which is why it’s less smooth. Reducing the sample rate made each sample last longer, which is why it’s made up of short horizontal chunks. (I resampled it back to 44100 for this comparison, so really it’s made of short horizontal chunks because each sample appears five times; Audacity wouldn’t show an actual 8192 Hz file like this.)
It doesn’t sound great, but maybe it’ll be softened when played through a Game Boy. Worst case, I can try cleaning it up later. Let’s get to the good part: playing it!
Playing with channel 3
Here we go! First the global setup stuff I had before.
1    ; Enable sound globally
2    ld a, $80
3    ldh [rAUDENA], a
4    ; Map instruments to channels
5    ld a, $44
6    ldh [rAUDTERM], a
7    ; Set volume
8    ld a, $77
9    ldh [rAUDVOL], a
Then some bits specific to channel 3.
 1    ld a, $80
 2    ldh [rAUD3ENA], a
 3    ld a, $ff
 4    ldh [rAUD3LEN], a
 5    ld a, $20
 6    ldh [rAUD3LEVEL], a
 7SAMPLE_RATE EQU 8192
 8CH3_FREQUENCY set 2048 - 65536/(SAMPLE_RATE / 32)
 9    ld a, LOW(CH3_FREQUENCY)
10    ldh [rAUD3LOW], a
11    ld a, $80 | HIGH(CH3_FREQUENCY)
12    ldh [rAUD3HIGH], a
Channel 3 has its own bit for toggling it on or off in AUD3ENA (NR30); none of the other bits are used. The other new register is AUD3LEVEL (NR32), which is sort of a global volume control. The only bits used are 6 and 5, which make a two-bit selector. The options are:
- 00: mute
- 01: play nybbles as given
- 10: play nybbles shifted right 1
- 11: play nybbles shifted right 2
Three of those are obviously useless, so 01 it is! That’s where I get the $20.
Figuring out the frequency is a little more clumsy. I used some rgbasm features here to do it for me, and it took a bit of fiddling to get it right. For example, why am I using 65536 instead of 131072, the factor I said was used for the square wave?
The answer is that for the longest time I kept getting this absolutely horrible output, recorded directly from mGBA:
I had no idea what this was supposed to be. Turns out it’s, well, roughly what happens when you halve the Game Boy’s idea of frequency. I finally found out this coefficient was different from the gbdev wiki. I’m guessing the factor of 2 has something to do with there being two nybbles per byte?
Then there’s the division by 32, which neither the manual nor the gbdev wiki mention. The frequency isn’t actually the time it takes to play one sample, but the time it takes to play the entire buffer. Which does make some sense — the “normal” use for the channel 3 is as a custom instrument, so you’d want to apply the frequency to the entire waveform to get the right notes out. This was even more of a nightmare to figure out, since it produced… well, mostly just garbage. I’ll leave it to your imagination.
1    ld a, 256 - 4096 / (SAMPLE_RATE / 32)
2    ldh [rTMA], a
3    ld a, 4
4    ldh [rTAC], a
Oho! TMA and TAC are new.
The CPU has a timer register, TIMA, which counts up every… well, every so often. It’s only a single byte, and when it overflows, it generates a timer interrupt. It then resets to the value of TMA.
TAC is the timer controller. Bit 2 enables the timer, and the lower two bits select how fast the clock counts up.
Above, I’m using clock speed 00, which is 4096 Hz. The expression for TMA computes SAMPLE_RATE / 32, which is the number of times per second that the entire waveform should play, and then divides that into 4096 to get the number of timer ticks that the waveform plays for. Subtract that from 256, and I have the value TIMA should start with to ensure that it overflows at the right intervals.
I note that this will cause a timer interrupt 256 times per second, which sounds like a lot on a CPU-constrained system. It’s only 4 or 5 interrupts per frame, though, so maybe it won’t intrude too much. I’ll burn down that bridge when I come to it.
Now I just need to enable timer interrupts:
1start:
2    ; Enable interrupts
3    ld a, IEF_TIMER | IEF_VBLANK
4    ldh [rIE], a
And of course do a call in the timer interrupt, which you may remember is a fixed place in the header:
1SECTION "Timer overflow interrupt", ROM0[$0050]
2    call update_aowr
3    reti
One last gotcha: I discovered that timer interrupts can fire during OAM DMA, a time when most of the memory map is inaccessible. That’s pretty bad! So I also added di and ei around my DMA call.
Okay! I’m so close! All that’s left is the implementation of update_aowr.
Updating the waveform
 1aowr:
 2INCBIN "build/aowr.dat"
 3aowr_end:
 4
 5; ...
 6
 7update_aowr:
 8    push hl
 9    push bc
10    push de
11    push af
12
13    ; The current play position is stored in music_offset, a
14    ; word in RAM somewhere.  Load its value into de
15    ld hl, music_offset
16    ld d, [hl]
17    inc hl
18    ld e, [hl]
19
20    ; Compare this to aowr_end.  If it's >=, we've reached the
21    ; end of the sound, so stop here.  (Note that the timer
22    ; interrupt will keep firing!  This code is a first pass.)
23    ld hl, aowr_end
24    ld a, d
25    cp a, h
26    jr nc, .done
27    jr nz, .continue
28    ld a, e
29    cp a, l
30    jr nc, .done
31    jr z, .done
32.continue:
33
34    ; Copy the play position back into hl, and copy 16 bytes
35    ; into waveform RAM.  This unrolled loop is as quick as
36    ; possible, to keep the gap between chunks short.
37    ld h, d
38    ld l, e
39_addr = _AUD3WAVERAM
40    REPT 16
41    ld a, [hl+]
42    ldh [_addr], a
43_addr = _addr + 1
44    ENDR
45
46    ; Write the new play position into music_offset
47    ld d, h
48    ld e, l
49    ld hl, music_offset
50    ld [hl], d
51    inc hl
52    ld [hl], e
53.done:
54    pop af
55    pop de
56    pop bc
57    pop hl
58    ret
Perfect! Let’s give it a try.
Hey, that’s not too bad! I can see wiring that up to a button and pressing it relentlessly. It’s a bit rough, but it’s not bad for this first attempt.
…
That was mGBA, though, and I’ve had surprising problems before because I was reading or writing when the actual hardware wouldn’t let me. I guess it wouldn’t hurt to try in bgb. (warning: very bad)
OH NO
What has happened.
Tragedy
A lot of fussing around, reading about obscure trivia, and being directed to SamplePlayer taught me a valuable lesson: you cannot write to waveform RAM while the wave channel is playing.
Okay. No problem. I’ll just turn it off, write to wave RAM, then turn it back on. Turning it off clears the frequency, but that’s fine, I can just write it again.
 1    ; Disable channel 3 to allow writing to wave RAM
 2    xor a
 3    ldh [rAUD3ENA], a
 4
 5    ; ... do the copy ...
 6
 7    ld a, $80
 8    ldh [rAUD3ENA], a
 9    ld a, LOW(CH3_FREQUENCY)
10    ldh [rAUD3LOW], a
11    ld a, $80 | HIGH(CH3_FREQUENCY)
12    ldh [rAUD3HIGH], a
Okay! Perfect! I’m so ready for a meow!!!
why god why
This is what I get in mGBA and SameBoy. Ironically, it plays fine in bgb.
It seems I have come to an impasse.
Why
After a Herculean amount of debugging and discussion with people who actually know what they’re talking about, here’s what I understand to be happening.
When the wave channel first starts playing, it doesn’t correctly read the very first nybble; instead, it uses the high nybble of whatever was already in its own internal buffer.
Disabling the wave channel sets its internal buffer to all zeroes.
I disable the wave channel every time it plays. Effectively, every 32nd sample starting with the first is treated as zero, which is the most extreme negative value, which is why the playback looks like this (bearing in mind that mGBA’s audio is currently upside-down):
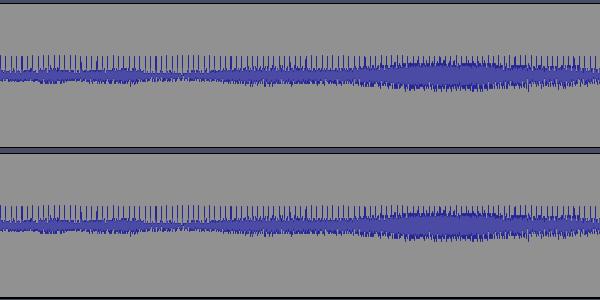
For whatever reason, bgb doesn’t emulate this spiking, so it plays fine. I’m told the spiking also happens on actual hardware, but the speakers are cheap so it’s harder to notice.
SamplePlayer isn’t much help here, because it’s subject to the same problem.
A ray of hope, dashed
But wait! There’s one last thing I can try. Pokémon Yellow has freeform sounds in it, and it doesn’t have this spiking! There’s even a fan disassembly of it!
Alas. Pokémon Yellow doesn’t use channel 3 to play back sounds. It uses channel 1.
How, you ask? Remember when I said earlier that hearing is really just detecting changes in volume? Pokémon Yellow plays a constant square wave and simply toggles it on and off, very rapidly. Channel 3 is 4-bit; the sounds Pokémon Yellow plays are 1-bit, on or off. It’s baffling, but it does work.
I don’t think it’ll work for me, since that means 32 times as many interrupts. In fact, Pokémon Yellow uses a busy loop as a timer, so it effectively freezes the entire rest of the game anytime it plays a Pikachu sound. I’d rather not do that, but… I don’t seem to have a lot of options.
And so I’ve reached a dead end. The spiking seems to be a fundamental bug with the Game Boy sound hardware. I’ve found evidence that it may even still exist in the GBA, which uses a superset of the same hardware. I can’t fix it, I don’t see how to work around it, and it sounds really incredibly bad.
After days of effort trying to get this to work, I had to shelve it.
The title of this post is a sort of pun, you see, a play on words—
UPDATE: DRAMATIC TURNAROUND
HOT DAMN
With the problem laid bare, the homebrew community came through with a brilliant suggestion.
- Re-enable channel 3, but mute it.
- Start playing at a very high frequency, to get through the first sample as quickly as possible.
- Change the frequency back to normal and restart the channel, via the high bit in
AUD3HIGH. Since the first byte is now in the buffer, the first sample should play correctly! - Don’t forget to unmute the channel!
There are some tricky bits here.
The first is how to mute the channel. The manual claims that using zero in AUD3LEVEL will mute the sound, but both mGBA and SameBoy seem to agree that it actually plays all zeroes — maximum negative amplitude. That’ll just recreate the spikes again, so that’s out. There’s also the master volume knob AUDVOL, but that won’t work if I ever try to play a sound at the same time as I’m playing music or something. That basically just leaves AUDTERM, which lets me unplug the wave channel entirely — and luckily, the hardware is still generating output even if it’s not going anywhere.
The second is what frequency to use, exactly. The obvious thing to try is the maximum possible frequency, which turns out to be 2 MHz… but the Game Boy CPU only runs at 1 MHz, and it takes a couple instructions to change the frequency a second time, so a whole bunch of samples will have played in the meantime.
Instead, I worked backwards. If I want a sample to last \(n\) cycles, then the entire waveform lasts \(32 n\) cycles, for a frequency of \(\frac{2^{20}}{32 n} = \frac{2^{15}}{n}\) Hz (obtained by dividing into the CPU speed). The frequency value I need is thus \(2048 - \frac{65536}{\frac{2^{15}}{n}} = 2048 - 2 n\). Counting the actual work I need to do: ld a, CONSTANT takes 2 cycles, and ldh [CONSTANT], a takes 3, so changing the frequency takes 10 cycles. I need to be between the first and second samples at this point, so let’s say one sample takes 8 cycles to play, and the value I want is 2032. Cool.
I tried this all out, and… it totally didn’t work! In mGBA. But it did work in SameBoy (which I am told has very very good audio emulation), so this still gave me a(nother) ray of hope.
I sprinkled mGBA with debug code and finally discovered something suspicious. Its “mixer” looks like this (simplified):
 1    int dcOffset = 8;
 2    int sample = dcOffset;
 3
 4    if (audio->playingCh1) {
 5        sample -= audio->ch1.sample;
 6    }
 7    if (audio->playingCh2) {
 8        sample -= audio->ch2.sample;
 9    }
10    if (audio->playingCh3) {
11        sample -= audio->ch3.sample;
12    }
13    if (audio->playingCh4) {
14        sample -= audio->ch4.sample;
15    }
16
17    return sample;
As we’ve seen, channel 3 uses unsigned values for its samples, so to convert them to virtually any modern audio format, you do need to subtract a midpoint to get a signed value. That’s what a DC offset is.
But this code isn’t quite doing that. It applies the DC offset once for the entire mixer, even though all four channels are unsigned.
This explains why I was still spiking in mGBA, though! Once I’d unplugged channel 3, the audio system was still enabled but zero channels were playing, so the above code would produce 8, which is interpreted as a signed value, which is… maximum amplitude! Aha! Spikes!
I changed it to this:
 1    int dcOffset = 8;
 2    int sample = 0;
 3
 4    if (audio->playingCh1) {
 5        sample += audio->ch1.sample - dcOffset;
 6    }
 7    if (audio->playingCh2) {
 8        sample += audio->ch2.sample - dcOffset;
 9    }
10    if (audio->playingCh3) {
11        sample += audio->ch3.sample - dcOffset;
12    }
13    if (audio->playingCh4) {
14        sample += audio->ch4.sample - dcOffset;
15    }
16
17    return sample;
And the spikes went away! As an added bonus, waveforms are no longer upside-down! Now all I need is to follow the steps above:
 1    ; Re-enable the channel
 2    ld a, $80
 3    ldh [rAUD3ENA], a
 4    ; Unplug it
 5    ld a, [rAUDTERM]
 6    ld d, a
 7    and a, %10111011
 8    ldh [rAUDTERM], a
 9    ; Set to a high frequency and start playing
10    ld a, LOW(2032)
11    ldh [rAUD3LOW], a
12    ld a, $80 | HIGH(2032)
13    ldh [rAUD3HIGH], a
14    ; Correct the frequency and restart
15    ld a, LOW(CH3_FREQUENCY)
16    ldh [rAUD3LOW], a
17    ld a, $80 | HIGH(CH3_FREQUENCY)
18    ldh [rAUD3HIGH], a
19    ; Plug back in
20    ld a, d
21    ld [rAUDTERM], a
The result is so, so beautiful, and virtually identical in every emulator:
YES!!!
I think this problem was never noticeable on most games because it only ever adds a constant bias (based on the number of active channels, which would usually change infrequently), and a constant shift up or down sounds almost the same. I’ve sent a PR to mGBA, and hopefully I’ll have understood this correctly. If not, well, back to despair.
Wow! I did it. Cool. It took a mighty long time to get this working, and now I feel a bit silly since I don’t have an inventory or even an audio engine to really plug this into yet. I also want to capture a much more pestful meow from Anise, which is a little difficult since he only does his loudest meowing when we’re not around. This is fantastic progress, though!
UPDATE II: DRAMATIC UN-TURNAROUND
In the days since the above “discovery” I finally got ahold of a flash cart, which lets me test on real hardware. I have unfortunate news: I was totally wrong. The weird thing mGBA does is in fact correct, and “fixing” it breaks a few other games that play custom sounds by changing the master volume while nothing is playing. So, of course, my “successful” attempt still spikes on real hardware.
After all that, I’m still at square one. I do have a couple leads: there’s the master volume trick, which I don’t quite understand yet, and there’s also Duke Nukem for GBC, which uses my original approach but quantizes the sounds more harshly which helps to disguise the spiking. I also have a list of other games that use custom samples, and when I revisit this, I might just run through as many of them as possible and try to figure out exactly what they’re doing.
But for now, this is shelved. Again.
To be continued
This work doesn’t correspond to a commit at all; it exists only as a local stash. I’ll clean it up later, once I figure out what to actually do with it.
Next time: dialogue! With moderately less suffering along the way!