
 notepad
![[process]](https://eev.ee/theme/images/category-process.png)
This is a series about Star Anise Chronicles: Cheezball Rising, an expansive adventure game about my cat for the Game Boy Color. Follow along as I struggle to make something with this bleeding-edge console!
GitHub has intermittent prebuilt ROMs, or you can get them a week early on Patreon if you pledge $4. More details in the README!
In this issue, I draw some text!
Previously: I get a Game Boy to meow.
Next: collision detection, ohh nooo…
Recap
The previous episode was a diversion (and left an open problem that I only solved after writing it), so the actual state of the game is unchanged.
Where should I actually go from here? Collision detection is an obvious place, but that’s hard. Let’s start with something a little easier: displaying scrolling dialogue text. This is likely to be a dialogue-heavy game, so I might as well get started on that now.
Planning
On any other platform, I’d dive right into it: draw a box on the screen somewhere, fill it with text.
On the Game Boy, it’s not quite that simple. I can’t just write text to the screen; I can only place tiles and sprites.
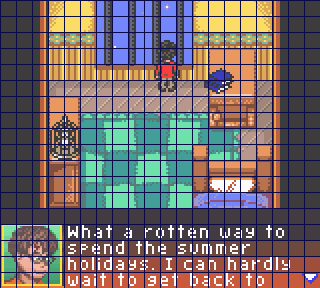
Let’s look at how, say, Pokémon Yellow handles its menu.
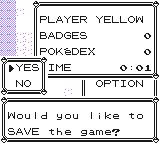
This looks — feels — like it’s being drawn on top of the map, and that sub-menus open on top of other menus. But it’s all an illusion! There’s no “on top” here. This is a completely flat image made up of tiles, like anything else.
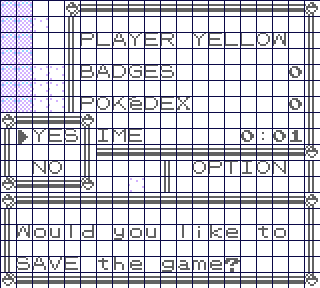
This is why Pokémon has such a conspicuously blocky font: all the glyphs are drawn to fit in a single 8×8 char, so “drawing” text is as simple as mapping letters to char indexes and drawing them onto the background. The map and the menu are all on the same layer, and the game simply redraws whatever was underneath when you close something. Part of the illusion is that the game is clever enough to hide any sprites that would overlap the menu — because sprites would draw on top! (The Game Boy Color has some twiddles for controlling this layering, but Yellow was originally designed for the monochrome Game Boy.)
A critical reason that this actually works is that in Pokémon, the camera is always aligned to the grid. It scrolls smoothly while you’re walking, but you can’t actually open the menu (or pick up an item, or talk to someone, or do anything else that might show text) until you’ve stopped moving. If you could, the menu would be misaligned, because it’s part of the same grid as the map!
This poses a slight problem for my game. Star Anise isn’t locked to the grid like the Pokémon protagonist is, and unlike Link’s Awakening, I do want to have areas larger than the screen that can scroll around freely.
I know offhand that there are a couple ways to do this. One is the window, an optional extra opaque layer that draws on top of the background, with its top-left corner anchored to any point on the screen. Another is to change some display registers in the middle of the screen redrawing. If you’re thinking of any games with a status bar at the bottom or right, chances are they use the window; games with a status bar at the top have to use display register tricks.
But I don’t want to worry about any of this right now, before I even have text drawing. I know it’s possible, so I’ll deal with it later. For now, drawing directly onto the background is good enough.
Font decisions
Let’s get back to the font itself. I’m not in love with the 8×8 aesthetic; what are my other options? I do like the text in Oracle of Ages, so let’s have a look at that:
Ah, this is the same approach again, except that letters are now allowed to peek up into the char above. So these are 8×16, but the letters all occupy a box that’s more like 6×9, offering much more familiar proportions. Oracle of Ages is designed for the Game Boy Color, which has twice as much char storage space, so it makes sense that they’d take advantage of it for text like this.
It’s not bad, but the space it affords is still fairly… limited. Only 16 letters will fit in a line, just as with Pokémon, and that means a lot of carefully wording things to be short and use mostly short words as well. That’s not gonna cut it for the amount of dialogue I expect to have.
(You may be wondering, as I did, how Oracle pulled off this grid-aligned textbox. In small buildings and the overworld, each room is exactly the size of the screen, so there’s no scrolling and no worry about misaligned text. But how does the game handle showing text inside a dungeon, where a room is bigger than the screen and can scroll freely? The answer is: it doesn’t! The textbox is just placed as close as possible to the position shown in this screenshot, so the edges might be misaligned by up to 4 pixels. In 20 years, I never noticed this until I thought to check how they were handling it. I’m sure there’s a lesson, here.)
What other options do I have? It seems like I’m limited to multiples of 8 here, surely. (The answer may be obvious to some of you, but shh, don’t read ahead.)
The answer lies in the very last game released for the Game Boy Color: Harry Potter and the Chamber of Secrets. Whatever deep secrets were learned during the Game Boy’s lifetime will surely be encapsulated within this, er, movie tie-in game.
Hot damn. That is a ton of text in a relatively small amount of space! And it doesn’t fit the grid! How did they do that?
The answer is… exactly how you’d think!
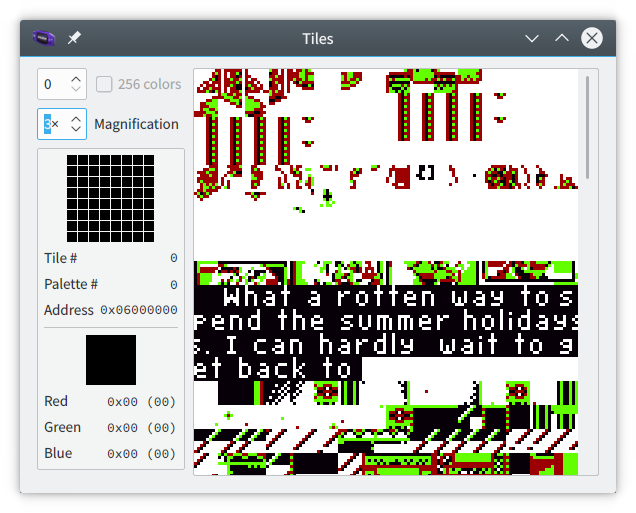
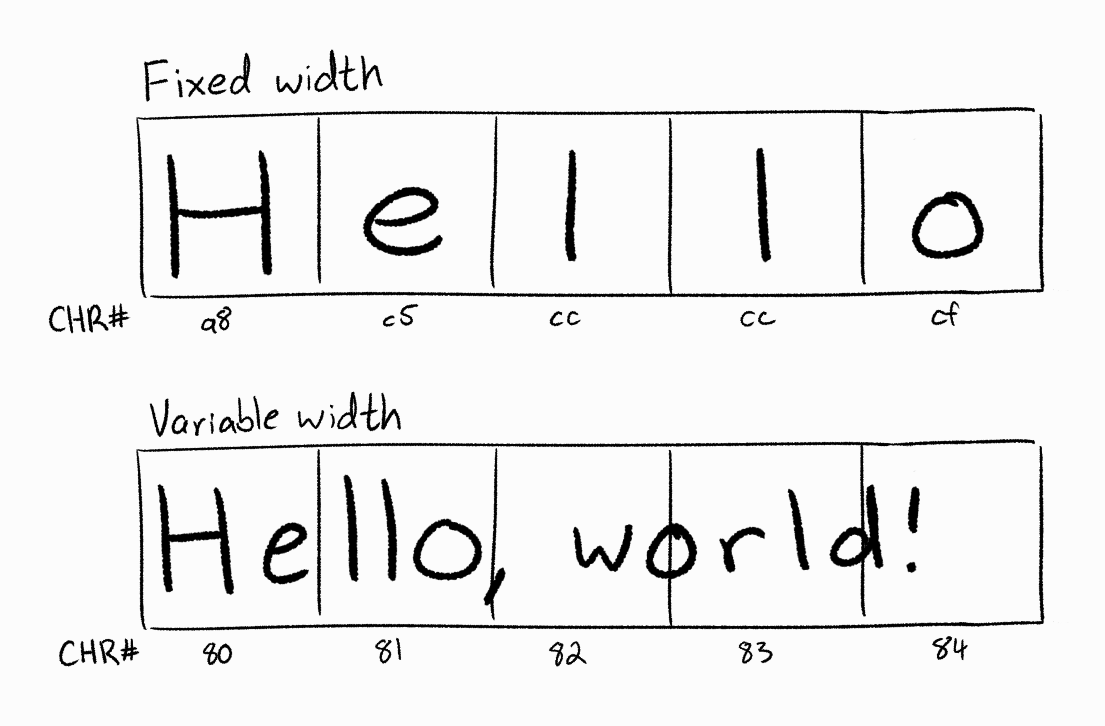
With a fixed-width font like in Pokémon and Zelda games, the entire character set is stored in VRAM, and text is drawn by drawing a string of characters. With a variable-width font like in Harry Potter, a block of VRAM is reserved for text, and text is drawn into those chars, in software. Essentially, some chars are used like a canvas and have text rendered to them on the fly. The contents of the background layer might look like this in the two cases:
Some pros of this approach:
-
Since the number of chars required is constant and the font is never loaded directly into char memory, the font can have arbitrarily many glyphs in it. Multiple fonts could be used at the same time, even. (Of course, if you have more than 256 glyphs, you’ll have to come up with a multi-byte encoding for actually storing the text…)
-
A lot more text can fit in one line while still remaining readable.
-
It has the potential to look very cool. I definitely want to squeeze every last drop of fancy-pants graphical stuff that I can from this hardware.
And, cons:
-
It’s definitely more complicated! But I only have to write the code once, and since the game won’t be doing anything but drawing dialogue while the box is up, I don’t think I’ll be in danger of blowing my CPU budget.
-
Colored text becomes a bit trickier. But still possible, so, we can worry about that later.
-
Fixed text that doesn’t scroll, like on menus and whatnot, will be something of a problem — this whole idea relies on amortizing the text rendering across multiple frames. On the other hand, this game shouldn’t have too much of that, and this sounds like a good excuse to hand-draw fixed text (which can then be much more visually interesting). At worst, I could just render the fixed text ahead of time.
Well, I’m sold. Let’s give it a shot.
First pass
Well, I want to do something on a button press, so, let’s do that.
A lot of games (older ones especially) have bugs from switching “modes” in the same frame that something else happens. I don’t entirely understand why that’s so common and should probably ask some speedrunners, but I should be fine if I do mode-switching first thing in the frame, and then start over a new frame when switching back to “world” mode. Right? Sure.
 1    ; ... button reading code in main loop ...
 2    bit BUTTON_A, a
 3    jp nz, .do_show_dialogue
 4
 5    ; ... main loop ...
 6
 7    ; Loop again when done
 8    jp vblank_loop
 9
10.do_show_dialogue:
11    call show_dialogue
12    jp vblank_loop
The extra level of indirection added by .do_show_dialogue is just so the dialogue code itself isn’t responsible for knowing where the main loop point is; it can just ret.
Now to actually do something. This is a first pass, so I want to do as little as possible. I’ll definitely need a palette for drawing the text — and here I’m cutting into my 8-palette budget again, which I don’t love, but I can figure that out later. (Maybe with some shenanigans involving changing the palettes mid-redraw, even.)
 1PALETTE_TEXT:
 2    ; Black background, white text...  then gray shadow, maybe?
 3    dcolor $000000
 4    dcolor $ffffff
 5    dcolor $999999
 6    dcolor $666666
 7
 8show_dialogue:
 9    ; Have to disable the LCD to do video work.  Later I can do
10    ; a less jarring transition
11    DisableLCD
12
13    ; Copy the palette into slot 7 for now
14    ld a, %10111000
15    ld [rBCPS], a
16    ld hl, PALETTE_TEXT
17    REPT 8
18    ld a, [hl+]
19    ld [rBCPD], a
20    ENDR
I also know ahead of time what chars will need to go where on the screen, so I can fill them in now.
Note that I really ought to blank them all out, especially since they may still contain text from some previous dialogue, but I don’t do that yet.
An obvious question is: which tiles? I think I said before that with 512 chars available, and ¾ of those still being enough to cover the entire screen in unique chars, I’m okay with dedicating a quarter of my space to UI stuff, including text. To keep that stuff “out of the way”, I’ll put them at the “end” — bank 1, starting from $80.
I’m thinking of having characters be about the same proportions as in the Oracle games. Those games use 5 rows of tiles, like this:
1top of line 1
2bottom of line 1
3top of line 2
4bottom of line 2
5blank
Since the font is aligned to the bottom and only peeks a little bit into the top char, the very top row is mostly blank, and that serves as a top margin. The bottom row is explicitly blank for a bottom margin that’s nearly the same size. The space at the top of line 2 then works as line spacing.
I’m not fixed to the grid, so I can control line spacing a little more explicitly. But I’ll get to that later and do something really simple for now, where $ff is a blank tile:
1+--+--+--+--+--+--+--+--+--+--+--+--+--+---+
2|ff|ff|ff|ff|ff|ff|ff|ff|ff|ff|ff|ff|ff|...|
3+--+--+--+--+--+--+--+--+--+--+--+--+--+---+
4|ff|80|82|84|86|88|8a|8c|8e|90|92|94|96|...|
5+--+--+--+--+--+--+--+--+--+--+--+--+--+---+
6|ff|81|83|85|87|89|8b|8d|8f|91|93|95|97|...|
7+--+--+--+--+--+--+--+--+--+--+--+--+--+---+
8|ff|ff|ff|ff|ff|ff|ff|ff|ff|ff|ff|ff|ff|...|
9+--+--+--+--+--+--+--+--+--+--+--+--+--+---+
This gives me a canvas for drawing a single line of text. The staggering means that the first letter will draw to adjacent chars $80 and $81, rather than distant cousins like $80 and $a0.
You may notice that the below code updates chars across the entire width of the grid, not merely the screen. There’s not really any good reason for that.
 1    ; Fill text rows with tiles (blank border, custom tiles)
 2    ; The screen has 144/8 = 18 rows, so skip the first 14 rows
 3    ld hl, $9800 + 32 * 14
 4    ; Top row, all tile 255
 5    ld a, 255
 6    ld c, 32
 7.loop1:
 8    ld [hl+], a
 9    dec c
10    jr nz, .loop1
11
12    ; Text row 1: 255 on the edges, then middle goes 128, 130, ...
13    ld a, 255
14    ld [hl+], a
15    ld a, 128
16    ld c, 30
17.loop2:
18    ld [hl+], a
19    add a, 2
20    dec c
21    jr nz, .loop2
22    ld a, 255
23    ld [hl+], a
24
25    ; Text row 2: same as above, but middle is 129, 131, ...
26    ld a, 255
27    ld [hl+], a
28    ld a, 129
29    ld c, 30
30.loop3:
31    ld [hl+], a
32    add a, 2
33    dec c
34    jr nz, .loop3
35    ld a, 255
36    ld [hl+], a
37
38    ; Bottom row, all tile 255
39    ld a, 255
40    ld c, 32
41.loop4:
42    ld [hl+], a
43    dec c
44    jr nz, .loop4
Now I need to repeat all of that, but in bank 1, to specify the char bank (1) and palette (7) for the corresponding tiles. Those are the same for the entire dialogue box, though, so this part is easier.
 1    ; Switch to VRAM bank 1
 2    ld a, 1
 3    ldh [rVBK], a
 4
 5    ld a, %00001111  ; bank 1, palette 7
 6    ld hl, $9800 + 32 * 14
 7    ld c, 32 * 4  ; 4 rows
 8.loop5:
 9    ld [hl+], a
10    dec c
11    jr nz, .loop5
12
13    EnableLCD
Time to get some real work done. Which raises the question: how do I actually do this?
If you recall, each 8-pixel row of a char is stored in two bytes. The two-bit palette index for each pixel is split across the corresponding bit in each byte. If the leftmost pixel is palette index 01, then bit 7 in the first byte will be 0, and bit 7 in the second byte will be 1.
Now, a blank char is all zeroes. To write a (left-aligned) glyph into a blank char, all I need to do is… well, I could overwrite it, but I could just as well OR it. To write a second glyph into the unused space, all I need to do is shift it right by the width of the space used so far, and OR it on top. The unusual split layout of the palette data is actually handy here, because it means the size of the shift matches the number of pixels, and I don’t have to worry about overflow.
 10 0 0 0 0 0 0 0  <- blank glyph
 2
 31 1 1 1 0 0 0 0  <- some byte from the first glyph
 4↓ ↓ ↓ ↓ ↓ ↓ ↓ ↓
 51 1 1 1 0 0 0 0  <- ORed together to display first character
 6
 7          1 1 1 1 0 0 0 0  <- some byte from the second glyph,
 8                              shifted by 4 (plus a kerning pixel)
 9↓ ↓ ↓ ↓ ↓ ↓ ↓ ↓
101 1 1 1 0 1 1 1  <- ORed together to display first two characters
The obvious question is, well, what happens to the bits from the second character that didn’t fit? I’ll worry about that a bit later.
Oh, and finally, I’ll need a font, plus some text to display. This is still just a proof of concept, so I’ll add in a couple glyphs by hand.
1; somewhere in ROM
2font:
3; A
4 ; First byte indicates the width of the glyph, which I need
5 ; to know because the width varies!
6 db 6
7 dw `00000000
8 dw `00000000
9 dw `01110000
10 dw `10001000
11 dw `10001000
12 dw `10001000
13 dw `11111000
14 dw `10001000
15 dw `10001000
16 dw `10001000
17 dw `10001000
18 dw `00000000
19 dw `00000000
20 dw `00000000
21 dw `00000000
22 dw `00000000
23; B
24 db 6
25 dw `00000000
26 dw `00000000
27 dw `11110000
28 dw `10001000
29 dw `10001000
30 dw `10001000
31 dw `11110000
32 dw `10001000
33 dw `10001000
34 dw `10001000
35 dw `11110000
36 dw `00000000
37 dw `00000000
38 dw `00000000
39 dw `00000000
40 dw `00000000
41
42text:
43 ; Shakespeare it ain't.
44 ; Need to end with a NUL here so I know where the text
45 ; ends. This isn't C, there's no automatic termination!
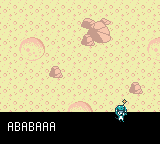
46 db "ABABAAA", 0
And here we go!
  1    ; ----------------------------------------------------------
  2    ; Setup done!  Real work begins here
  3    ; b: x-offset within current tile
  4    ; de: text cursor + current character tiles
  5    ; hl: current VRAM tile being drawn into
  6    ld b, 0
  7    ld de, text
  8    ld hl, $8800
  9
 10    ; This loop waits for the next vblank, then draws a letter.
 11    ; Text thus displays at ~60 characters per second.
 12.next_letter:
 13    ; This is probably way more LCD disabling than is strictly
 14    ; necessary, but I don't want to worry about it yet
 15    EnableLCD
 16    call wait_for_vblank
 17    DisableLCD
 18
 19    ld a, [de]                  ; get current character
 20    and a                       ; if NUL, we're done!
 21    jr z, .done
 22    inc de                      ; otherwise, increment
 23
 24    ; Get the glyph from the font, which means computing
 25    ; font + 33 * a.
 26    ; A little register juggling.  hl points to the current
 27    ; char in VRAM being drawn to, but I can only do a 16-bit
 28    ; add into hl.  de I don't need until the next loop,
 29    ; since I already read from it.  So I'm going to push de
 30    ; AND hl, compute the glyph address in hl, put it in de,
 31    ; then restore hl.
 32    push de
 33    push hl
 34    ; The text is written in ASCII, but the glyphs start at 0
 35    sub a, 65
 36    ld hl, font
 37    ld de, 33                   ; 1 width byte + 16 * 2 tiles
 38    ; This could probably be faster with long multiplication
 39    and a
 40.letter_stride:
 41    jr z, .skip_letter_stride
 42    add hl, de
 43    dec a
 44    jr .letter_stride
 45.skip_letter_stride:
 46    ; Move the glyph address into de, and restore hl
 47    ld d, h
 48    ld e, l
 49    pop hl
 50
 51    ; Read the first byte, which is the character width.  This
 52    ; overwrites the character, but I have the glyph address,
 53    ; so I don't need it any more
 54    ld a, [de]
 55    inc de
 56
 57    ; Copy into current chars
 58    ; Part 1: Copy the left part into the current chars
 59    push af                     ; stash width
 60    ; A glyph is two chars or 32 bytes, so row_copy 32 times
 61    ld c, 32
 62    ; b is the next x position we're free to write to.
 63    ; Incrementing it here makes the inner loop simpler, since
 64    ; it can't be zero.  But it also means two jumps per loop,
 65    ; so, ultimately this was a pretty silly idea.
 66    inc b
 67.row_copy:
 68    ld a, [de]                  ; read next row of character
 69
 70    ; Shift right by b places with an inner loop
 71    push bc                     ; preserve b while shifting
 72    dec b
 73.shift:                         ; shift right by b bits
 74    jr z, .done_shift
 75    srl a
 76    dec b
 77    jr .shift
 78.done_shift:
 79    pop bc
 80
 81    ; Write the updated byte to VRAM
 82    or a, [hl]                  ; OR with current tile
 83    ld [hl+], a
 84    inc de
 85    dec c
 86    jr nz, .row_copy
 87    pop af                      ; restore width
 88
 89    ; Part 2: Copy whatever's left into the next char
 90    ; TODO  :)
 91
 92    ; Cleanup for next iteration
 93    ; Undo the b increment from way above
 94    dec b
 95    ; It's possible I overflowed into the next column, in which
 96    ; case I want to leave hl where it is: pointing at the next
 97    ; column.  Otherwise, I need to back it up to where it was.
 98    ; Of course, I also need to update b, the x offset.
 99    add a, b                    ; a <- new x offset
100    ; If the new x offset is 8 or more, that's actually the next
101    ; column
102    cp a, 8
103    jr nc, .wrap_to_next_tile
104    ld bc, -32                  ; a < 8: back hl up
105    add hl, bc
106    jr .done_wrap
107.wrap_to_next_tile:
108    sub a, 8                    ; a >= 8: subtract tile width
109    ld b, a
110.done_wrap:
111    ; Either way, store the new x offset into b
112    ld b, a
113
114    ; And loop!
115    pop de                      ; pop text pointer
116    jr .next_letter
117
118.done:
119    ; Undo any goofy stuff I did, and get outta here
120    EnableLCD
121    ; Remember to reset bank to 0!
122    xor a
123    ldh [rVBK], a
124    ret
Phew! That was a lot, but hopefully it wasn’t too bad. I hit a few minor stumbling blocks, but as I recall, most of them were of the “I get the conditions backwards every single time I use cp augh” flavor. (In fact, if you look at the actual commit the above is based on, you may notice that I had the condition at the very end mixed up! It’s a miracle it managed to print part of the second letter at all.)
There are a lot of caveats in this first pass, including that there’s nothing to erase the dialogue box and reshow the map underneath it. (But I might end up using the window for this anyway, so there’s no need for that.)
As a proof of concept, though, it’s a great start!

That’s the letter A, followed by the first two pixels of the letter B. I didn’t implement the part where letters spill into the next column, yet.
Guess I’d better do that!
Second pass
One of the big problems with the first pass was that I had to turn the screen off to do the actual work safely. Shifting a bunch of bytes by some amount is a little slow, since I can only shift one bit at a time and have to do it within a loop, and vblank only lasts for about 6.5% of the entire duration of the frame. If I continued like this, the screen would constantly flicker on and off every time I drew a new letter. Yikes.
I’ll solve this the same way I solve pretty much any other vblank problem: do the actual work into a buffer, then just copy that buffer during vblank. Since I intend to draw no more than one character per frame, and each character glyph is no wider than a single char column, I only need a buffer big enough to span two columns. Text covers two rows, also, so that’s four tiles total.
I also need to zero out the tile buffer when I first start drawing text — otherwise it may still have garbage left over from the last time text was displayed! — and this seems like a great opportunity to introduce a little fill function. Maybe then I’ll do the right damn thing and clear out other stuff on startup.
 1; Utility code section
 2
 3; fill c bytes starting at hl with a
 4; NOTE: c must not be zero
 5fill:
 6    ld [hl+], a
 7    dec c
 8    jr nz, fill
 9    ret
10
11; ...
12
13; Stick this at a fixed nice address for now, just so it's easy
14; for me to look at and debug
15SECTION "Text buffer", WRAM0[$C200]
16text_buffer:
17    ; Text is up to 8x16 but may span two columns, so carve out
18    ; enough space for four tiles
19    ds $40
20
21show_dialogue:
22    DisableLCD
23    ; ... setup stuff ...
24    EnableLCD
25
26    ; Zero out the tile buffer
27    xor a
28    ld hl, text_buffer
29    ld c, $40
30    call fill
That first round of disabling and enabling the LCD is still necessary, because the setup work takes a little time, but I can get rid of that later too. For now, the priority is fixing the text scroll (and supporting text that spans more than one tile).
The code is the same up until I start copying the glyph into the tiles. Now it doesn’t go to VRAM, but into the buffer.
There’s another change here, too. Previously, I shifted the glyph right, letting bits fall off the right end and disappear. But the bits that drop off the end are exactly the bits that I need to draw to the next char. I could do a left shift to retrieve them, but I had a different idea: rotate the glyph instead.
Say I want to draw a glyph offset by 3 pixels. Then I want to do this:
1abcdefgh  <- original glyph bits
2fghabcde  <- rotate right 3
300011111  <- mask, which is just $ff shifted right 3
4
5000abcde  <- rotated glyph AND mask gives the left part
6
711100000  <- mask, inverted
8fgh00000  <- rotated glyph AND inverted mask gives the right part
The time and code savings aren’t huge, exactly, and nothing else is going on while text is rendering so it’s not like time is at a premium here. But hey this feels clever so let’s do it.
 1    ; Copy into current chars
 2    push af                     ; stash width
 3    ld c, 32                    ; 32 bytes per row
 4    ld hl, text_buffer          ; new!
 5    ; This is still silly.
 6    inc b
 7.row_copy:
 8    ld a, [de]                  ; read next row of character
 9    ; Rotate right by b - 1 pixels -- remember, b contains the
10    ; x-offset within the current tile where to start drawing
11    push bc                     ; preserve b while shifting
12    ld c, $ff                   ; initialize the mask
13    dec b
14    jr z, .skip_rotate
15.rotate:
16    ; Rotate the glyph (a), but shift the mask (c), so that the
17    ; left end of the mask fills up with zeroes
18    rrca
19    srl c
20    dec b
21    jr nz, .rotate
22.skip_rotate:
23    push af                     ; preserve glyph
24    and a, c                    ; mask right pixels
25    ; Draw to left half of text buffer
26    or a, [hl]                  ; OR with current tile
27    ld [hl+], a
28    ; Write the remaining bits to right half
29    ld a, c                     ; put mask in a...
30    cpl                         ; ...to invert it
31    ld c, a                     ; then put it back
32    pop af                      ; restore unmasked glyph
33    and a, c                    ; mask left pixels
34    ld [hl+], a                 ; and store them!
35    ; Clean up after myself, and loop to the next row
36    inc de                      ; next row of glyph
37    pop bc                      ; restore counter!
38    dec c
39    jr nz, .row_copy
40    pop af                      ; restore width
The use of the stack is a little confusing (and don’t worry, it only gets worse in later posts). Note for example that c is used as the loop counter, but since I don’t actually need its value within the body of the loop, I can push it right at the beginning and use c to hold the mask, then pop the loop counter back into place at the end.
(UPDATE: A reader points out that I don’t really need the mask at all. The rrca instruction puts the lost bit in the carry flag, so I can instead follow it with rr c, which puts the carry flag into bit 7 of c. Then I’ll end up with the right bits in c, no masking required. If I also used rra instead of rrca, then a would end up with just the left bits, and nothing needs masking at all!)
(Also, it occurs to me that I could avoid the loop entirely with a Duff’s device… but that might be a little over the top.)
This is where I first started to feel register pressure, especially when addresses eat up two of them. My options are pretty limited: I can store stuff on the stack, or store stuff in RAM. The stack is arguably harder to follow (and easier to fuck up, which I’ve done several times), but either way there’s the register ambiguity.
Which is shorter/faster? Well:
-
A
push/poppair takes 2 bytes and 7 cycles. -
Immediate writing to RAM and immediate reading back from it takes 6 bytes and 8 cycles, and can only be done with
a, so I’d probably have to copy into and out of some other register too. -
Putting an address in
hl, writing to it, then reading from it takes 5 bytes and 7 cycles, but requires that I can preservehl. (On the other hand, if I can preserve the value ofhlacross a loop or something, then it’s amortized away and the read/write is only 2 bytes and 3 cycles. But if that’s the case, chances are that I’m not under enough register pressure to need using RAM in the first place.) -
Parts of high RAM ($ff80 and up) are available for program use, and they can be read or written with the same instructions that operate on the control knobs starting at $ff00. A high RAM read and write takes 4 bytes and 6 cycles, which isn’t too bad, but once again I have to go through the
aregister so I’ll probably need some other copies.
Stack it is, then.
Anyway! Where were we. I need to now copy the buffer into VRAM.
You may have noticed that the buffer isn’t quite populated in char format. Instead, it’s populated like one big 16-pixel char, with the first 16 bits corresponding to the 16 pixels spanning both columns. VRAM, of course, expects to get all the pixels from the first column, then all the pixels from the second column. If that’s not clear, here’s what I have (where the bits are in order from left to right, top to bottom):
1AAAAAAAA BBBBBBBB  <- high bits for first row of pixels
2aaaaaaaa bbbbbbbb  <- low bits for first row of pixels
3... other rows ...
And here’s what I need to put in VRAM:
1AAAAAAAA  <- high bits for first row of left column of pixels
2aaaaaaaa  <- low bits for first row of left column of pixels
3... other rows of left column ...
4BBBBBBBB  <- high bits for first row of right column of pixels
5bbbbbbbb  <- low bits for first row of right column of pixels
6... other rows of right column ...
I hope that makes sense! To fix this, I use two loops (one for each column), and in each loop I copy every other byte into VRAM. That deinterlaces the buffer.
 1    ; Draw the buffered tiles to vram
 2    ; The text buffer is treated like it's 16 pixels wide, but
 3    ; VRAM is of course only 8 pixels wide, so we need to do
 4    ; this in two iterations: the left two tiles, then the right
 5    pop hl                      ; restore hl (VRAM)
 6    push af                     ; stash width, again
 7    call wait_for_vblank        ; always wait before drawing
 8    push bc
 9    push de
10    ; Draw the left two tiles
11    ld c, $20
12    ld de, text_buffer
13.draw_left:
14    ld a, [de]
15    ; This double inc fixes the interlacing
16    inc de
17    inc de
18    ld [hl+], a
19    dec c
20    jr nz, .draw_left
21    ; Draw the right two tiles
22    ld c, $20
23    ; This time, start from the SECOND byte, which will grab
24    ; all the bytes skipped by the previous loop
25    ld de, text_buffer + 1
26.draw_right:
27    ld a, [de]
28    inc de
29    inc de
30    ld [hl+], a
31    dec c
32    jr nz, .draw_right
33    pop de
34    pop bc
35    pop af                      ; restore width, again
Just about done! There’s one last thing to do before looping to the next character. If this character did in fact span both columns, then the buffer needs to be moved to the left by one column. Here’s a simplified diagram, pretending chars are 5×5 and I just drew a B:
1+-----+-----+.....+
2| A  B|B    |     .
3|A A B| B   |     .
4|AAA B|B    |     .
5|A A B| B   |     .
6|A A B|B    |     .
7+-----+-----+.....+
The left column is completely full, so I don’t need to buffer it any more. The next character wants to draw in the last partially full column, which here is the one containing the B; it’ll also want an empty right column to overflow into if necessary.
 1    ; Increment the pixel offset and deal with overflow
 2    add a, b                    ; a <- new x offset
 3    ; Regardless of whether this glyph overflowed, the VRAM
 4    ; pointer was left at the beginning of the next (empty)
 5    ; column, and it needs rewinding to the right column
 6    ld bc, -32                  ; move the VRAM pointer back...
 7    add hl, bc                  ; ...to the start of the char
 8    cp a, 8
 9    jr nc, .wrap_to_next_char
10    ; The new offset is less than 8, so this character didn't
11    ; actually draw anything in the right column.  Move the
12    ; VRAM pointer back a second time, to the left column,
13    ; which still has space left
14    add hl, bc
15    jr .done_wrap
16.wrap_to_next_char:
17    ; The new offset is 8 or more, so this character drew into
18    ; the next char.  Subtract 8, but also shift the text buffer
19    ; by copying all the "right" chars over the "left" chars
20    sub a, 8                    ; a >= 8: subtract char width
21    push hl
22    push af
23    ; The easy way to do this is to walk backwards through the
24    ; buffer.  This leaves garbage in the right column, but
25    ; that's okay -- it gets overwritten in the next loop,
26    ; before the buffer is copied into VRAM.
27    ld hl, text_buffer + $40 - 1
28    ld c, $20
29.shift_buffer:
30    ld a, [hl-]
31    ld [hl-], a
32    dec c
33    jr nz, .shift_buffer
34    pop af
35    pop hl
36.done_wrap:
37    ld b, a                     ; either way, store into b
38
39    ; Loop
40    pop de                      ; pop text pointer
41    jp .next_letter
And the test run:

Hey hey, success!
Quick diversion: Anise corruption
I didn’t mention it above because I didn’t actually use it yet, but while doing that second pass, I split the button-polling code out into its own function, read_input. I thought I might need it in dialogue as well (which has its own vblank loop and thus needs to do its own polling), but I didn’t get that far yet, so it’s still only called from the main loop.
While testing out the dialogue, I notice a teeny tiny problem.
Well, yes, obviously there’s the problem of the textbox drawing underneath the player. Which is mostly a problem because the textbox doesn’t go away, ever. I’ll worry about that later.
The other problem is that Anise’s sprite is corrupt. Again. Argh!
A little investigation suggests that, once again, I’m blowing my vblank budget. But this time, it’s a little more reasonable. Remember, I’m overwriting Anise’s sprite after handling movement. That means I do a bunch of logic followed by writing to char data. No wonder there’s a problem. I must’ve just slightly overrun vblank when I split out read_input (or checked for the dialogue button press in the first place?), since call has a teeny tiny bit of overhead.
That approach is a little inconsistent, as well. Remember how I handle OAM: I write to a buffer, which is then copied to real OAM during the next vblank. But I’m updating the sprite immediately. That means when Anise turns, the sprite updates on the very next frame, but the movement isn’t visible until the frame after that. Whoops.
So, a buffer! I could make this into a more general mechanism later, but for now I only care about fixing Anise. I can revisit this when I have, uh, a second sprite.
1; in ram somewhere
2
3anise_sprites_address:
4    dw
Now, Anise is composed of three objects, which is six chars, which is 96 bytes. The fastest way to copy bytes by hand is something like this:
1    ld hl, source
2    ld de, destination
3    ld c, 96
4.loop:
5    ld a, [hl+]
6    ld [de], a
7    inc de
8    dec c
9    jr nz, .loop
Each iteration of the loop copies 1 byte and takes 7 cycles. (It’s possible to shave a couple cycles off in some specific cases, and unrolling would save some time, but let’s stay general for now.) That’s 672 cycles, plus 10 for the setup, minus one on the final jr, for 681 total. But vblank only lasts 1140 cycles! That’s more than half the budget blown for updating a single entity. This can’t possibly work.
Enter a feature exclusive to the Game Boy Color: GDMA, or general DMA. This is similar to OAM DMA, except that it can copy (nearly) anything to anywhere. Also (unlike OAM DMA), the CPU pauses while the copy is taking place, so there’s no need to carefully time a busy loop. It’s configured by writing to five control registers (which takes 5 cycles each), and then it copies two bytes per cycle, for a total of 73 cycles. That’s 9.3 times faster. Seems worth a try.
(Note that I’m not using double-speed CPU mode yet, as an incentive to not blow my CPU budget early on. Turning that on would halve the time taken by the manual loop, but wouldn’t affect GDMA.)
GDMA has a couple restrictions: most notably, it can only copy multiples of 16 bytes, and only to/from addresses that are aligned to 16 bytes. But each char is 16 bytes, so that works out just fine.
The five GDMA registers are, alas, simply named 1 through 5. The first two are the source address; the next two are the destination address; the last is the amount to copy. Or, well, it’s the amount to copy, divided by 16, minus 1. (The high bit is reserved for turning on a different kind of DMA that operates a bit at a time during hblanks.) Writing to the last register triggers the copy.
Plugging in this buffer is easy enough, then:
 1    ; Update Anise's current sprite.  Use DMA here because...
 2    ; well, geez, it's too slow otherwise.
 3    ld hl, anise_sprites_address
 4    ld a, [hl+]
 5    ld [rHDMA1], a
 6    ld a, [hl]
 7    ld [rHDMA2], a
 8    ; I want to write to $8000 which is where Anise's sprite is
 9    ; hardcoded to live, and the top three bits are ignored so
10    ; that the destination is always in VRAM, so $0000 works too
11    ld a, HIGH($0000)
12    ld [rHDMA3], a
13    ld a, LOW($0000)
14    ld [rHDMA4], a
15    ; And copy!
16    ld a, (32 * 3) / 16 - 1
17    ld [rHDMA5], a
Finally, instead of actually overwriting Anise’s sprite, I write the address of the new sprite into the buffer:
1    ; Store the new sprite address, to be updated during vblank
2    ld a, h
3    ld [anise_sprites_address], a
4    ld a, l
5    ld [anise_sprites_address + 1], a
And done! Now I can walk around just fine. It looks basically like the screenshot from the previous section, so I don’t think you need a new one.
Note that this copy will always happen, since there’s no condition for skipping it when there’s nothing to do. That’s fine for now; later I’ll turn this into a list, and after copying everything I’ll simply clear the list.
Crisis averted, or at least deferred until later. Back to the dialogue!
Interlude: A font
Writing out the glyphs by hand is not going to cut it. It was fairly annoying for two letters, let alone an entire alphabet.
Nothing about this part was especially interesting. I used LÖVE’s font format, which puts all glyphs in a single horizontal strip. The color of the top-left pixel is used as a sentinel; any pixel in the top row that’s the same color indicates the start of a new glyph.
(I note that LÖVE actually recommends against using this format, but the alternatives are more complicated and require platform-specific software — whereas I can slop this format together in any image editor without much trouble.)
I then turned this into Game Boy tiles much the same way as with the sprite loader, except with the extra logic to split on the sentinel pixels and pad each glyph to eight pixels wide. I won’t reproduce the whole script here, but it’s on GitHub if you want to see it.
The font itself is, well, a font? I initially tried to give it a little personality, but that made some of the characters weirdly wide and was a bit hard to read, so I revisited it and ended up with this:

I like it, at least! The characters all have shadows built right in, and you can see at the end that I was starting to play with some non-ASCII characters. Because I can do that!
Third pass
One major obstacle remains: I can only have one line of text right now, when there’s plenty of space for two.
The obvious first thing I need to do is alter the dialogue box’s char map. It currently has a whole char’s worth of padding on every side. What a waste. I want this instead:
1+--+--+--+--+--+--+--+--+--+--+--+--+---+
2|80|82|84|86|88|8a|8c|8e|90|92|94|96|...|
3+--+--+--+--+--+--+--+--+--+--+--+--+---+
4|81|83|85|87|89|8b|8d|8f|91|93|95|97|...|
5+--+--+--+--+--+--+--+--+--+--+--+--+---+
6|a8|aa|ac|ae|b0|b2|b4|b6|b8|ba|bc|be|...|
7+--+--+--+--+--+--+--+--+--+--+--+--+---+
8|a9|ab|ad|af|b1|b3|b5|b7|b9|bb|bd|bf|...|
9+--+--+--+--+--+--+--+--+--+--+--+--+---+
The second row begins with char $a8 because that’s $80 + 40.
Obviously I’ll need to change the setup code to make the above pattern. But while I’m in here… remember, the setup code is the only remaining place that disables the LCD to do its work. Can I do everything within vblank instead?
I’m actually not sure, but there’s an easy way to reduce the CPU cost. Instead of setting up the whole dialogue box at once, I can do it one row at a time, starting from the bottom. That will cut the vblank pressure by a factor of four, and it’ll create a cool slide-up effect when the dialogue box opens!
Let’s give it a try. I’ll move the real code into a function, since it’ll run multiple times now. I’ll also introduce a few constants, since I’m getting tired of all the magic numbers everywhere.
 1SCREEN_WIDTH_TILES EQU 20
 2CANVAS_WIDTH_TILES EQU 32
 3SCREEN_HEIGHT_TILES EQU 18
 4CANVAS_HEIGHT_TILES EQU 32
 5BYTES_PER_TILE EQU 16
 6TEXT_START_TILE_1 EQU 128
 7TEXT_START_TILE_2 EQU TEXT_START_TILE_1 + SCREEN_WIDTH_TILES * 2
 8
 9; Fill a row in the tilemap in a way that's helpful to dialogue.
10; hl: where to start filling
11; b: tile to start with
12fill_tilemap_row:
13    ; Populate bank 0, the tile proper
14    xor a
15    ldh [rVBK], a
16
17    ld c, SCREEN_WIDTH_TILES
18    ld a, b
19.loop0:
20    ld [hl+], a
21    ; Each successive tile in a row increases by 2!
22    add a, 2
23    dec c
24    jr nz, .loop0
25
26    ; Populate bank 1, the bank and palette
27    ld a, 1
28    ldh [rVBK], a
29    ld a, %00001111  ; bank 1, palette 7
30    ld c, SCREEN_WIDTH_TILES
31    dec hl
32.loop1:
33    ld [hl-], a
34    dec c
35    jr nz, .loop1
36
37    ret
Now replace the setup code with four calls to this function, waiting for vblank between successive calls.
 1    ; Row 4
 2    ld hl, $9800 + CANVAS_WIDTH_TILES * (SCREEN_HEIGHT_TILES - 1)
 3    ld b, TEXT_START_TILE_2 + 1
 4    call fill_tilemap_row
 5
 6    ; Row 3
 7    call wait_for_vblank
 8    ld hl, $9800 + CANVAS_WIDTH_TILES * (SCREEN_HEIGHT_TILES - 2)
 9    ld b, TEXT_START_TILE_2
10    call fill_tilemap_row
11
12    ; Row 2
13    call wait_for_vblank
14    ld hl, $9800 + CANVAS_WIDTH_TILES * (SCREEN_HEIGHT_TILES - 3)
15    ld b, TEXT_START_TILE_1 + 1
16    call fill_tilemap_row
17
18    ; Row 1
19    call wait_for_vblank
20    ld hl, $9800 + CANVAS_WIDTH_TILES * (SCREEN_HEIGHT_TILES - 4)
21    ld b, TEXT_START_TILE_1
22    call fill_tilemap_row
Cool. I have a full font now, too, so I might as well try it out with some more interesting text.
1SECTION "Font", ROMX
2text:
3    db "The quick brown fox jumps over the     lazy dog's back.  AOOWWRRR!!!!", 0
Now I just need to— oh, hang on.

Hey, it already works! Magic.
(I did also change the initial value for the x-offset to 4 rather than 0, so the text doesn’t start against the left edge of the screen.)
Well. Not really. The code I wrote doesn’t actually know when to stop writing, so it continues off the end of the first line and onto the second. You may notice the conspicuous number of extra spaces in the new text.
Still, it looks right, and this was a lot of effort already, and it’s not actually plugged into anything yet, so I called this a success and shelved it for now. Quit while you’re ahead, right?
Future work
Obviously this is still a bit rough.
That thing where the player can walk on top of the textbox is a bit of a problem, since the same thing happens if the textbox opens while the player is near the bottom of the screen. There are a couple solutions to this, and they’ll really depend on how I end up deciding to display the box.
I actually wanted the glyphs to be drawn a little lower than normal on the top line, to add half a char or so of padding around them, but I tried it and got a buffer overrun that I didn’t feel like investigating. That’s an obvious thing to fix next time I touch this code.
What about word wrapping? I’ve written about that before and clearly have strong opinions about it, but I really don’t want to do dynamic word wrapping with a variable-width font on a Game Boy. Instead, I’ll probably store dialogue in some other format and use another converter script to do the word-wrapping ahead of time. That’ll also save me from writing large amounts of dialogue in, um, assembly. And if/when I want any fancy-pants special effects within dialogue, I can describe them with a human-readable format and then convert that to more assembly-friendly bytecode instructions.
The dialogue box still doesn’t go away, partly because it draws right on top of the map, and I don’t have any easy way to repair the map right now. I’ll probably switch to one of those other mechanisms for showing the box later that won’t require clobbering the map, and then this problem will pretty much solve itself.
What about menus? Those will either have to go inside the dialogue box (which means the question being asked isn’t visible, oof), or they’ll have to go in a smaller box above it like in Pokémon. But the latter solution means I can’t use the window or display trickery — both of those only work reliably for horizontal splits. I’m not quite sure how to handle this, yet.
And then, what of portraits? Most games get away without them by having a silent protagonist, which makes it obvious who’s talking. But Anise is anything but silent, so I need a stronger indicator. I obviously can’t overlay a big transparent portrait on the background, like I do in my LÖVE games. I think I can reseve space for them in the status bar, which will go underneath the dialogue box. I’ll have to see how it works out. Maybe I could also use a different text color for every speaker?
After all that, I can start worrying about other frills like colored text and pauses and whatever. Phew.
To be continued
That brings us up to commit a173dbb, which is slightly beyond the second release (which includes a one-line textbox)! Also that was three months ago oh dear. I think I’ll be putting out a new release soon, stay tuned!
Next time: collision detection! I am doomed.
