
 notepad
![[articles]](https://eev.ee/theme/images/category-articles.png)
You may recall that I once had the ambitious idea to write a book on game development, walking the reader through making simple games from scratch in a variety of different environments, starting from simple level editors and culminating in some “real” engine.
That never quite materialized. As it turns out, writing a book is a huge slog, publishers want almost all of the proceeds, and LaTeX is an endless rabbit hole of distractions that probably consumed more time than actually writing. Also, a book about programming with no copy/paste or animations or hyperlinks kind of sucks.
I thus present to you Plan B: a series of blog posts. This is a narrative reconstruction of a small game I made recently, Star Anise Chronicles: Oh No Wheres Twig??. It took me less than two weeks and I kept quite a few snapshots of the game’s progress, so you’ll get to see a somewhat realistic jaunt through the process of creating a small game from very nearly nothing.
And unlike your typical programming tutorial, I can guarantee that this won’t get you as far as a half-assed Mario clone and then abruptly end. The game has original art and sound, a title screen, an ending, cutscenes, dialogue, UI, and more — so this series will necessarily cover how all of that came about. I will tell you why I made particular decisions, mention planned features I cut, show you the tradeoffs I made, and confess when I made life harder for myself. You know, all the stuff you actually go through when doing game development (or, frankly, any kind of software development).
The target audience is (ideally) anyone who knows what a computer is, so hopefully you can follow along no matter what your experience level. Enjoy!
This is part zero, and it’s mostly introductory stuff. Please don’t skip it! I promise there’s some meat in the latter half.
Table of contents
Here’s what you have to look forward to (though it is of course a WIP until the series is done). Occasionally there’ll be a snapshot of the game, but these were made on a whim during development and aren’t particularly meaningful as milestones.
For reference, I started working on the game the morning of April 29, and I released it the night of May 10, for a total of twelve days.
- Part 0: Groundwork (you are here) — introduction, tour of PICO-8, putting something on the screen, moving around, measuring time, simple sprite animation
- Part 1: Scaffolding — structure, objects in Lua, a taste of collision detection
Introduction
This is not a tutorial. Please set your expectations accordingly. Honestly, I don’t even like tutorials — too many of them are framed as something that will teach you a skill, but then only tell you what buttons to press to recreate what the author already made, with no insight as to why they made their decisions or even why they pressed those particular buttons. They often leave you hanging, with no clear next steps, no explanation of what to adjust to get different results.
I’ve never seen a platformer tutorial that actually produced a finished game. Most of them give you just enough to have a stock sprite (poorly) jump around on the screen, perhaps collect some coins, and that’s it. How do you fix the controls, add cutscenes, even make a damn title screen? That’s all left up to you.
This is something much better than a tutorial: a story. I made a video game — a real, complete video game — and I will tell you everything I can remember doing and thinking along the way. Every careful decision, every rushed tradeoff, every boneheaded mistake, every weird diversion. I don’t guarantee that anything I did is necessarily a good idea, but everything I did is an idea, and sometimes that’s all you need to get the gears turning.
If you’re interested in making a video games, I don’t promise that this series will teach you anything. But with a little effort, you can probably learn something. And to be frank, if you’re starting with zero knowledge but still manage to muddle through the whole series, you’ve got more than enough curiosity and determination to succeed at whatever you feel like doing.
The game in question is Star Anise Chronicles: Oh No Wheres Twig??, which I made with the PICO-8. (If you are from the future, I specifically used version 0.2.0i; later versions may have added conveniences I’m not using.) This is not a whizbang fully-featured game engine like Godot or Unity. If I want to draw something, I have to draw it myself. If I want physics, I have to write them myself. If I want shaders… well, that’s not going to happen, but a little ingenuity can still go a long way.
And that kind of ingenuity is what makes game development appealing to me in the first place. It’s one big puzzle: given the tools I have, what’s the most interesting thing I can make with the least amount of hapless flailing? That question will come up a number of times in this series.
If any of this sounds appealing to you, keep reading! Follow along if you can. You can get the PICO-8 (tragically not open source) for $15, and chances are you already own it — it was in the itch.io BLM bundle, so if you bought that, you’re free to download it whenever you want.
Conventions
In order to replicate the experience of reading the book, I’m porting these little “admonition” boxes from what I’d started. I have a somewhat meandering writing style, and hopefully these will help get tangents out of the main text, while also better highlighting warnings and gotchas.
Here they are, in no particular order:
I reserve the right to invent more, if they’re needed and/or funny.
Setting expectations, again
Game development is about a lot more than programming, but this will contain an awful lot of programming. The PICO-8 in particular tends to blur the lines between code and assets if you want to do anything fancy.
That puts me in a tricky position as an author. I want this to be accessible to people with little or no programming experience, but I can’t realistically explain every single line of code I write, or this series will never end (and will be more noise than signal for intermediate programmers).
Thus, I’m trusting you to look up basic concepts on your own if you need to. I’m writing this to fill a perceived gap, so I’ll try to focus on the gaps — finding resources on from-scratch collision detection is a crapshoot, but the web is awash in explanations of what a “variable” is. PICO-8 uses a programming language called Lua which is pretty simple and easy to pick up, so if you’re having trouble, maybe thumb through the Programming in Lua book a bit too.
Of course, if you’re just here for the ride and not too worried about writing your own game, you can skip ahead whenever you like. I’m not your mom.
(Oh, and if you’ve used Lua before, you should know that PICO-8’s Lua has been modified from stock Lua. The precise list of changes would be a big block of stuff in the middle of this already too long intro, so I’ve put it at the bottom. The upshot is: numbers are fixed-point instead of floating-point, you can use compound assignment, and the standard library is almost completely different.)
That’s probably enough words with no pictures. Time to get started.
The PICO-8
As mentioned, this is a game built with the PICO-8. I promised I’d tell you a story, but I can’t even explain why I chose PICO-8 if you don’t know what the thing is.
PICO-8 is a “fantasy console” — a genre that it pioneered. It has a fixed screen size, its own palette, its own font, a little chiptune synthesizer, its own idea of what buttons the player can press, and so on. It’s like an emulator for an 8-bit handheld that doesn’t actually exist, plus a bunch of relatively friendly tools for making cartridges for that handheld. It even has some arbitrary limitations to preserve that aesthetic. (I carefully avoid calling them artificial limitations, because there are some technical reasons for them, and a lot of programmers do a thing with their face if you say “artificial” to them. Like you’ve just spat in their lunch.)
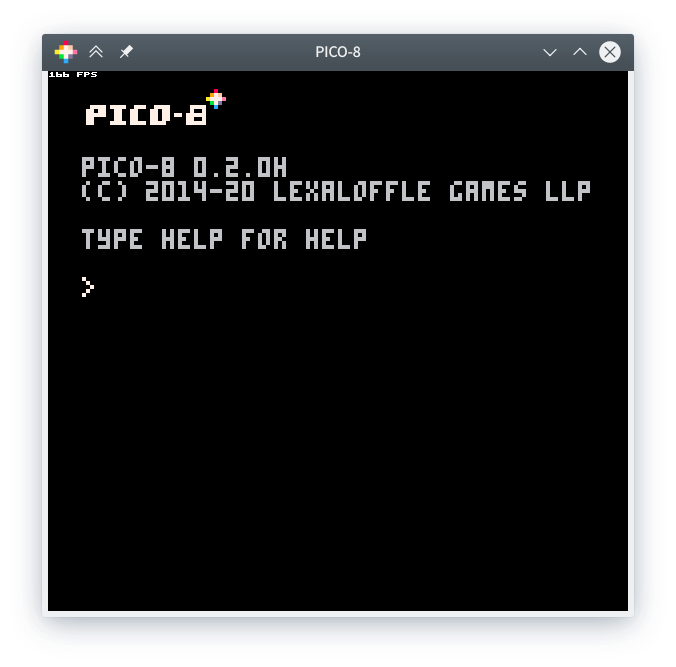
If you’ve got PICO-8 open, you can type splore at this little command prompt to open the cartridge explorer, which lets you download and play cartridges that have been posted to the PICO-8 BBS (forum). You might want to try a few to get a sense of what the PICO-8 can do, though bear in mind that some of the best games are incredible feats of ingenuity and not representative. A good place to start is the “featured” tab, which lists games that… I believe have been hand-picked as high-quality? Some suggestions:
-
Star Anise Chronicles: Oh No Wheres Twig is in there, as is our older (and first!) game Under Construction.
-
The original PICO-8 version of Celeste, if you weren’t aware of its origins.
-
Dusk Child, one of the earliest games I played and a big inspiration — it’s pretty and expansive, but doesn’t do anything I couldn’t figure out.
-
Just One Boss, which is just so damn crisp.
-
Dank Tomb, a dungeon crawler with absolutely beautiful lighting effects.
-
PicoHot, which is absolute fucking nonsense how dare you.
Note that when playing most games, the PICO-8 functions as though it only had six buttons: a directional pad bound to the arrow keys, and “O” and “X” buttons bound to the Z and X keys. Most games refer to those buttons by name (the PICO-8 font has built-in symbols for them) rather than keyboard key, since you might be playing on a controller or with some other bindings. You can always press Esc for the built-in menu.
…
Had fun? Great! Pressing Esc takes you back to the prompt. From there, you can press Esc again to switch to the editor (and vice versa).
Now, this is not a PICO-8 tutorial. But the PICO-8’s design and constraints immensely impact how much I could do and how I planned to do it, so I can’t very well explain my thought process without that context. Luckily, all the code and assets for the last game you played stay loaded, so I might as well give you the whirlwind tour. Even if you’re not following along with an actual copy of PICO-8, you should keep reading so you understand what I’ve got to work with.
Code editor

This is the code editor, a very tiny text editor. If you’ve loaded Under Construction, feel free to page through and see what I did. (Keyboard shortcuts help a lot; see the manual for a full list of them. There are also some cheat sheets floating around, though they focus more on programming capabilities.)
You may have noticed the ominous 7695/8192 in the bottom right. That’s hinting at one of the PICO-8’s limitations: the token count. A cartridge’s source code cannot exceed 8192 tokens, or it will not run at all. A “token” is, in general terms, a single “word” of code — a number like 133, a name like animframedelay, an operator like +, a keyword like function, and so on. The term “token” is borrowed from the field of parsing, which is an entire tangent you are free to look up yourself.
The PICO-8’s definition of “token” is slightly different from its typical usage and includes a few exceptions. The common Lua keywords local and end don’t count at all; nor do commas, periods, semicolons, or comments. A string of any length is one token. A pair of parentheses, brackets, or braces only counts as one token. Negative literal numbers (e.g., -25) are one token.
The token limit is the most oppressive of the limits on your code, but there are two others. The full size of your code cannot exceed 64KiB, though in practice I’ve never come anywhere near that size and I think you’d only approach it if you were committing some serious shenanigans. More of concern, the compressed size of your code cannot exceed 15,616 bytes. I do wind up battling that one near the end of this project (as I did with Under Construction), and it can be extra frustrating since it’s hard to gauge exactly what impact any particular change will have on compression. Thankfully, and unlike with the token limit, the PICO-8 will still run a game that’s over the compressed size; it just physically cannot export it to a cartridge.
Incidentally, you can use Alt and an arrow key to move between the editors.
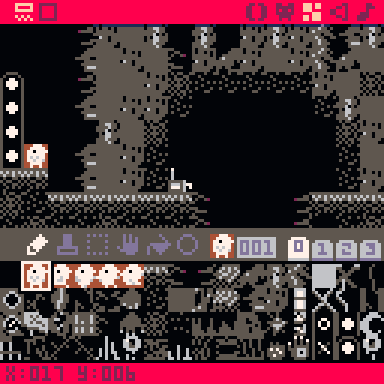
Sprite editor
Here we have a tiny pixel art editor. As you might have guessed, the “native” size for a tile is 8 × 8 pixels, though you can use the bottom of the two sliders to edit bigger blocks of tiles at a time. (The screen is 128 × 128 pixels, or 16 × 16 tiles.) You have at your disposal a spritesheet of 256 such tiles, which are arranged at the bottom of the screen in four tabs of 64 tiles each. 001 here is the tile number. Each tile has its own set of 8 flags you can toggle on and off, which are represented by the eight circles just above the tabs; here, all the flags are off. The flags do nothing by themselves, but you can use them for whatever you like, and they turn out to be pretty handy.
The palette is 16 colors, as shown. There are 16 more colors on the “secret palette” which I’ll be dipping into later, but you can only swap them in; you can never have more than 16 distinct colors on screen at the same time. This is reminiscent of how some early systems actually worked.
Map editor
The map editor edits the map. You only get one; if you want to carve it up somehow, that’s up to you. It’s extremely simple: you have a grid of 128 × 64 tiles (that’s 8 × 4 screenfuls), and you can pick which tile goes in each cell. No layers, no stacking, no two things in the same cell. You can pan around with the middle mouse button and zoom with the mouse wheel (or check the manual for the keyboard equivalents).
The especially nice thing about the map is that you can draw entire blocks of it with the built-in map function, which saves a whole lot of tokens over drawing a bunch of tiles by hand. Even if you’re making a game that doesn’t have a literal map, it’s a convenient way to define and draw blocks of multiple tiles.
The catch is that the bottom half of the spritesheet and the bottom half of the map are shared, so you can’t actually have a full map and a full set of tiles in the same cartridge. You could have a full 8 × 4 map and 128 tiles, or you could have a full set of 256 tiles but only an 8 × 2 map, or you can split the space up somehow, but you can’t have the maximum of both. Drawing in the bottom half of one will immediately update the other with garbage. It’s beautiful, actually, if you’re into the aesthetic of arbitrary memory being drawn as tiles.
If you have a cartridge open, you can see this yourself: check out the bottom half of the map (it helps to use Tab or the buttons in the upper left to hide the tile palette) and tabs 2 and 3 of the sprite editor. If they’re not both completely empty, something will be full of garbage. Try drawing in one or the other, if you like, and you’ll see the other update with junk. That’s the memory layout of pixel data being interpreted as map data, or vice versa. Cool, right?
Sound editor
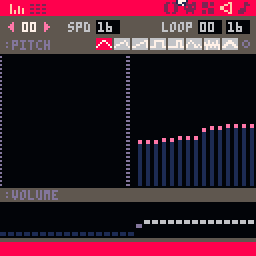
The sound editor (or SFX editor) does a lot, despite being very simple conceptually, and it can be a little intimidating if you’ve never worked with sound or music before. These screenshots are the two display modes, “pitch mode” and “tracker mode” — allegedly pitch mode is more suitable for sound effects and tracker mode is more suitable for music, but I honestly have no idea how anyone does anything in pitch mode, and I use tracker mode for both. Your mileage may vary. As with the map editor, use Tab or the buttons in the top-left to switch views.
There are 64 sound effects to work with, each consisting of 32 notes played by a little chiptune synth. Notes consist of a pitch (i.e., the actual note being played), an instrument, the volume, and an optional effect.
I could say an awful lot about sound and chiptunes and what any of this means, but this is not a chiptuning tutorial, so I’ll save that for when I actually made some sounds for the game. Do feel free to mess around here, though.
There’s also a music editor, but all it does is arrange several sound effects to play at the same time, so it’s not especially interesting.
And that’s everything at my disposal! I guess that means it’s time to get started, for real. Go back to the command prompt and use reboot to get a fresh blank cartridge, if you’re planning on following along.
Inspiration
The first step to making a game is having a game you want to make.
I started on this at the end of April, after a very rushed month spent preparing the Steam release of Cherry Kisses. I was pretty pumped about having just published something in a very visible place for the first time, and I wanted to keep that energy going, but I didn’t want to immediately jump into an even larger thing. I wanted to make something small, something self-contained, something I could do entirely on my own. (My spouse is the better artist by far, and they did all the art for Cherry Kisses.)
The PICO-8 came to mind as the obvious platform to use. For one, the limitations make it very difficult for a game’s scope to balloon very far; you will simply run out of space and have to cut some ideas. For two, the art and audio are fairly low-resolution, so I wouldn’t have much opportunity to endlessly fuss over trying to make them perfect. For three, it runs in a browser, even on phones, so the resulting game would be easy for anyone to play. (Having to download a thing will discourage a surprising amount of casual passersby, especially if the thing is fairly small and thus low-reward.)
I also just find the PICO-8 endlessly charming, and I hadn’t touched it in a couple years and was curious how it had improved in the interim. It’s great for a game started on a whim, too, since I can jump in and start slapping stuff on the screen without worrying that my ADHD brain will start fretting over how everything should be organized.
That only left the question of what to make.
Two and a half years prior — almost three, now — I’d started on a platformer where you played as Star Anise, my cat’s fursona. It was intended to be a goofy Metroidvania where you collected cat-themed powers, ran around defeating little monsters, collected useless garbage, and generally left a trail of minor mayhem in your wake. Sadly, it was interrupted by real-life events and we haven’t touched it since.
I loved how this game was shaping up! It was so goofy, but its goofiness really opened up the design. Star Anise is great to build a game around. I can give him all manner of strong yet absurd motivations, and as long as I tie them to something vaguely cat-themed, they’ll be memorable and feel sensible. I can load him up with goofy cat-themed powers without needing any kind of justification, because he’s a cat, and everyone knows cats are basically magic anyway. He has a group of friends already built in: other cats. And most importantly, he’s just fun to play as, because everything he does is ridiculous and overboard, but you never have to feel guilty about his mischief because he’s a cat.
It’s such a good hook. I’ve wanted to make a whole series of little Star Anise games, but the furthest I’d gotten so far was Star Anise Chronicles: Escape from the Chamber of Despair — which is good, but is also a text adventure, one of the most impenetrable genres imaginable.
So why not take another crack at it? I couldn’t fit the entire original vision into a PICO-8 game, but surely I’d have enough room for Star Anise, a few of the abilities we’d come up with, and some things to interact with. At long last, a Star Anise platformer.
You could say the stars aligned. The stars. Get it? Like Star Anise. Okay.
From zero to something
Before I could do anything, I needed some art. Okay, that’s not true; I could have boxes moving around on the screen, but I’ve done this enough that I am beyond tired of boxes. If I’m gonna make a Star Anise game then I want to have Star Anise on the damn screen right from the start.
And right away I had to make some decisions. I wanted this to be a little bit Metroidvania style, where Star Anise gained his handful of powers throughout the game and could then explore new areas.
That meant I wanted as much map space as humanly possible, so from the very beginning I knew the sprite/map split I wanted: all map. 32 screens, but only 128 sprites.
And that made several other decisions, automatically. I probably wouldn’t have enough sprite space to include a gun and enemies and whatnot, but a puzzler would let me skip all of that.
This is why I chose PICO-8! The game basically decided its own design with only minimal input from me. Puzzle platformer with some powerups.
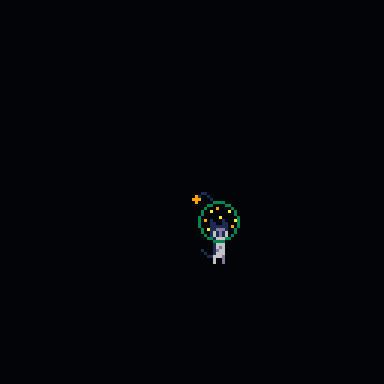
Now, to draw Star Anise, which meant deciding how big he should be. A very conspicuous part of his design is his huge helmet, which wouldn’t fit especially well in a single 8×8 tile, or even in two of them stacked. I decided to go one bigger and make a 2×3 block.
This wasn’t especially complicated to draw. At this size, it feels like a lot of the sprites draw themselves, too. It did help that I’d already seen my spouse’s interpretation of Star Anise from the prototype game above, but I think the general lesson there is to look at existing art that’s similar to what you want to draw and reverse-engineer the bits that make it work. Here, I made a big circle, squeezed in the narrowest possible face — a pixel each for the eyes, then three pixels for spacing — and gave him a rectangle for his body. Toss a couple stars into the inside of the helmet and, presto, that’s Star Anise.
You might be wondering about those weird extra tiles on the side! I’ll get to those in a moment.
With Star Anise drawn, the obvious first thing is to put him on the dang screen.
 1function _init()
 2end
 3
 4function _update()
 5end
 6
 7function _draw()
 8    cls()
 9    spr(1, 64, 64, 2, 3)
10end
Some explanation may be in order. For starters, a “function” is a block of code that can be used repeatedly. (But then, this is not a programming tutorial.) These particular functions are special to the PICO-8: _init runs when the cartridge starts, _update runs every frame, and _draw also runs every frame.
What’s a frame, you ask? Well, you know how movies aren’t really showing movement, but are more like a very fast slideshow? Real life is “continuous” — that is, events occur smoothly over time, so when an object moves, it goes through every point between where it started and where it ends up. But we have no way to record that motion in full, becuase that would be an infinite amount of information! The best we can do is take a lot of snapshots very close together. And it turns out our eyes also work with snapshots (more or less), so it works well enough.
Likewise, simulating continuous behavior is extremely difficult, so video games tend to cheat the same way. We slice time into thin chunks — also called frames — and during each one, we move everything in the world ahead by that amount of time. If frames are short enough, you get the illusion that the world is behaving smoothly. Surprise! It’s all fake.
Modern games can (or should) deal with a varying frame rate, where each frame is a slightly (or greatly) different duration for any of myriad reasons. Since the PICO-8 is a faux-retro console, I’ll be using the retro term tic. It means the same thing, but it’s sometimes used for older systems where the framerate is reliably fixed, usually because it’s tied to (or even enforced by) hardware somewhere. Here it’s just emulated, but, you know, close enough.
Right, so, back to the PICO-8 itself. Every tic (of which there are 30 per second), the PICO-8 does two things: it calls _update to advance the game, then it calls _draw to draw the new state of the game to the screen. You might immediately wonder: why have these be separate if they happen one after the other anyway? Great question! The answer is that the PICO-8 does something clever — if it notices that the _update + _draw combination is taking longer than one tic (and the game is thus starting to lag), it will automatically drop down to 15 FPS. In this mode, it will call _update twice and then call _draw. Here is a terrible ASCII diagram.
1        | tic                   | tic                   |
2--------+-----------------------+-----------------------+
330 FPS: | _update() _draw()     | _update() _draw()     |
4--------+-----------------------+-----------------------+
515 FPS: | _update() _update() _draw()                   |
As you can see, the game still updates twice in the same amount of time, so it still runs at the same speed, but it only draws half as often. With any luck, that saves enough effort that the game can keep running at the intended speed.
All of that is to say: the _draw function draws to the screen.
The first thing you (usually) want to do in _draw is clear the screen, which is accomplished by the charmingly terse cls(). If you don’t do this, your game will merrily draw right on top of whatever was on the screen previously: the prompt, a previous game, even the code editor.
After that, I called spr() to draw Star Anise. The usual arguments are spr(n, x, y), where n is the sprite number (visible near the middle of the screen in the sprite editor) and x, y say where to place him. He’s made up of six tiles, and you might think that drawing six tiles would thus require calling spr() six times, but it helpfully takes two more optional arguments: how many tiles to draw, as a single rectangle taken from the spritesheet. The above code thus draws a 2-by-3 block of tiles, starting from tile 1, at the coordinates (64, 64) — the center of the screen.
As is programming tradition, sprites are drawn from their top-left corner, so the initial tile is the top-left of the rectangle that gets drawn, and the coordinates are where the top-left of the drawn rectangle appears on screen. Thus, Star Anise appears with his top left “corner” in the middle of the screen.
There he is! How immensely satisfying. I always try to get something “real” drawing as early as humanly possible. It helps me feel like I’ve made some progress, like I’m working on a specific game and have made steps towards making it exist. This is already, quite clearly, a Star Anise game, but that wouldn’t be obvious if I’d started out with rectangles.
Now what? A good start would be to have him move around a bit. That’s easy enough if I introduce some state.
I do need to check what buttons the player is pressing, which I can do with btn(b), where b is the button… number. Left is button 0, right is button 1, up is button 2… but that makes for some unreadable garbage, so instead, let’s use a recently-introduced shortcut. If you hold Shift and press U, D, L, R, O, or X, the PICO-8 will insert a symbol representing that button. (I will be representing those symbols as ⬆️⬇️⬅️➡️🅾️❎, which is how the PICO-8 stores them on disk.)
That’s enough to move him around:
 1function _init()
 2end
 3
 4local px = 64
 5local py = 64
 6
 7function _update()
 8    if btn(⬆️) then
 9        py -= 1
10    end
11    if btn(⬇️) then
12        py += 1
13    end
14    if btn(⬅️) then
15        px -= 1
16    end
17    if btn(➡️) then
18        px += 1
19    end
20end
21
22function _draw()
23    cls()
24    spr(1, px, py, 2, 3)
25end
Here I’ve put his position (still anchored at his top-left) into some variables, and during _update() I update them. (If you’re familiar with Lua, you may balk at += and -= — these are extensions added by PICO-8, and they save enough space that they’re definitely worth it.)

This is already halfway to being a game — it does something when I press buttons! Excellent. But also weird. This doesn’t look like Star Anise is walking around; it looks like he’s a static image being dragged by an invisible cursor or something. A very easy aesthetic improvement would be to make him not moonwalk when moving left.
That’s easy enough; the spr() function takes two more optional arguments, indicating whether to flip the sprite horizontally and/or vertically. I can just slap those in when he’s moving left. Or, well, not quite — I want to flip him when the last direction he moved was left. If he moves left and then stops, or moves left and then up and down, he should still be facing left.
 1function _init()
 2end
 3
 4local px = 64
 5local py = 64
 6local left = false
 7
 8function _update()
 9    if btn(⬆️) then
10        py -= 1
11    end
12    if btn(⬇️) then
13        py += 1
14    end
15    if btn(⬅️) then
16        px -= 1
17        left = true
18    end
19    if btn(➡️) then
20        px += 1
21        left = false
22    end
23end
24
25function _draw()
26    cls()
27    spr(1, px, py, 2, 3, left)
28end
Making progress, but obviously he’d look a lot better if he were animated, right?
Which, finally, brings us back to those extra tiles I drew. They’re copies of Star Anise’s legs and antenna, lightly edited to look like he’s in mid-step. The legs are sticking out all the way, and the antenna is adjusted to be… positioned slightly differently, since it’s bouncy. It’s a bit rough, but I can touch it up later.

Note that I’ve crammed as much movement into as little space as possible here. This is only a two-frame animation, so the leg movement is exaggerated to get the most bang for my buck. I don’t even duplicate the entirety of Star Anise for the other frame; instead, I only copied the tiles that change. That’ll make him more complicated to draw, but it does save me sprite space — remember, I only have 127 tiles available, and 9 of them is already 7% gone. (Writing more code to save on limited asset space is, in my experience, a pretty common PICO-8 tactic.)
Unfortunately, this makes flipping his sprite somewhat more complicated. I can’t just use that argument to spr(), because— well, I’ll get to that in a second. Here’s the updated code.
 1local anise_stand = {1, 2, 17, 18, 33, 34}
 2local anise_jump = {3, 2, 17, 18, 19, 35}
 3
 4function _init()
 5end
 6
 7local t = 0
 8local px = 64
 9local py = 64
10local left = false
11local moving = false
12
13function _update()
14    t += 1
15    t %= 120
16
17    moving = false
18    if btn(⬆️) then
19        py -= 1
20        moving = true
21    end
22    if btn(⬇️) then
23        py += 1
24        moving = true
25    end
26    if btn(⬅️) then
27        px -= 1
28        moving = true
29        left = true
30    end
31    if btn(➡️) then
32        px += 1
33        moving = true
34        left = false
35    end
36end
37
38function _draw()
39    cls()
40
41    local pose = anise_stand
42    if moving and t % 8 < 4 then
43        pose = anise_jump
44    end
45    local y = py
46    local x0 = px
47    local dx = 8
48    if left then
49        dx = -8
50        x0 += 8
51    end
52    local x = x0
53    for i = 1, #pose do
54        spr(pose[i], x, y, 1, 1, left)
55        if i % 2 == 0 then
56            x = x0
57            y += 8
58        else
59            x += dx
60        end
61    end
62end
That sure got longer in a hurry! A quick overview:
I’ve introduced a global called t to act as a clock. I intend to use this for animation and other global cycles, so I don’t care about the actual time — that’s why I take it mod 120.
If you’re not familiar, the % (or “modulus”) operator gives you the remainder after division. It’s super duper useful and I wish we taught it as a primitive math operation! You can think of it like “clock arithmetic” — if it’s 9 o’clock and you wait 4 hours, it becomes 1 o’clock, which is the remainder when you divide 9 + 4 by 12. Or you can think of it as removing all chunks of something — to convert the 24-hour “13 o’clock” to 12-hour, you remove all the 12s, leaving just 1 behind. Or you can think of it as coiling the entire number line into a circle, so after 11 you wrap around to 0 and start over. (That’s not quite how clocks work, but using 0–11 turns out to be much simpler than using 1–12.)
The upshot here is that t will hit 119 and then wrap back around to zero, which is important because PICO-8 numbers can’t go any higher than 32767. If I left it to its own devices, it would still wrap around, but to the more cumbersome -32768. I don’t want a negative clock!
But why 120? Because I want to be able to divide the clock cycle into smaller animation cycles, and I can only do that evenly if the whole clock’s length is a multiple of the smaller cycle’s length. (On a more powerful system, I’d have a more elaborate animation setup, but that would cost more space and code than I’m willing to spend here.) Consider if I had a clock that wrapped around at 10, and I wanted an animation 3 tics long. I would use modulo 3 to shrink the clock, resulting in:
Whoops! Frame 0 will show twice in a row, intermittently, even seemingly at random. That’s not great. For the best chance of avoiding that problem without having to think too hard about it, I want a clock whose length is divisible by as much stuff as possible — a highly composite number. And, of course, 120 is one such number.
Next, I track whether Star Anise is moving at all, so I know whether to play the walk animation. Note that I always assume he isn’t moving, and then correct myself if it turns out he is; otherwise, the new value of moving would persist into future tics and he’d never stop.
That brings me to the new drawing code, which is a little tricky, so here it is a bit at a time:
1-- top of the file
2local anise_stand = {1, 2, 17, 18, 33, 34}
3local anise_jump = {3, 2, 17, 18, 19, 35}
4
5    -- in _draw()
6    local pose = anise_stand
7    if moving and t % 8 < 4 then
8        pose = anise_jump
9    end
This decides which tiles I’m going to draw. I can’t draw the walking part (which I’ve called “jump” because it does look like a jump in isolation, and I’ll be reusing them for that later) as a single block with spr() like before, and I’d like to share the code, so both frames are now assembled from individual tiles.
Note that tiles 1, 2, 17, 18, 33, and 34 are exactly the ones I was drawing in a single spr() call before. (The numbers increase by 16 when jumping to the next row, which makes sense, because each row has 16 tiles in it.) The other set is similar, but it has the alternate tiles substituted in.
I only want to use the jump tiles if Star Anise is moving, and if t % 8 < 4. That % turns my 120-tic clock into an 8-tic clock, then checks if we’re in the first half of it. Essentially: if it’s before noon, show the alternate frame; otherwise, show the normal standing frame.
The use of a global timer does have some subtle drawbacks here. If I tap an arrow key to move Star Anise only very briefly, then he may or may not animate, depending on whether the tap happens to be during the “stand” or “jump” intervals. A more powerful system, where every animation kept track of its own time, would always briefly show him moving. (On the other hand, this is an interesting aesthetic in its own right that kinda complements the very low-res and exaggerated animation.)
Next I need to draw the tiles, but we’ve come to the catch I mentioned before. When I draw Star Anise flipped, I’m now drawing him as a bunch of separate tiles. If I drew them in the same left-to-right order, then his left side would be flipped, and his right side would be flipped, but the whole image wouldn’t be. Er, just look at this picture.
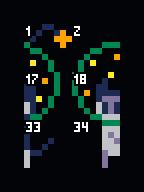
See? The tiles are arranged the same way, but each one is individually flipped, and the result is… not what I want. I’ll need to also draw the columns in reverse order. And that’s exactly what I do:
45    local y = py
46    local x0 = px
47    local dx = 8
48    if left then
49        dx = -8
50        x0 += 8
51    end
Here I’m determining the start point and how far apart the tiles are. The variable names are fairly terse, for a couple of reasons: one, the PICO-8 screen is not very wide, so long variable names make code much harder to read; but also, math code tends to be easier to follow with shorter names anyway. I’ve even taken the naming conventions from math — the initial state of a variable is often written with a subscript zero (\(x_0\)) and a change is written with the Greek letter delta (\(\Delta x\)), so I’ve used the ASCII equivalents of those, x0 and dx.
I’m starting from Star Anise’s position, of course, and then each tile is 8 pixels right of the previous one… if he’s not flipped. If he is flipped, I want to move left, which will draw the tiles in reverse order. But that would change where he draws from, so to compensate, I also start drawing 8 pixels right of where I usually would. (Try to convince yourself that this is correct; on a flipped Star Anise, tile number 1 should draw 8 pixels left from his upper-left corner.)
52    local x = x0
53    for i = 1, #pose do
54        spr(pose[i], x, y, 1, 1, left)
55        if i % 2 == 0 then
56            x = x0
57            y += 8
58        else
59            x += dx
60        end
61    end
All that’s left to do is the drawing itself. For each tile in the pose list, I draw that tile. Each row is two tiles wide, so after every second tile, I reset the horizontal “cursor” (x) back to where it started and move down by one row’s worth of pixels. For any other tile, I just move horizontally by dx.
The results are basically magic.
And that’s a good place to pause for now. Yes, I know, we didn’t get very far, but this is part zero! It’s mostly a test of this series and its tone for me, and a test of fortitude for you. I hope you could follow along with the minor mathematical hijinks above, because next time it gets much worse — before I can do anything else at all, I have to write collision detection. Oh boy! Stay tuned! And always feel free to ask questions, of me or anyone else!
Appendix: PICO-8 Lua extensions
Here are all the modifications PICO-8 has made to the language (based on Lua 5.2). If you’ve never used Lua, keep in mind that these won’t carry over if you try to write Lua anywhere else. Some of these are advanced features, so if you have no idea what something means, that’s probably fine.
Spoilers: it’s mostly that the standard library has changed.
-
Numbers are signed 15.16 fixed-point, rather than stock Lua’s 64-bit floating point. That means fractions can only be represented in increments of 0.0000152587890625 (= \(2^{-16}\), a cumbersome number I refer to as the “Planck size”), and numbers can’t exceed ±32768.
-
Compound assignment is supported:
a += bworks as ina = a + bin stock Lua, where+can be replaced with any binary operator. -
!=is allowed as an alias for~=. -
if (foo) bar = 1is shorthand forif foo then bar = 1 end. The parentheses are required, and the condition ends at the end of the line. (I strongly advise against using this unless you’re very desperate for space; it scans poorly and doesn’t even save tokens.) -
The new
@,%, and$unary prefix operators read 1, 2, or 4 bytes from a memory address. (PICO-8’s memory, not system RAM!) -
The
?unary prefix operator is equivalent toprint. (I’ve never used it, and it’s not even directly documented.) -
The built-in functions
collectgarbage,dofile,error,pcall,require,select, andxpcallare not available (though the lack ofselectmight be a bug).The built-in variables
_Gand_VERSIONare not available.loadhas been replaced with a function that loads PICO-8 carts from files.printhas been replaced with a drawing function, which prints a single string at a position on screen.tonumberandtostringhave been replaced withtonumandtostr, which behave slightly differently (buttostrdoes still respect the__tostringmetatable field).(
assert,getmetatable,ipairs,next,pairs,rawequal,rawget,rawlen,rawset,setmetatable, andtypestill exist and work as in stock Lua.) -
The
coroutinelibrary is not available, but most of its contents are exposed directly ascocreate,coresume,costatus, andyield. There is no equivalent forcoroutine.runningorcoroutine.wrap. -
The
requirefunction andpackagelibrary are not available, though the#includesyntax can be used to textually substitute the contents of a Lua file. -
The
stringlibrary is not available. Replacement string functions are:chr,ord,split, andsub. -
The
tablelibrary is not available. Replacement table functions are:add,del,deli,count,all,foreach. There is no built-in way to concatenate or sort a list. -
The
mathlibrary is not available. Replacement math functions are:max,min,mid,flr,ceil,sin,cos,atan2,sqrt,abs,rnd,srand. There is also an integer division operator,\. -
The
bit32library is not available, but bitwise operations are available as both functions —band,bor,bxor,bnot,shl,shr,lshr,rotl,rotr— and operators —&,|,^^,~,<<,>>,>>>,<<>,>><. -
The
iolibrary is not available. Running PICO-8 cartridges have no notion of a filesystem. -
The
oslibrary is not available. Running PICO-8 cartridges have no direct access to the underlying operating system. (Some facilities are exposed through the “syscall” functionstat, such as accessing the current UTC or local time.) -
The
debuglibrary is not available. -
A number of other new functions were added, though I won’t list them all here; they’re generally for drawing, working with assets, or interacting with the PICO-8’s faux hardware.