![[blog]](https://eev.ee/theme/images/category-blog.png) You should make a Doom level, part 1: the basics
You should make a Doom level, part 1: the basics
Part 1: the basics · Part 2: design · Part 3: cheating
I love Doom. Or, well, I love Doom 2, which is the game we actually had when I was nostalgia years old.
I love the aesthetic — pixely in a 3D(ish) environment, and consistent in a way that meshes together really well. The classic levels are abstract (occasionally too abstract), but still detailed enough to feel like they could represent real places as long as you don’t think about it too hard. The environment is surprisingly dynamic: there are switches and devices everywhere. That seems to have gotten much rarer over time, as climbing polygon counts have required ever-heavier optimizations on environments, which make it harder to move at runtime.
Plus the engine is really simple, so mapping is really simple, and anyone can make a little world they can then move around in and share with others.
And I think that’s fantastic. Everyone should try making games. They’re a great medium, a way to express nearly any kind of creative idea, no matter what your interests. If you like music (Audiosurf), or art (BECOME A GREAT ARTIST IN JUST 10 SECONDS), or storytelling (Photopia), or programming (TIS-100), or puzzles, or human interaction, or ANYTHING, you can probably find a way to express it with a game. You don’t need to be good at everything. You can focus on one thing, or you can focus on everything, or you can pair up with people who have very different interests. A lot of the existing tools are aimed at programming types (probably since they’re all made by programming types), but they’re only getting better over time.
And what better way to get your feet wet than one of the oldest forms of homebrew game development: Doom modding.
I thought I’d try something different this month, especially because I keep writing ludicrously long posts (I say, as if this one were any better), and also this month I’m trying to focus on an intersection of gamedev and writing, and also it’s Christmas (???). So here is part 1 of a three-part series on how to build you a world.
You will need
-
A computer! A real one. Phones don’t count. Sorry.
-
Doom! Preferably Doom 2, as it has more textures and monsters and weapons. You can get it from Steam, on GOG, and probably other places.
Both of those claim to be for Windows only, but the executable isn’t important — only the actual data file,
doom2.wad(called an “IWAD”). If you get it from either Steam or GOG, ZDoom and SLADE should both automatically find it for you (though SLADE only on Windows). If not you’ll have to find it yourself — for Steam it should be insteamapps/common/Doom 2/base, and for GOG it should be indoom2, relative to the installation directory.Technically, you don’t have to use Doom at all. You could use any of the games that ZDoom supports: Final Doom, Heretic, Hexen, Strife, and a couple more obscure options. Doom 2 is just the most common base by far.
Alternatively, if you don’t want to shell out money and can’t find your original floppies, there’s always Freedoom, a project that seeks to recreate all the Doom assets from scratch with a free license.
-
ZDoom! This is a super fancy Doom “source port” that runs everywhere, plays Doom and every official game based on it, and has accumulated mountains of fancy player and mapper features over the years.
Snag an official build of the latest and greatest. Alternatively, you might be interested in GZDoom, which is a ZDoom fork that uses OpenGL for rendering. (ZDoom is 100% software-rendered, just like the original engine.)
-
An editor! We’ll be using SLADE. You can get the latest release from its website or GitHub. You can also file tickets on GitHub if anything is totally broken. I fixed several bugs I ran across just during the course of writing this series, even.
The more popular editor is GZDoom Builder, but it only exists for Windows, so I can’t very well write about it. Also I’ve contributed a lot to SLADE and it’s cool when people use code I wrote.
-
An Internet! Not strictly required, but the ZDoom wiki and Doom wiki are bursting with helpful information. (Note: there’s a Doom wikia which has more Google juice at the moment, but it’s basically abandoned and there was some kind of skeezy kerfuffle and everyone says to avoid it, so.)
ZDoom and SLADE offer both Windows and OS X binaries. GZDoom only has Windows binaries; if you’re on OS X, you’ll have to build it yourself. ZDoom has some Ubuntu builds, but for SLADE or other Linuxes, you’ll have to hope you can find some distro packages (all three things are in Arch’s AUR, fwiw), or build all of it yourself. Sorry. They all have pretty good compilation instructions, at least…
First things first
Before we get into building things, you should make sure you can actually run ZDoom.
So, try running ZDoom. If you got Doom 2 from Steam or GOG, ZDoom should automagically detect where the IWAD (doom2.wad) is and load the game right away. Good. Skip the next few paragraphs.
Or, if ZDoom can’t find a game at all, it’ll spew an error about that. Or just close immediately without doing anything. In this case, you have a couple options, in decreasing order of cleanliness:
-
Find your
zdoom.inifile. Running ZDoom, even unsuccessfully, should have created one for you automatically. On Linux, this will be in~/.config/zdoom/(or~/.config/gzdoomif you’re using GZDoom). On OS X, it’s in~/Library/Preferences/zdoom.ini. On Windows, it’s apparentlyzdoom-<username>.ini, in the same directory as ZDoom itself. Right at the top is a section called[IWADSearch.Directories]followed by severalPath=lines; just add another one with the path to the directory containing yourdoom2.wad. -
Set the
DOOMWADDIRenvironment variable to the directory containing your IWAD. -
Copy or move the IWAD into the same directory as ZDoom. (On Linux, you can also stick it in
~/.config/zdoom. On any platform, you can stick it in any of the directories listed inzdoom.ini.)
Now you should definitely be able to run the game and see the good ol’ Doom 2 title screen.
You may want to play with some settings, since out of the box, ZDoom is still basically using the original Doom bindings. I don’t know why. No one plays like this, I hope.
Press Esc to pop open the menu, and pick Options. There are a ton of options and many of them are obscure, so here are my suggestions:
-
Under
Set Video Mode, pick a slightly bigger resolution. You’ve got the pixels, might as well use ‘em. This will also fix the menu text to not be unreadably small. -
Under
Customize Controls, use some more contemporary bindings. I have W A S D for move forwards/backwards and strafe left/right; E and lshift to use/open; F11 to take a screenshot because my keyboard is conspicuously lacking the default sysrq key.By default mouse1 fires and the mouse wheel switches between weapons. You can use mouse2 and mouse3 for whatever you want, perhaps alt-fire (not useful in Doom but used in some mods) and an extra use/open key. I also have space to jump and Z to duck, which you shouldn’t use in stock Doom, but which you might want to support in your own map.
-
Under
Mouse Options, turn “always mouselook” on. (By default it’s toggled with a key.)Note that in ZDoom, you can only look so far upwards or downwards. There’s a fascinating reason for this: there’s no vertical perspective! The software renderer is designed around drawing walls as vertical lines, always. You know how when you stand at the bottom of a tall building and look upwards, the walls are slanted? The Doom engine simple can’t do that, and always draws them straight. That looks increasingly ridiculous the further up or down you look (and also more impossible, for even more obscure reasons), so ZDoom won’t let you look too far away from the horizon. GZDoom lets you look wherever you want, since it draws the world in true 3D.
-
Under
Player Setup, turn “always run” on. You might also want to play with the “autoaim” setting — Doom would automatically aim at monsters anywhere in your vertical line of sight, as there was no way to look up or down, but mouselook makes that less necessary. -
Under
HUD Options, change “default crosshair” to “cross 1”. Or, maybe don’t. I dunno, I like to know where I’m aiming.While you’re in here, go under
Alternative HUDand set “enable alternative HUD” to “on”. Then back out of the menu and press = once to max out the screen size.Some people will find this heretical, playing Doom without the classic status bar. But I dig the minimal look and full weapon art. It’s also nice having the kill and secret counts right on the screen.
-
Under
Automap Options, change the “map color set” to “custom”, which really means “ZDoom’s defaults”. This is another a matter of taste, but it’s easier on the eyes, shows you secrets you’ve found, highlights the exit, and colors locked doors to match the required key.
Feel free to mess with whatever else catches your eye, but those are the settings I most direly miss from a stock configuration.
Run around in the game a bit, shoot some bad guys, and make sure you’re comfortable with the controls. Playing a game is an important part of making a game.
One more thing: ZDoom has a console, which you can open with `. It has bunches of commands that can be useful for testing a map. god, noclip, and give all are equivalent to some classic Doom cheat codes; kill monsters kills everything on the map; notarget prevents monsters from seeing you unless you attack them; buddha toggles a mode where you take damage but can’t go below 1% health; resurrect lets you keep playing after you die; fly toggles fly mode (jump/crouch move up and down); and freeze will stop all actors in their tracks. You can bind some of these to your spare keys, if you like; I have freeze mode bound to F (bind f freeze), for example.
Boy, this all sure is exciting. Let’s actually make something.
Diving right in
Run SLADE. It’ll give you a first-time-setup prompt with three questions.
-
Something about a temp folder. Unless you have a compelling reason to think otherwise, the default is fine.
-
Where to find your “base resource WADs”, by which it means data files from a full game. SLADE has to read these to know about all the standard textures and items and whatnot. If you’re lucky, it’s autodetected your
doom2.wad; if not, add it manually here. -
Something about a “nodebuilder”, whatever that is. You can ignore this.
You may want to poke around the preferences as we go; there are a few options that are invaluable but not turned on by default. Map Editor → “Automatically apply property panel changes” is particularly useful, and I’ve changed a lot of the 3D mode bindings.
A quick word of warning: ZDoom is a continuation of a game first released 22 years ago. It supports a dozen or more commercial games and all their features, plus untold thousands of hobbyist mods made across two decades. It tries to be compatible with every other fork of the Doom engine, and add new features as well. So for anything you could possibly want to do, chances are, there are at least two or three different ways of doing it — with different tradeoffs. I’m going to gently nudge you towards making the decisions I would make, but it’s something to be aware of, if only to understand why the editor is asking you to make a zillion different decisions upfront.
For example, there are three different map formats: Doom, Hexen, and UDMF. UDMF is a shiny new text-based format that’s flexible and easy to extend with new properties. Hexen format can do most of the same things, but uses a binary format and requires a lot of hacks for some newer features. Doom format is the original and is extremely rigid. But a lot of mappers still target the Doom format, because it’s guaranteed to run on any Doom fork. We’ll be using UDMF, because it gives you the most capabilities upfront.
Go to File > New > Map, and you’ll get a little prompt. The defaults are terrible, so make sure you set the game to Doom 2 and the port to ZDoom! Otherwise SLADE will be very confused. You’ll also want to set the base resource to doom2.wad. You only have to do this once; SLADE will remember them as defaults in the future.
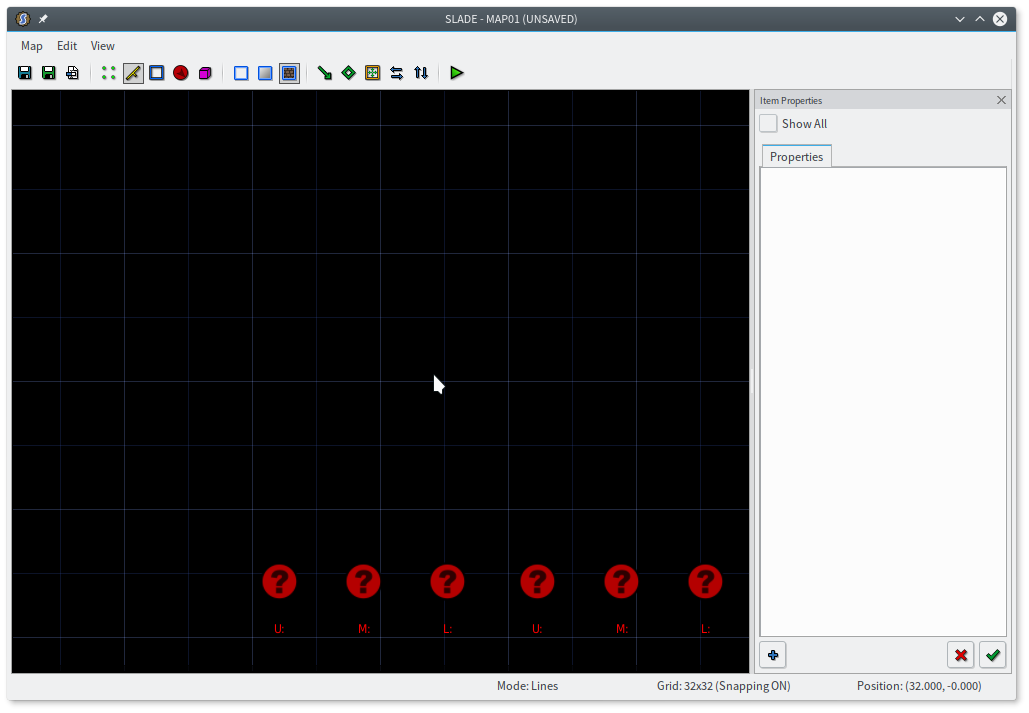
After this you’ll get another little prompt, which should have MAP01 as the map name and UDMF as the format. Click OK, and finally, at long last, you’re in a map editor.
I guess it’s about time we see a screenshot of something. It’s not much to look at, since your map is totally blank.
Something from nothing
There are two things you must have for a map to be playable: somewhere for the player to spawn, and a room for the player to be in. An exit is also helpful. Let’s make all of those.
SLADE has five major modes, which we’ll get to in a second. You start in lines mode. A “line” is, appropriately enough, a line. The entire world is built out of lines; they’re the fundamental unit of Doom architecture.
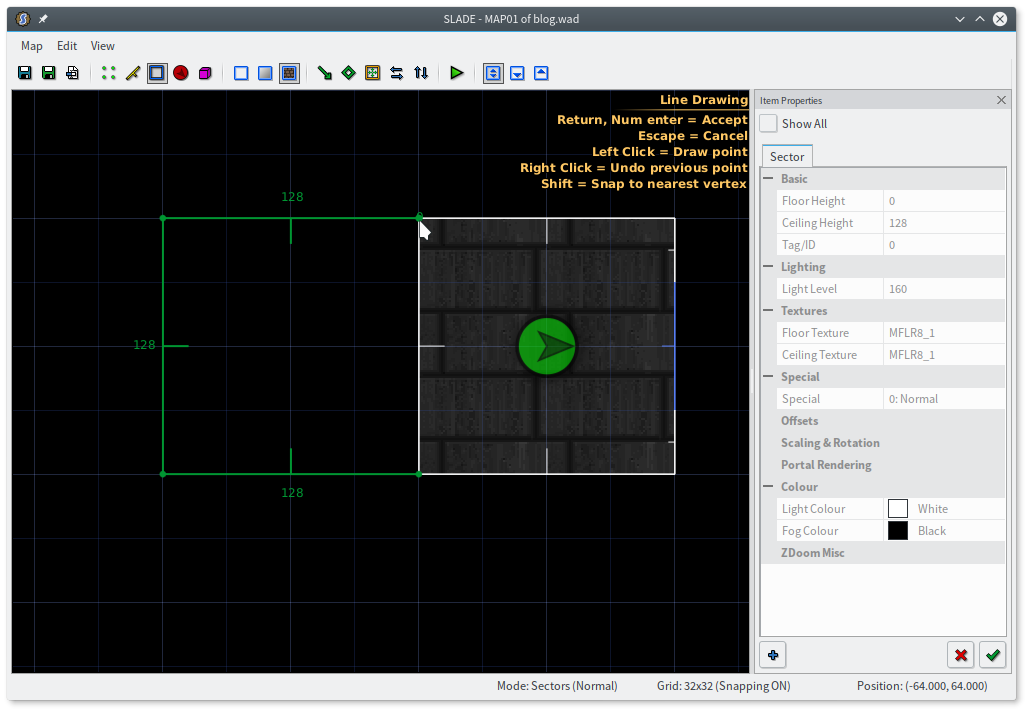
Press space to start “line drawing” mode. You can click wherever you want to add points in a polygon. Let’s draw a room.
You can’t know how big to make it without some sense of scale. A very common yardstick in Doom is 64 units — it’s the height of a very low ceiling, the width of a very cramped hallway, and the length of each side of a teleporter pad. The player can fit in smaller spaces, but 64 works as a rough minimum. So you probably want to make your room at least 128 units across. (128 is the width of a large door and also the height of most textures, making it a common height for simple rooms.)
I have a tendency to draw really cramped and “efficient” spaces, which aren’t so fun to move around in. A trick I’ve found helpful is to change the grid size depending on what I’m trying to draw: 64 for a tight hallway, 128 for a normal-sized room, 256 for a larger room, and 512 or 1024 for outdoor spaces. The current grid size is in the bottom right, and you can change it with [ and ].
You’ll end up with something like this. Maybe something even more interesting than this, because I just drew a square, and you could’ve drawn a dodecahedron or something.
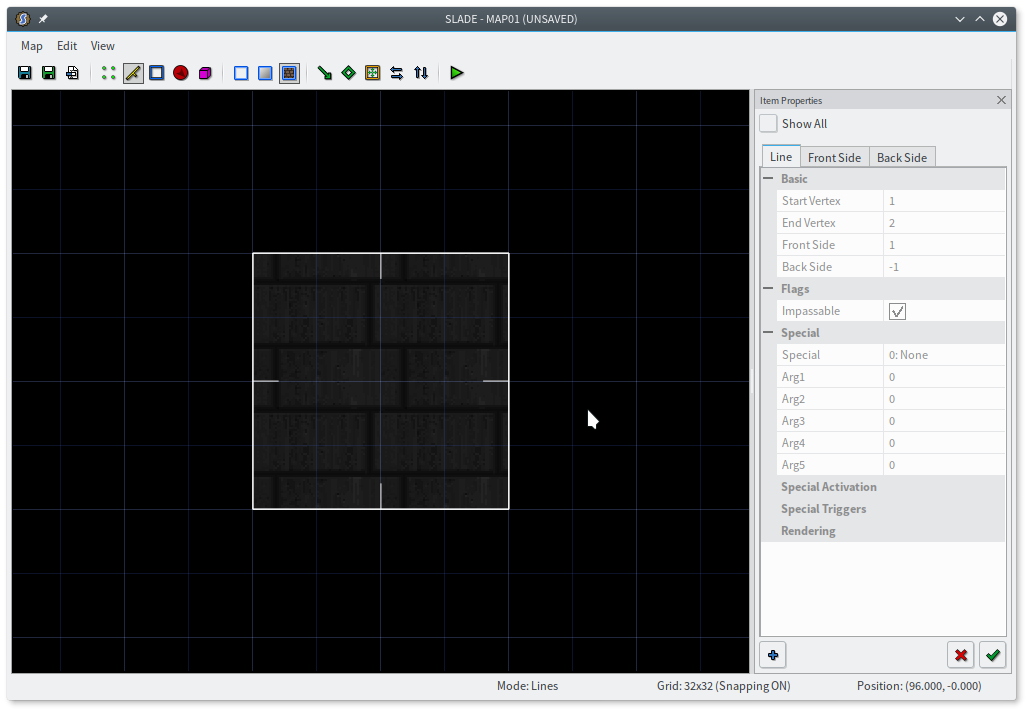
Halfway there! You can pan around and admire your masterpiece by dragging with the middle mouse button.
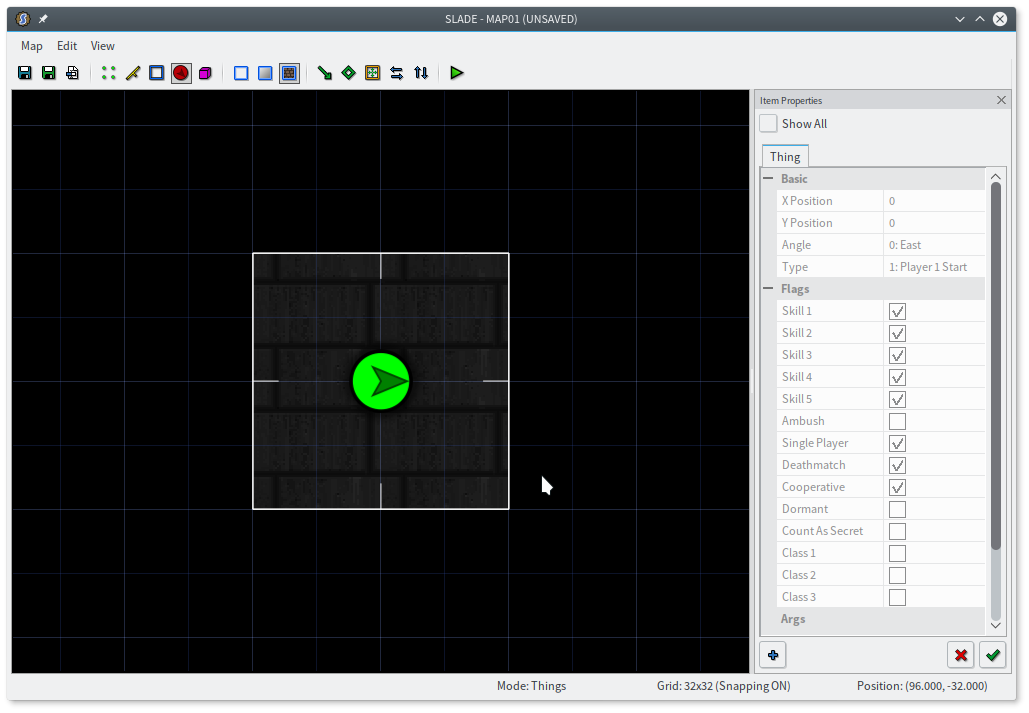
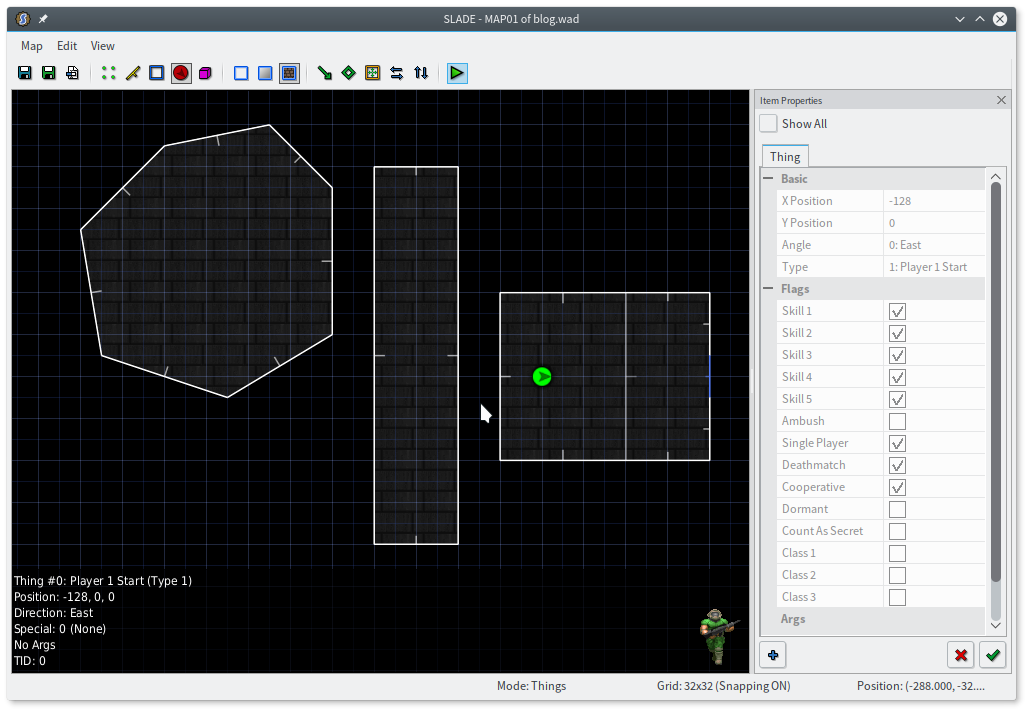
Now press T to switch to things mode. Aim at the middle of your room and press insert to create a thing, which by default will be a player 1 start point.
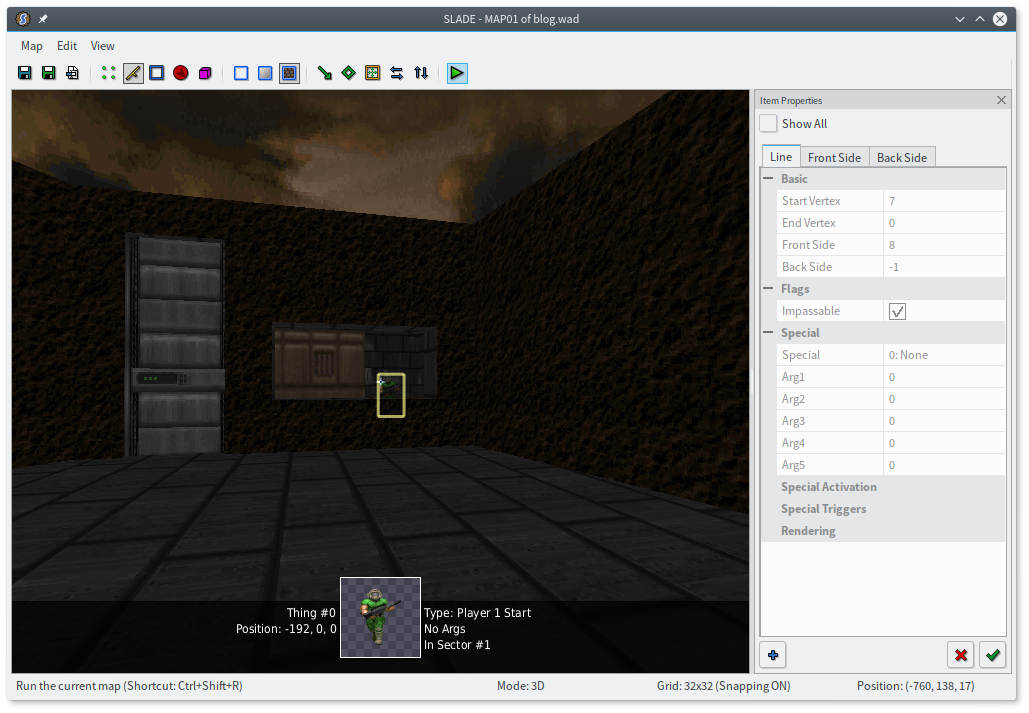
You did it! This is a playable map. Hit the green arrow in the toolbar (or press ctrlshiftR) to spawn the run dialog, and… more things to configure. But not many! Pick ZDoom (or GZDoom) from the “game executable” dropdown, then set the path to the actual game using the little folder button if it’s not already correct. Then you can click Run and—
Argh! SLADE will bug you with the preferences dialog, because you didn’t set a nodebuilder. You can hit cancel here and ignore the subsequent warning; you shouldn’t get another one, at least as long as SLADE is running. (“Nodebuilding” creates some internal structures that help the engine understand the map layout. It’s traditionally been done as a separate step, but computers are fast enough now that ZDoom can build nodes on the fly almost instantly. If you really really want to, you can download ZDBSP and configure SLADE to use it.)
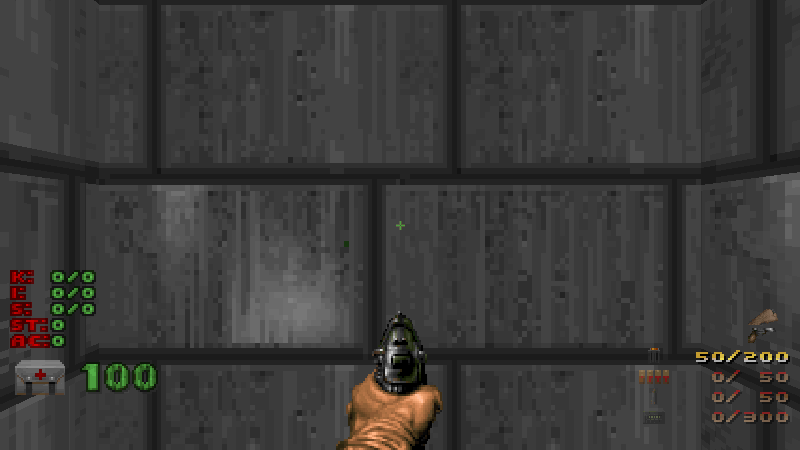
Now, finally, you will be in-game, staring at some beautiful gray brick walls.
Okay, let’s head back to SLADE and read a bunch of words before we do much else. You might also want to save your map at this point. Saving is good. Save a lot. SLADE crashes occasionally. Sorry. Please file tickets.
SLADE's modes
Right, so. SLADE has four 2D modes, corresponding to the four major kinds of stuff in a Doom map.
You should still be in things mode (T). A thing is basically anything that’s not architecture. Monsters, items, and decorations are things. So are the player start points. So are special effects like teleporter destinations, which aren’t visible in-game but are used to mark points on the map.
Generally the objects you see in-game are referred to as actors, whereas things are specifically what you see in the map editor. All things are actors, but not all actors are things — for example, an imp’s fireball is an actor, but you can’t directly place one in a map. The distinction is pretty minor, and no one will care much if you mix them up.
If you point to the player start you’ve made, you can see a brief summary of it at the bottom of the screen. You can also see a bunch of checkboxes in the properties panel on the right. Doom objects have accreted a whole lot of properties over the years, and this isn’t even all of them! Thing properties aren’t too interesting to us yet, so we’ll leave them alone for now.
You can move the start point around by dragging with the right mouse button. You can also change the direction it’s facing, which is the direction the player faces when the game starts, by holding D and moving the mouse around.
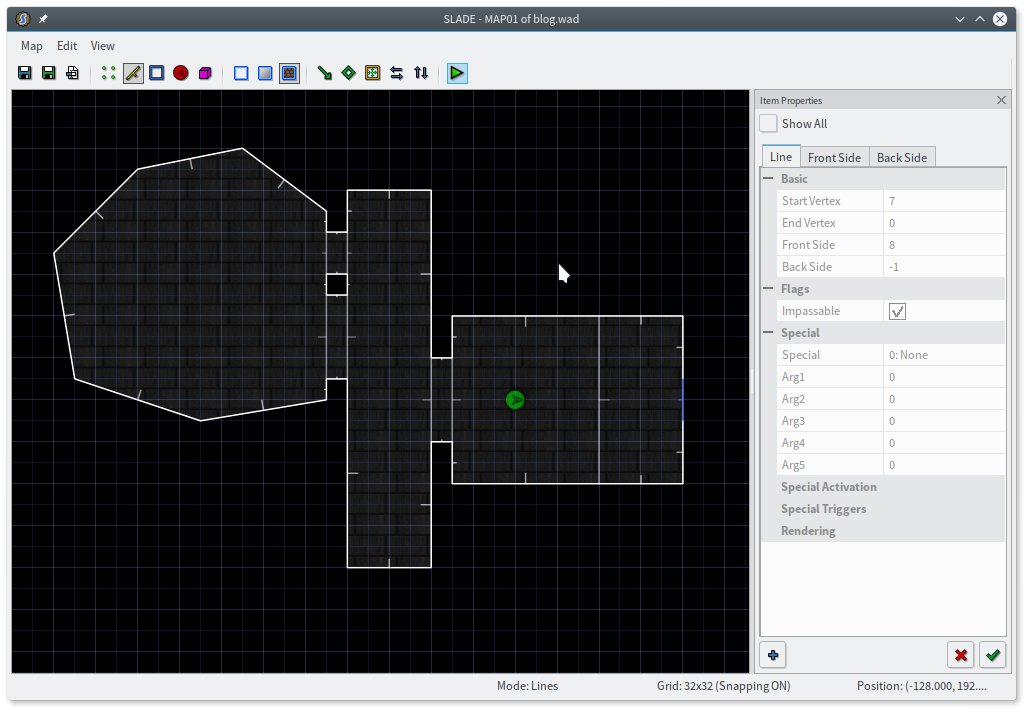
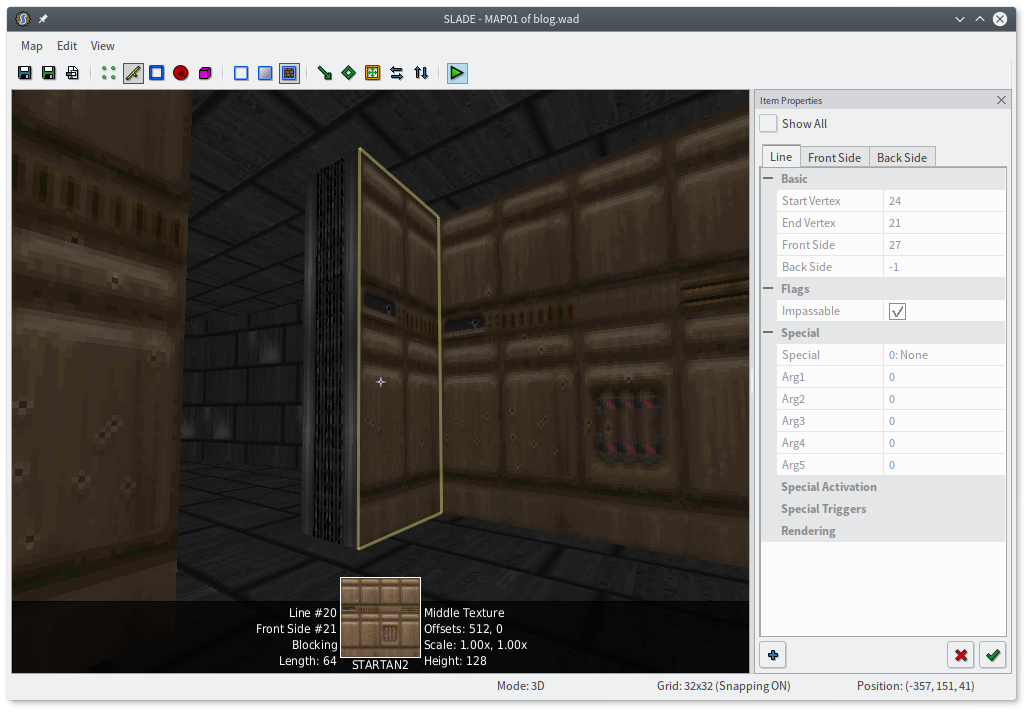
Okay, press L to switch back to lines mode. (You can right-drag lines to move them, too.) Lines have all kinds of interesting stuff going on. Every line has a little notch at its midpoint to indicate the “front” side. We only have one room so far, with an empty void on the other side, so our lines don’t have a back side yet.
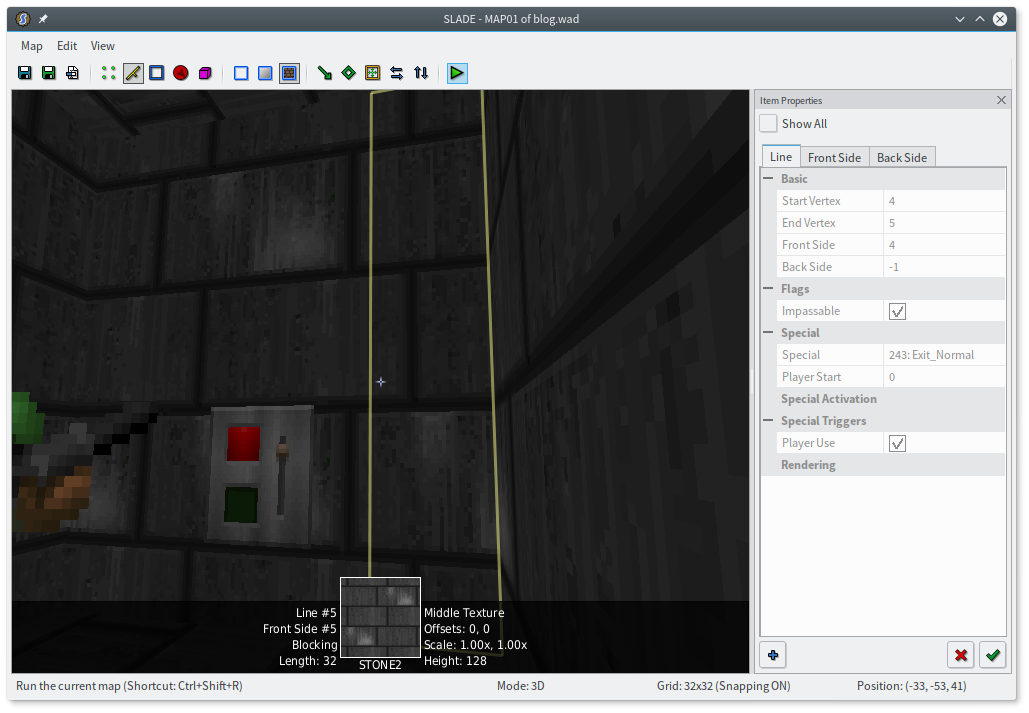
If you hover over a line, the overlay will tell you its length and special on the left, and its textures on the right.
Hang on, what’s a special?
I’m glad you asked! A special is just that: something special that a line can do. In most cases, that means an action that affects the world in some way: opening a door, lowering a lift, teleporting the player, etc. Specials are what make a map interactive. Let’s add one now. Click a line to select it, then right-click and choose “properties”. You’ll get a tabbed dialog, and you want the “Special” tab, which shows you a list with a bunch of checkboxes underneath. Here’s what I’ve chosen:
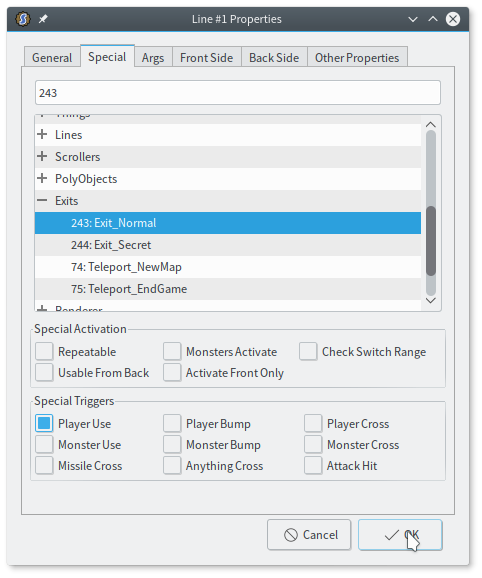
The ZDoom specials are arranged into categories. I want it to be possible to finish this map, so I ought to have an exit. Exit_Normal is the special that ends the level in the standard way. Most specials are fairly self-explanatory, but for those that aren’t, the ZDoom wiki has a detailed article on each of them. Here’s the article on Exit_Normal.
A special can have up to five arguments. Specials that open a door might have arguments for which door to open, how fast, and so on. Exiting is pretty basic, so Exit_Normal only has one argument, and it’s only used for special effects. For most other specials, you’ll want to take a peek at the “args” tab.
You also need to pick at least one “trigger”, i.e., the action that causes the special to fire. I want a standard exit switch, so I’ve checked “Player Use”. If you don’t check any of the triggers, the special will never happen!
Click OK to save these changes. Clear the selection with C, and you can see that the line is now blue to indicate it has a special. The overlay at the bottom tells you what it is and how it’s triggered.
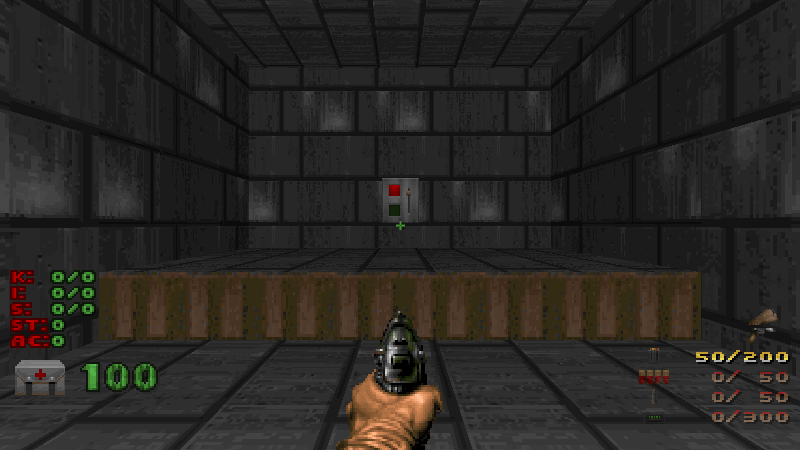
One last thing. I’ve made a switch, but there’s no way for the player to know it’s a switch! Point at the line and press ctrlT for quick texture change, then click the “front middle” texture. You’ll get a grid of every stock Doom 2 wall texture. All of the switch textures have names starting SW1 (for their “off” state) or SW2 (for their “on” state), and if you type “SW” the list will filter to only textures that start with those letters. You can use whichever of these you want, but the one matching the existing walls is SW1STON1. (You can also use SW2STON1, if you like, but using the SW2 textures makes it harder for the player to tell which switches they’ve already pressed.)
And that’s it! Run your map, and you should see a switch on one wall now. Run up and press it, and the level ends, taking you to map 2: Underhalls.
Just before the wipe, you can see that the switch automatically changes states when you press it. You don’t have to do anything in the editor to make this happen; it’s built into the texture.
Unless your room was very small, you may have noticed that the switch texture repeated, making it look like there was more than one switch. This looks pretty bad, so let’s fix it.
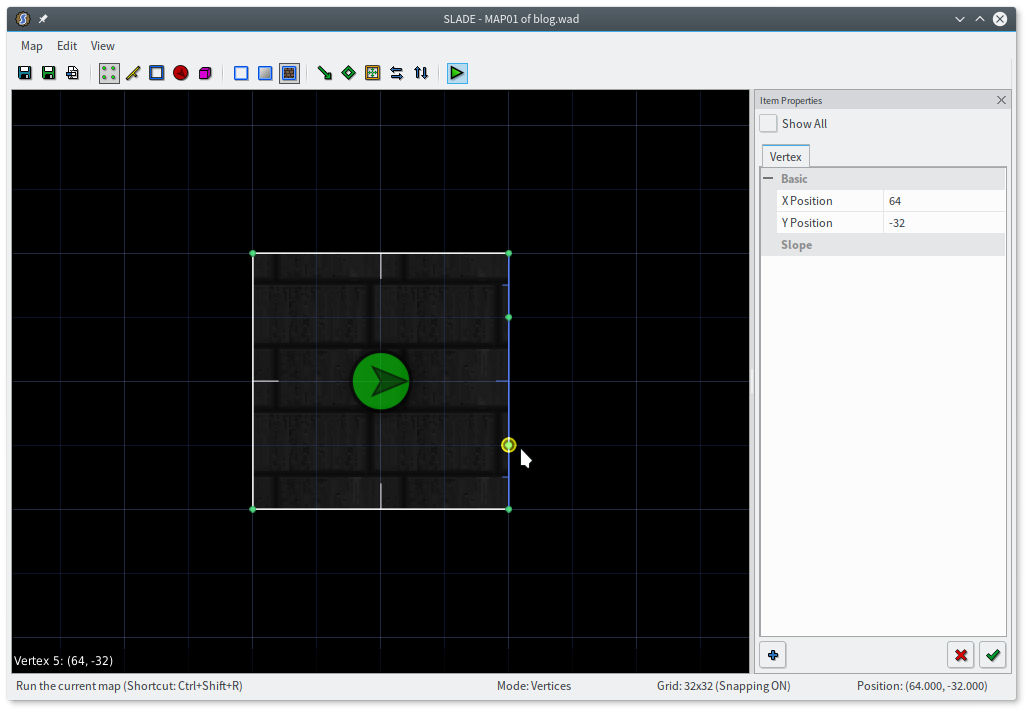
Press V to switch to vertex mode. Every line spans two vertices, and the editor inserts them whenever necessary. There’s not much else to say about vertices.
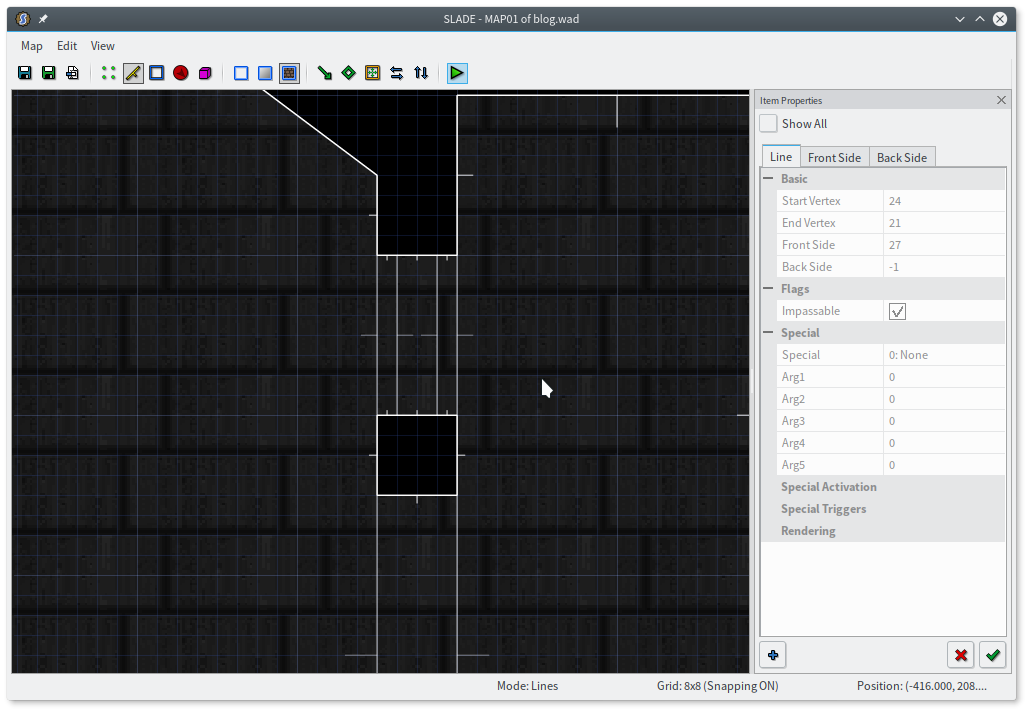
Vertex mode has two main uses: fine-tuning architecture by moving vertices around, and splitting lines. We want to do the latter. Aim somewhere along the top half of your line, and press insert to create a new vertex. It should snap to the grid and split the line into two pieces. Insert another vertex in the bottom part of your line. You should have a wall made of three lines now:
If your line was diagonal, you’ll have to insert the new vertices where it crosses the grid, or possibly change the grid size. Feel free to move its endpoints around a bit if necessary.
The switch texture we’re using is 64 units wide, so to have only one switch visible, the line should be 64 units wide as well. The lighter lines on the grid are 64 units apart, if that helps. You can switch back to lines mode to check the length of your line.
But now I have three exit switches! I’m too lazy to manually change the texture and special back. Instead, point at one of the regular walls (in lines mode) and press ctrlshiftC to copy its properties. Point at the two shorter segments surrounding your switch and press ctrlshiftV to paste onto each one. Tada; they should turn back into regular walls with the plain brick texture.

Okay! Let’s run the map and see the fixed switch.
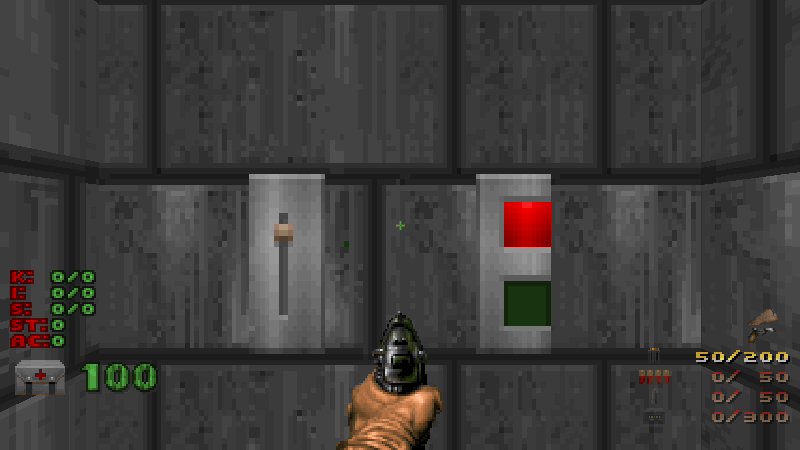
Ah, damn.
SLADE is slightly too clever for its own good. When we split the switch, it added offsets to the textures so that they’d still look like a single seamless wall in-game. This is really handy, except that I split my wall halfway through a switch.
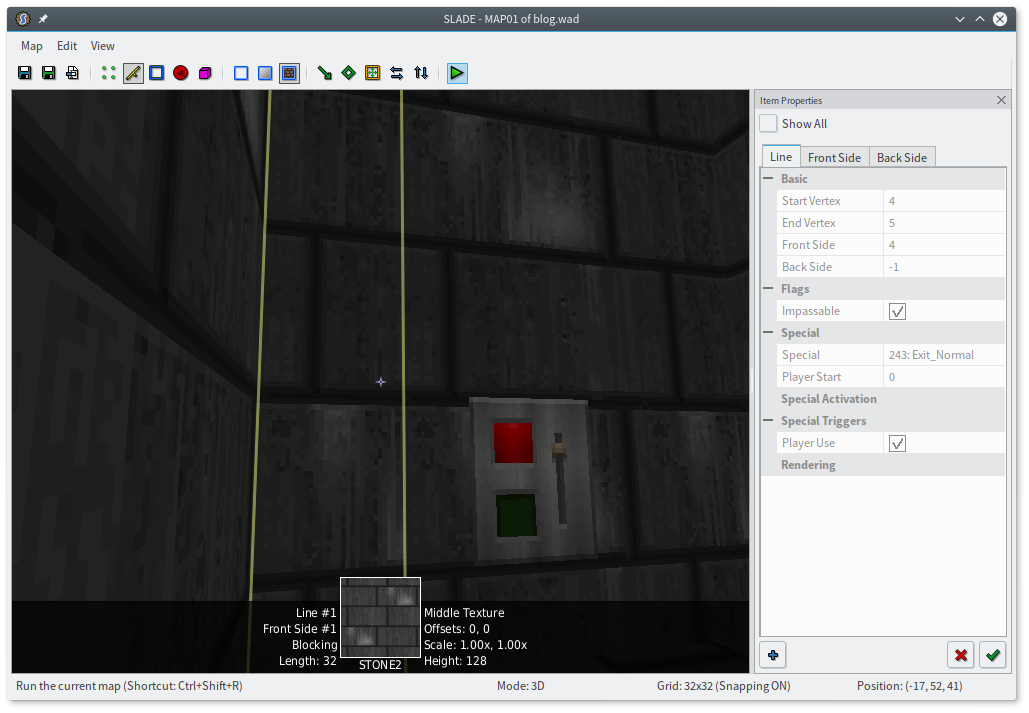
If only I’d used 3D mode first! Press Q. You can use W A S D to move around and explore this (imperfect!) preview of your level. You start on the player 1 start point, but you can quickly move the camera anywhere you like by right-clicking in 2D mode.
Find the switch wall. The problem should be obvious. (If you don’t see a highlight around the outline, move around a bit — your crosshair might be hitting the player start thing.) You can use the numpad to adjust the texture offsets, or just press R to reset them to zero.
Depending on the size of your room, this might now look a little funky. The left edge of the switch meets with the left wall in an awkward way for me, causing some very oddly-sized bricks.
Notice that the right wall looks fine. So I’m going to point at that wall and press ctrlA to auto-align the textures horizontally. This will continue along any adjacent wall with the same texture and change all the offsets so that the texture continues seamlessly between them.
That looks much better. But it only worked for me because the distance around the room happened to be a multiple of 64, the width of the texture. If that weren’t the case, I would’ve had to twiddle the offsets manually, or even change the size of the room so the texture can tile. I’ll get to some tricks for dealing with this problem in part 2.
Texture alignment is a fiddly thing. It’s not a fundamental part of the map and takes a lot of effort to get just right, but misaligned textures can be pretty jarring. It’s up to you how much time you want to spend on it, and whether you want to do it as you go or all at once at the end. Auto-align and unpegging (mentioned later) get you 90% of the way there; it’s the other 90% that’s painful.
Anyway! Press Q to escape back to 2D land, save, and run your level. You should have a beautiful switch.
Well. There’s one more 2D mode, but I couldn’t figure out how to work it into this adventure. Just press S, I guess. That brings you into sector mode.
A sector is a region bounded by lines. Our map only has one contiguous area, so it has one sector. Sectors define floor and ceiling height, the light level, and the floor and ceiling textures. If you want to change any of those, you need a separate sector.
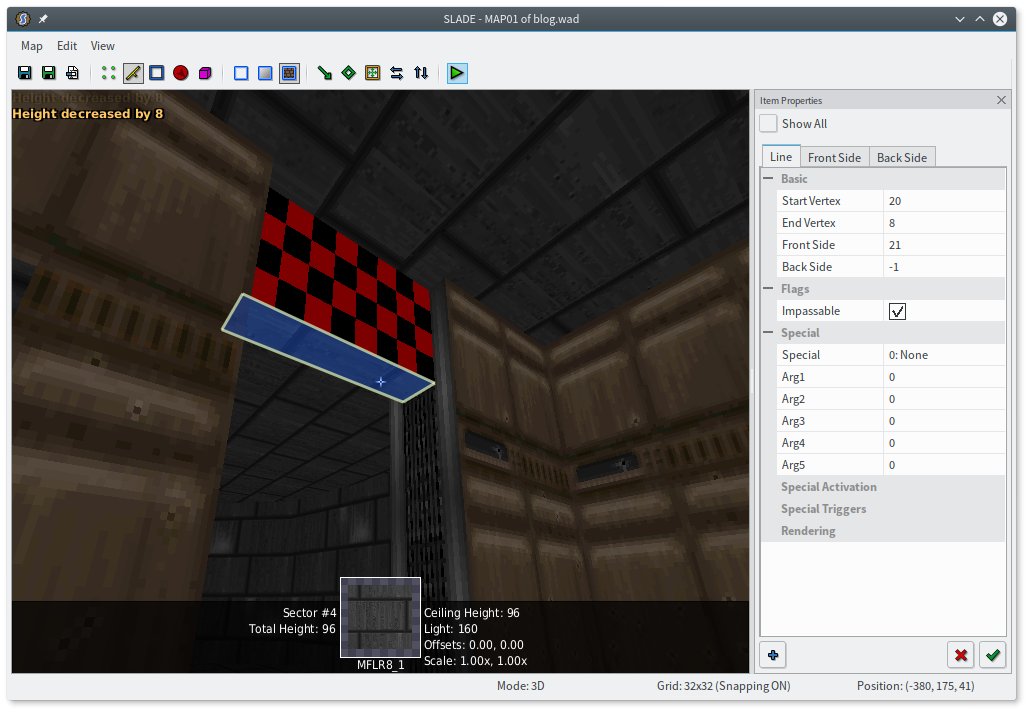
My level is pretty boring right now, so I’m going to take this opportunity to improve it a bit. Press space and draw an extra part on the “back” of the existing room, like this.
You can see that this splits my one sector into two. Pop into 3D mode with Q real quick, and aim at the floor of the new sector (the one not containing the switch). Scroll your mouse wheel down a couple notches, and the floor will lower into the ground, leaving an angry checkerboard texture where the floors differ. Each notch moves the floor by 8 units (conveniently the size of each angry checkerboard square), so three notches will get you a difference of 24 units, the maximum height the player can step up.
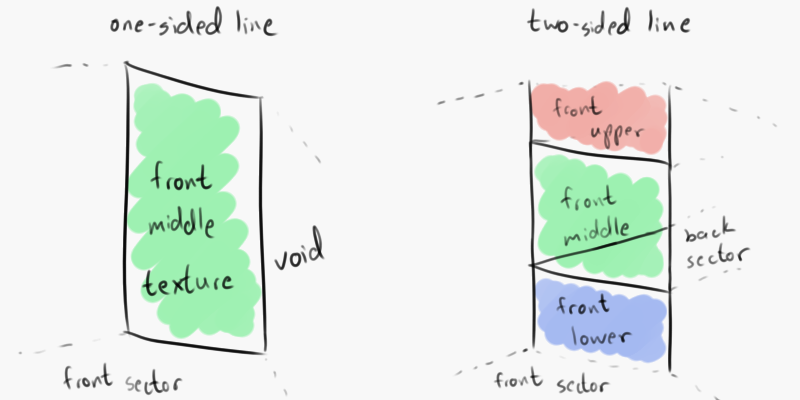
We have two sectors touching here, so we have a two-sided line. You may have noticed earlier that the walls have blank “lower” and “upper” textures, and this is where they come in: on two-sided lines, where the floor or ceiling heights differ. (You could try running the map like this; you’ll see some wacky effects in the gap.)
As a general rule, one-sided lines have only a middle texture (since there’s nowhere for an upper or lower texture to appear), and two-sided lines have at most one upper and one lower texture (since only one side can be higher than the other). There are exceptions, of course — a moving floor might need lower textures on both sides of its lines, because they’re both visible at different times; or you might want a gate or fence texture on the middle of a two-sided line.
You can use the quick-texture gizmo from line mode to assign a texture, or you can just do it directly in 3D mode by right-clicking the offending wall. I’m not going to tell you what texture to use this time; pick whatever you like!
One last thing: in things mode, move the player into the new sector, away from the exit switch. Now we have something that looks slightly more interesting.
You now know a good 80% of what goes into Doom mapping. Just keep doing more of this, and you’ve got a map!
Some words about Doom
You might have noticed that SLADE’s 2D mode looks an awful lot like the automap in Doom. (Press tab in-game.) If you’ve ever used an editor for a 3D game before, that might seem kind of weird.
There’s an excellent reason for this: Doom is actually 2D. Or… sort of 2D. That top-down view really is the map, and is the bulk of how the game understands the world. The biggest consequence of this is that you can’t have “room-over-room” — two open spaces stacked vertically, with a solid area between them. So no midair platforms, no two-story buildings, no crossing hallways. Doom is often referred to as “2.5D”, because the world looks 3D but the map layout is 2D.
(I’m lying. There are some ways to cheat this restriction nowadays, but they’re hacky and probably not something you’d want to base an entire map on. I’ll get to this in part 3.)
I was amazed when I first learned about this, because Doom 2 made such good use of vertical contrast that I’d never noticed. I was sure that maps like Downtown or Industrial Zone had had stacked rooms, but no — it’s all an illusion.
Doom is full of these surprising restrictions, and ZDoom is a story of trying to lift them when possible. Take the special system in UDMF, which is fairly flexible. The original system in Doom? A fixed list of line “types” that combined triggers, specials, and speeds. Type 1 is “DR Door”, meaning it acted like a door switch (press “use” to open, press “use” again to close early), was repeatable, and opened a door at standard speed and with a standard delay. You want a different speed, a different delay, a locked door, a door that only opens once? Well, you either have to find a different type that has the combination of properties you want, or you’re just out of luck.
It made sense for what Doom was: the engine behind a single game. If someone at id wanted a faster door or whatever, they could just turn around and ask Romero to add a new line type.
Another consequence of the map format is that sectors and walls can’t move sideways, only up and down. A lot of details of the geometry are baked into the map (that’s what “nodebuilding” does), and the engine just doesn’t support changing them at runtime. That’s why doors move up and down… which is kind of odd since they moved sideways in Wolfenstein.
(Lying, hacks, part 3, etc.)
You can also run into some trouble editing, because the way Doom sees a map is just not the way a human would interpret it. Imagine if I’d put a crate in the corner of my square room, butting up against the walls. If you played the level, you’d see that as a square room containing a crate, right?
That’s not what Doom sees — it sees two sectors, one a smaller square and one a sort of fat L-shape.
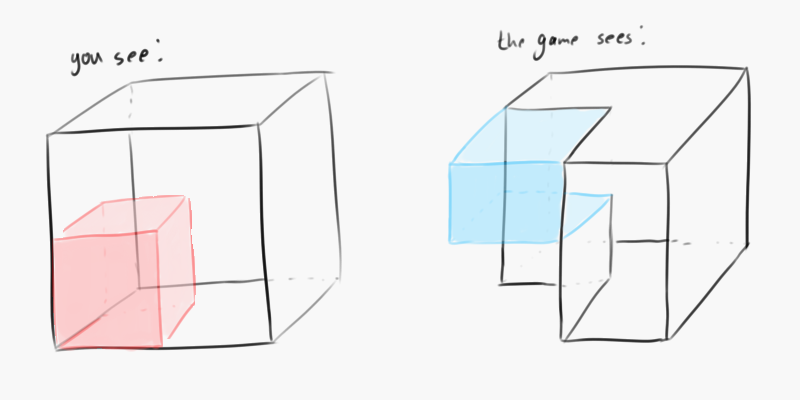
Some editing operations that sound really easy thus become surprisingly painful. What if you want to move the crate out of the corner? You can’t just drag it, because the edges of the crate are the walls of the room. There’s no distinction between them, as far as the map format is concerned. You’d have to cut a “trench” around the back sides of the crate and make them a part of the room, then fix the size of the crate and all the texture offsets. Not a huge deal, but imagine doing that when the room also has a floor trim (more sectors) and ceiling lights (more sectors) and some kind of decoration in the upper corner (more sectors), all of which might be overlapping.
There’s not really a good solution to this. It helps to figure out the general structure of your level before you do any really fiddly detailing. Sometimes you’ll just change your mind, though, and nothing can protect you from that. Just something you have to bear in mind.
On the other hand, Doom lacks some restrictions you might otherwise expect. Sectors are something of an illusion; they’re only defined by the line sides that claim to be part of them. Our two rooms are only two rooms because some of the walls say they’re part of sector 1, some say they’re part of sector 2, and that line in the middle says it’s sector 1 on one side and sector 2 in the other. That’s nice and tidy, but the engine doesn’t actually restrict the shape of sectors.
So it’s perfectly legal to have, say, my two rectangles as a single sector. They’d have the same floor height, but it’s perfectly legal; the line in the middle would just belong to the same sector on both sides. You can even create a whole sector out of two-sided lines like that, and you’ll get a sector that doesn’t actually touch the sector surrounding it. Or you could have two completely separate regions be a single sector, so they always move together. All of these are useful for various special effects in the original engine.
Some words about editors
Speaking of funky sectors, I should warn you: editors are not perfect. You might move or draw lines in a way they don’t know how to handle, or manually twiddle something in a way that doesn’t make sense, and you’ll end up with some really screwy geometry. I’ve fixed a lot of geometry bugs in SLADE, but a couple are still lurking. Turns out that making arbitrary edits work sensibly is kind of hard. So if you make an edit and get sectors that aren’t filled in all the way, or lines that show in red, or lines overlapping, or any other kind of weirdness: just mash undo and try it a different way. And save often.
Right, let’s get back to building things.
Windows
So far, my level isn’t very complicated. You don’t have to do anything except walk forwards, and the heart of Doom is doing things: exploring and affecting the environment.
You know what else is the heart of Doom? Hallways. I’m gonna draw a hallway, and another room, out in the void.
I even made the room a more interesting shape this time.
Now I’ll connect the rooms to the hallway with some smaller sectors…
…and also carve this one sector up a little more.
I had to zoom the grid in here, with ]. I intend to put a door here, and my basic generic door is 16 units thick with 8 units of trim. I prefer doors that are 8 units thick, honestly, but doing it this way means the total thickness is 32 units, which fits to the grid better.
I did the same carving to doorway leading to the exit. But before I turn these into actual doors, I want to make that longer sector into a window.
It’s getting pretty hard to tell these rooms apart, so while I’m here, I want to change the texture of the walls in this hallway. You can click walls to select them, then right-click to change all of them at once. I’m also changing the areas above and below the window to match. (C clears the selection, just like in the 2D modes. You can also shift-click to select all contiguous areas that have the same texture, but of course that would select the entire level right now.)
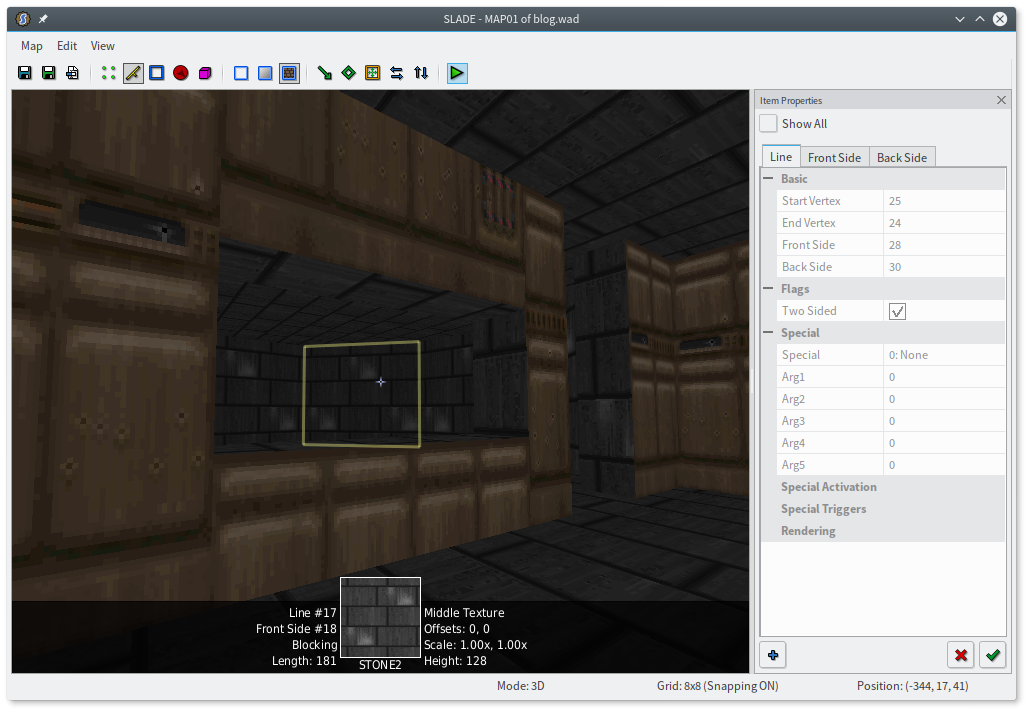
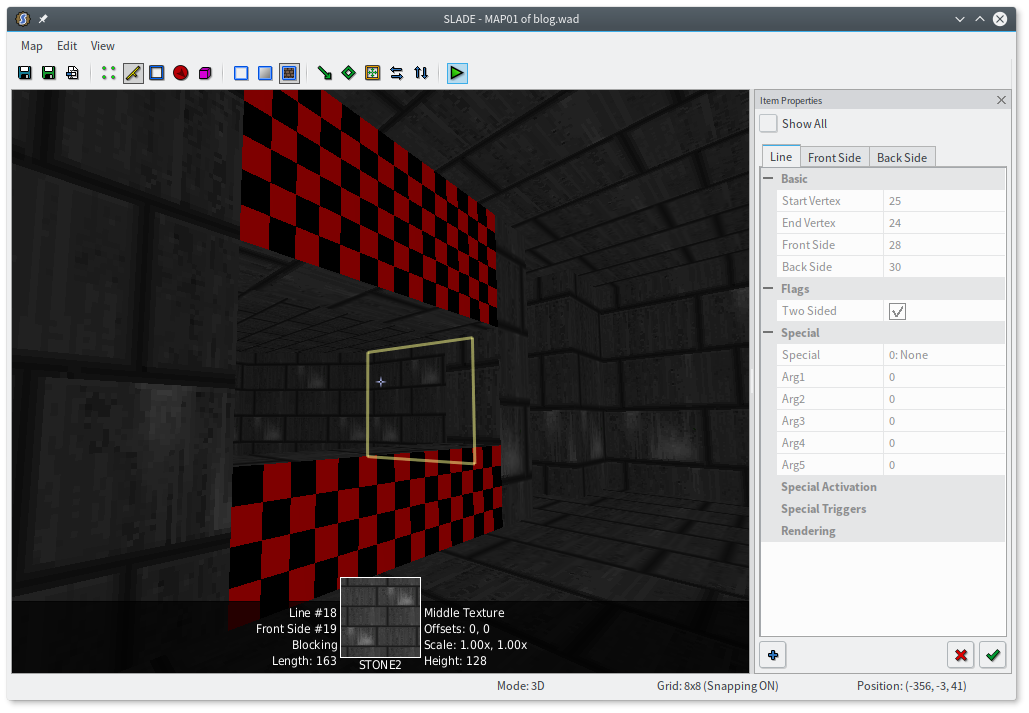
Wow, that looks awful. I could fix this with texture offsets, but there’s a much easier way. Finally, it’s time to learn a new thing!
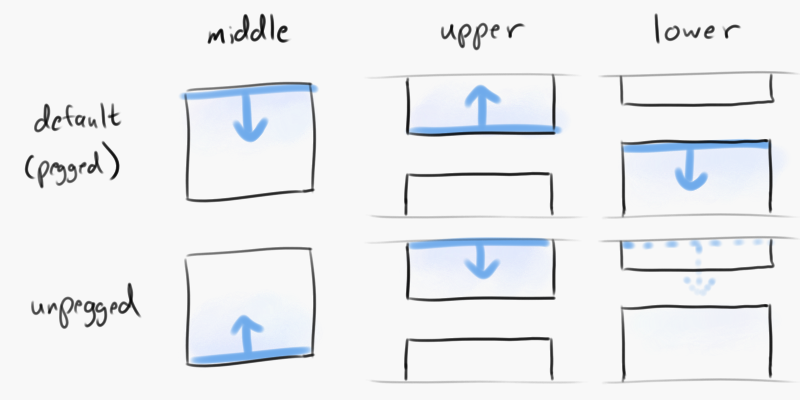
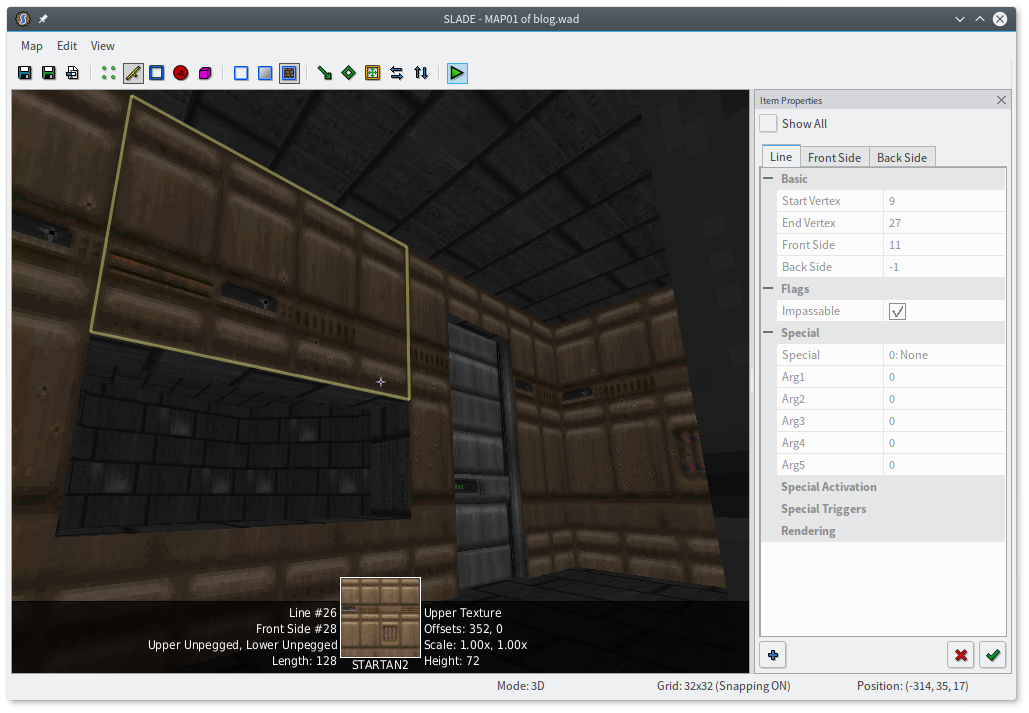
You may have noticed that a texture starts drawing horizontally from the left end of the line. Where it starts vertically depends on which section of the line you’re talking about. Middle textures draw starting from the (lower) ceiling, downwards. Upper and lower textures draw from the middle, outwards. That’s why this looks wrong: the top of the lower texture is attached (“pegged”) to the window’s “floor”, and the bottom of the upper texture is pegged to the window’s “ceiling”.
This might seem like a strange design, but consider a raised platform: the texture “belongs” to the platform behind it, and it makes perfect sense for the top of the platform texture to be stuck to the top of the platform itself. In fact, if the texture drew from the bottom, then the texture wouldn’t move with the platform!
But here we have a window, a hole punched through a wall, so the texture really “belongs” to the wall in front. Thankfully, there are line flags that reverse this behavior. Aim above or below the window and press L and U to toggle the line’s “lower unpegged” and “upper unpegged” flags. The wall is instantly fixed:
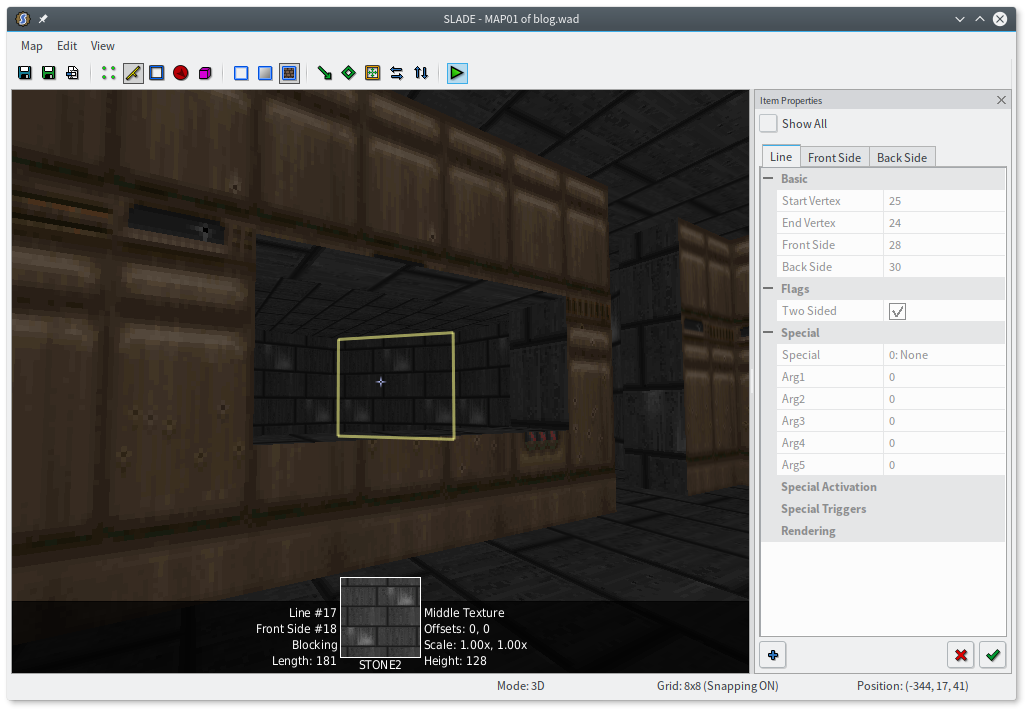
Note that the lower wall doesn’t actually draw from the floor upwards. It draws relative to the higher ceiling, but “skips” the height of the upper and middle areas, so that it will always create a cutout like this window. I can change the height of the hallway floor however I like, and the window will always be textured correctly.
There’s no “middle unpegged” flag; the lower unpegged flag also causes the middle texture to draw from the floor upwards, rather than the ceiling downwards.
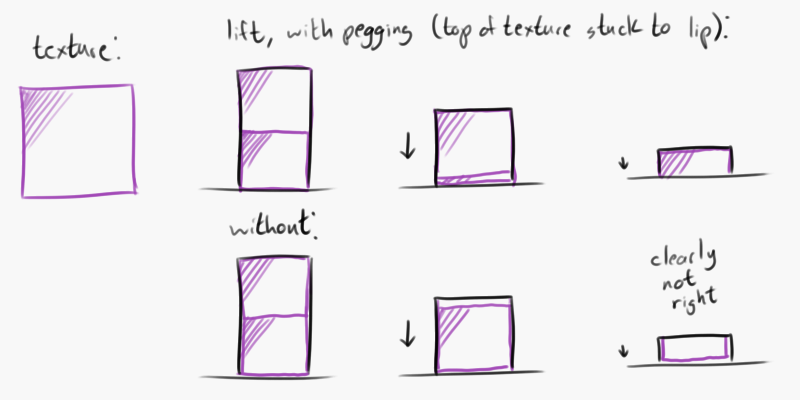
That was quite a mouthful, so here’s a summary of how textures draw and what “unpegging” does. In general: holes in larger surfaces should be unpegged; independent structures should not.
There’s one other case where you really, really want to unpeg.
Doors
Let’s texture the inside of the doorway. I’m using DOORTRAK in the middle, and DOORSTOP for the sides. (Remember, you can change multiple walls at once.) Once you’ve done that, select the ceiling of the middle area and scroll your mousewheel down to lower it.
If you watch closely, you might notice a glaring eyesore. As you lower the door, the door track texture scrolls with it! If you played the game like this and opened the door, the same thing would happen. Remember, middle textures draw from the top downwards — so if the ceiling moves, the texture shifts to stay with it. The solution to this is super duper easy: just set both door tracks to be lower unpegged.
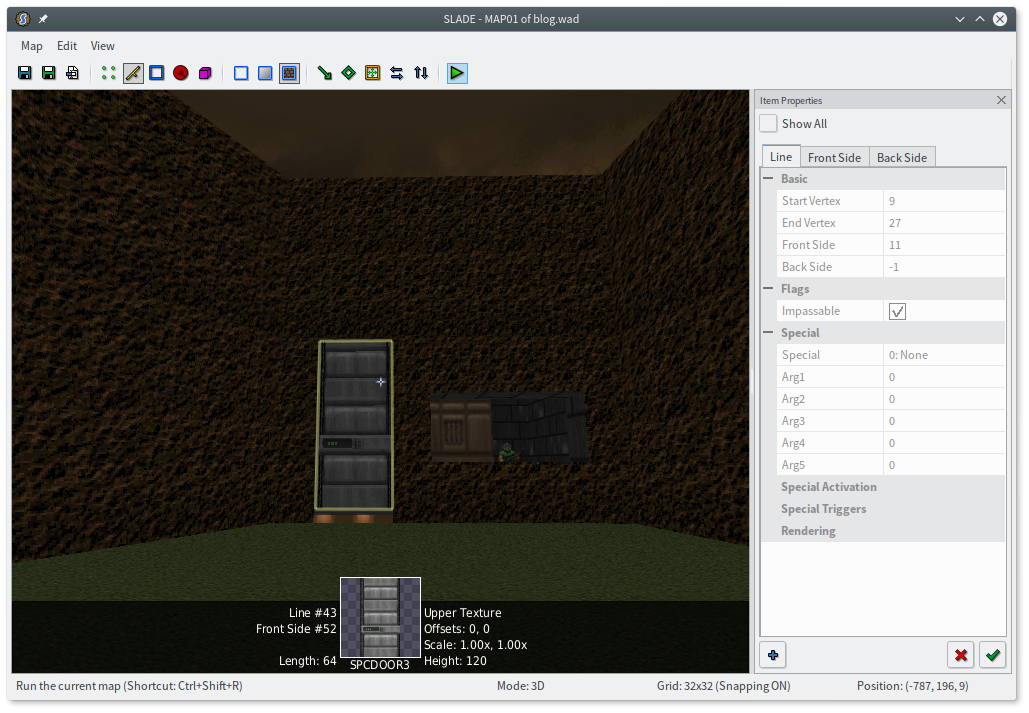
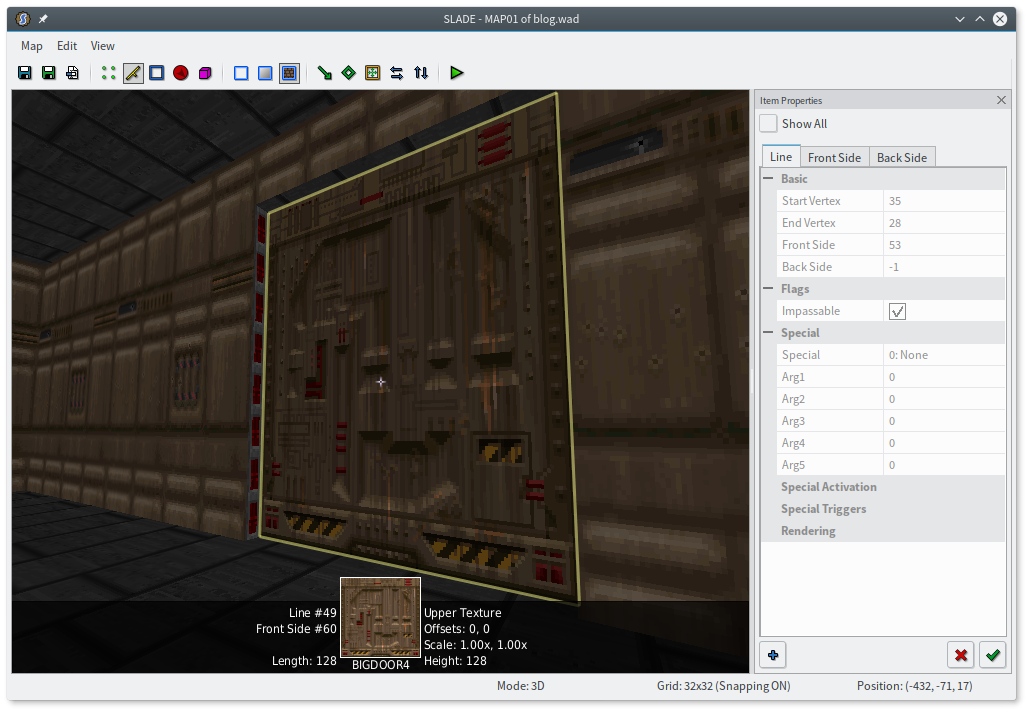
Now I can mousewheel the door all the way down until it touches the floor. (Although, while I’m at it, I might as well change the ceiling texture to something that looks more like the underside of a door.) I’m left with a gigantic angry missing texture on both sides, so I’ll just select them both and assign them a door texture. My door is skinny, so I’ll use one of the SPCDOORs, but there are a few other textures that start with DOOR and BIGDOOR. You might have to switch back to 2D mode and adjust the size of your door to fit the texture you pick, or you can shift the door texture to be centered on an oddly-sized door.
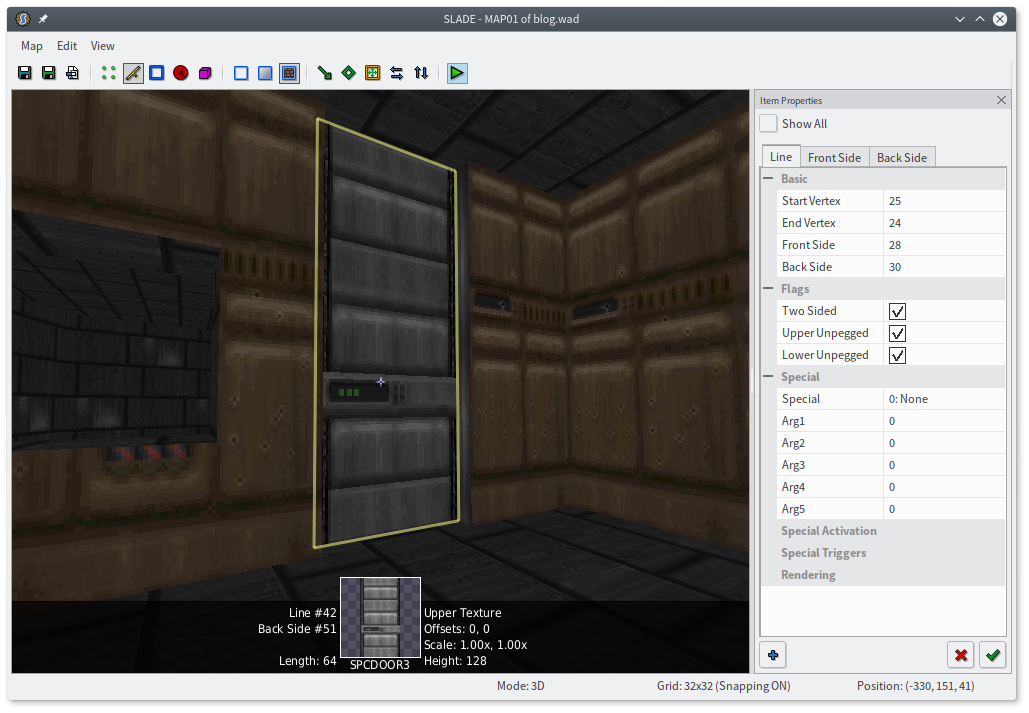
That’s looking a whole lot like a door now! There’s just one thing left to do: make it open. Switch to lines mode and select both sides of the door. If you drew them the same way I did, you’ll see something like this:
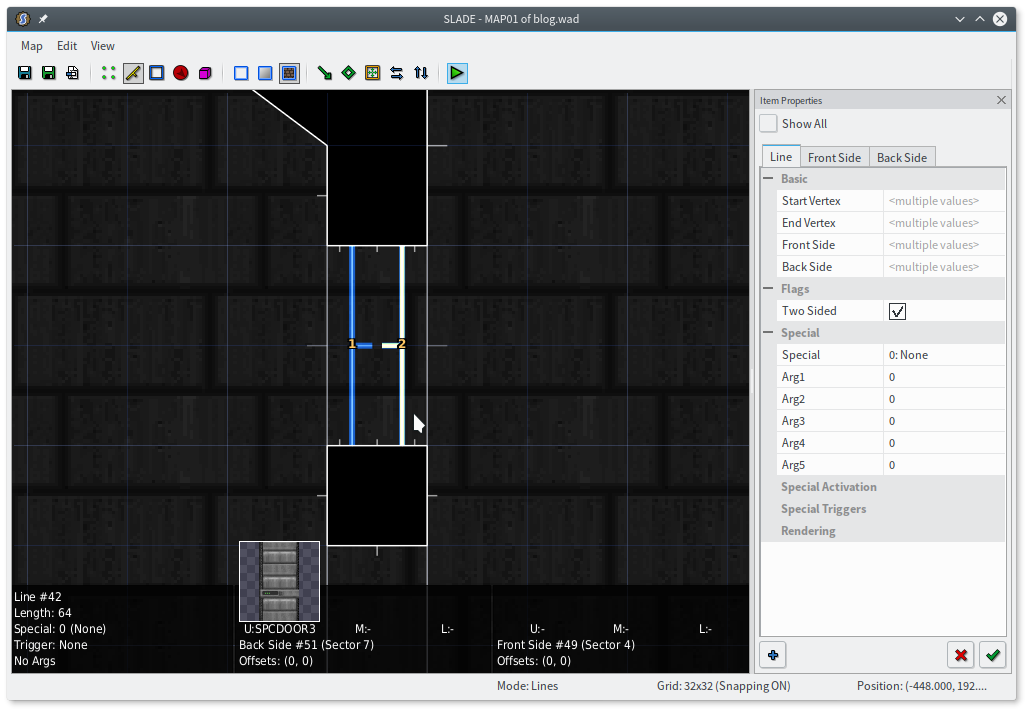
Notice that the notches point inwards, to the inside of the door. I want the door to react when the player presses use on it, but by default, lines can only be used from the front side. F will flip the line and fix that problem.
Now let’s check out the line properties. The “Player Use” trigger is the obvious choice for a standard door. Be sure to check “Repeatable” this time, so the door can be opened more than once!
You might also want monsters to be able to open this door, which was the default behavior for unlocked doors in vanilla Doom. In UDMF, you have to choose it explicitly, which has the advantage that you can also choose not to have it. Just check “Monster Use”. (Note that before ZDoom 2.8, this was broken, and in fact it was only fixed because I found out about it while writing this post! The lesson here is that a 22-year-old engine with a mishmash of features imposed on it sometimes has bugs. You can just check “Monsters Activate” instead to work with older versions.)
The special this time is Door_Raise. There’s also a Door_Open, but that will open the door and leave it open — “raising” means the door will close automatically, and can also be closed manually by using it while it’s open. You can double-click it to jump immediately to the args panel. SLADE is a little vague about what args do, unfortunately. You could look Door_Raise up on the ZDoom wiki, or you could just believe me.
The first argument is a sector tag, which is a number you can assign to some sectors and then reference from a special. This is how you specify what to open. In the case of a door (and most other specials), we can just leave it at 0, which is a special value meaning “use the sector on the other side of this line”. If you wanted to open a door with a switch, you’d want to give the door sector a tag, and then put the same tag here.
Speed is up to you; I’m using the “turbo” speed of 64, which a lot of skinny doors in Doom 2 use. Delay is how long the door waits before closing again, as measured in eighths of a second, and SLADE sadly tells you none of this. The Doom default is 34, an awkward magic number I’ve just committed to memory.
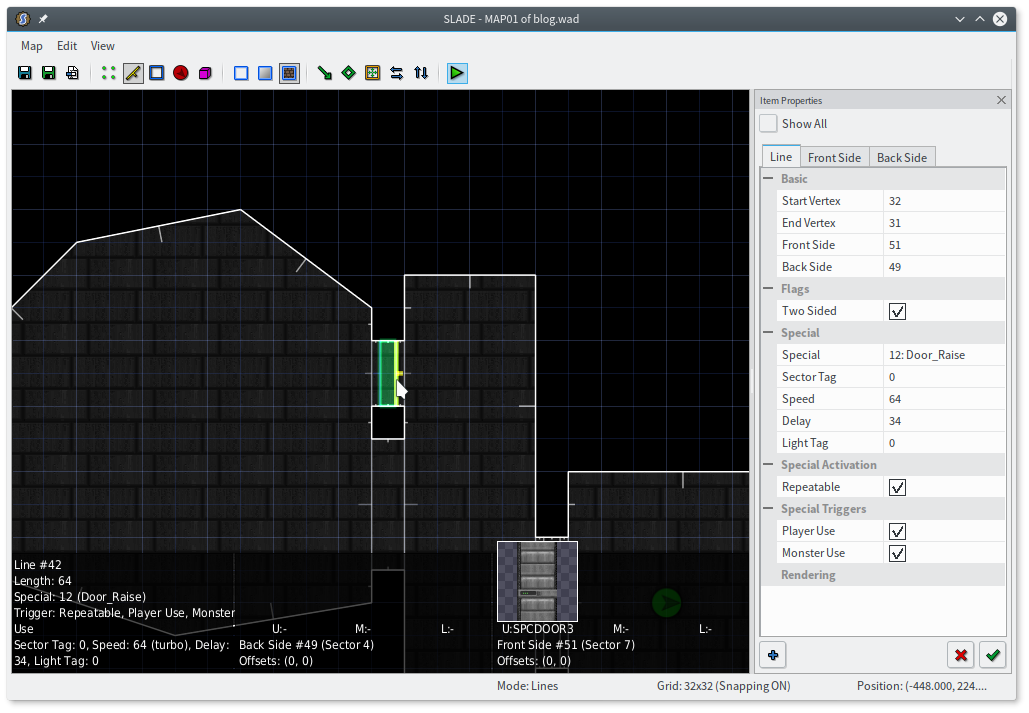
SLADE shows the changes I made in the overlay. Notice that the door sector glows to indicate that it’s linked to the line’s special.
Before running the level, I took a quick run around it in 3D mode, and noticed I have a couple missing textures! The original room is below ground, but when I created the hallway, it started with the default floor height of 0. So now there’s a lower texture missing.
Rather than set one, I think I’d like to lower the rest of the level. Shift-clicking on the hallway floor will select every adjacent floor texture that’s the same height — the hallway, the other room, and the entire door. The mousewheel then lowers everything together.
After that, I realize I want to lower the window as well (you can select both the ceiling and floor and move them simultaneously). I also have to move the door down so it’s flush with the floor again (G, to disable gravity, helps get a view of the very low ceiling). And then I don’t like how tall the door is, so I lower the ceiling around the trim, too… which creates another missing texture! Luckily there’s a handy shortcut here: middle-clicking a wall copies its texture, and shift-middle-clicking pastes a texture. I need to make the newly-painted line upper unpegged, too, since the door frame is a “hole” in the wall.

Perfect! Save, run, and enjoy your door.
Atmosphere
You might have noticed that there are also some missing textures in the other room, the one we haven’t gotten to yet. (SLADE has a “Map Checks” panel, in the View menu, which can check for these — but it’s pretty obvious in this tiny map just by looking around.)
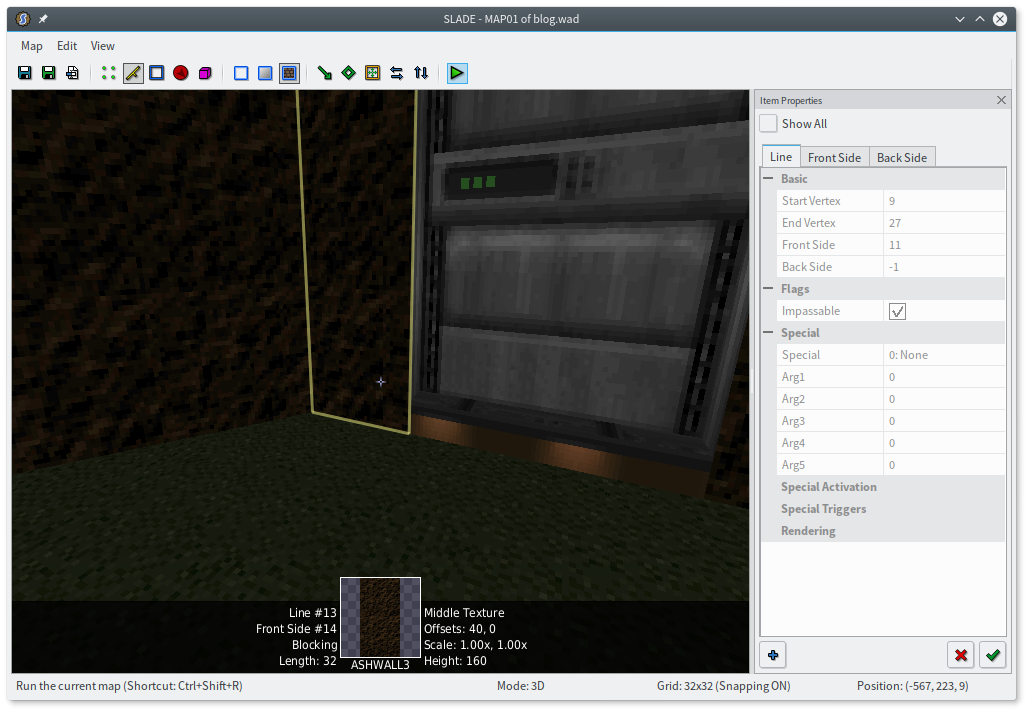
I’m gonna go in there now and make it a little more interesting. I drew this room more organically, so maybe it’s an outside area. Shift-click and some manual fine-tuning selects all the walls, and I’ll texture them all with ASHWALL3. But use whatever you like. The window and door frame need to be unpegged on this side, too.
The textures don’t line up very well, and I have a bunch of diagonal lines that probably aren’t nice multiples of 128. I’m just going to point at a wall in a less-visible corner and hit ctrlA to auto-align everything. There’ll be a seam in this corner where the texture couldn’t line up, but ASHWALL3 is dirty enough that it’s hard to notice.
This is a start, but doesn’t look very outdoorsy still. One easy tweak that helps a lot is to change the ceiling texture to F_SKY1, which is a special texture that draws Doom’s sky instead of the mountain you see. It opens up the room a lot!
I’ll also change the floor texture to GRASS1, rather than these boring old bricks. Now the door looks a bit weird, transitioning directly from grass to bricks, so I’ll lower the whole floor by a notch and turn the door into a step.
Finally, daytime outdoors areas should be brighter, so a few taps of ' raises the light level. (; will lower it.) And just for kicks I’ll raise the sky up a ways, so it’s not level with the hallway ceiling. That wouldn’t make a lot of sense.
I hope I’m not going too fast here! None of this is new or particularly complicated. It’s just a lot of little fine-tuning steps.
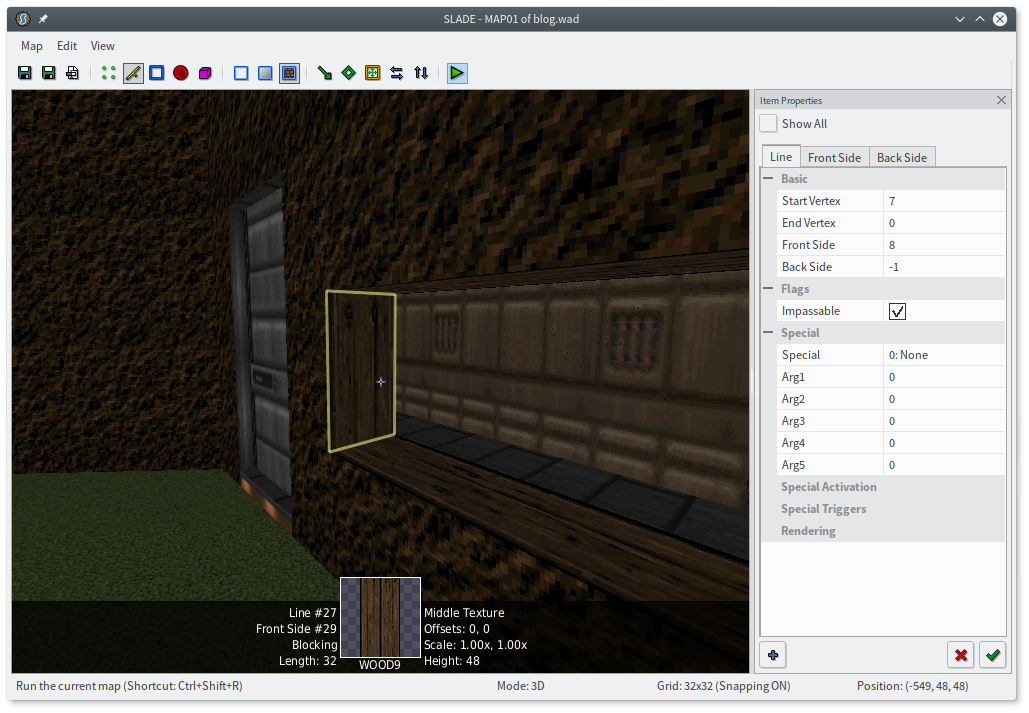
One thing that’s particularly bothering me now is the window, which is lined in awkwardly-cut-off bricks. I dig this outdoor theme, so I’m going to change the walls inside the window to WOOD9.
But then, what to do with the top and bottom? You may have noticed that you get a totally different set of textures for floors/ceilings versus walls. In vanilla Doom, floors and ceilings have a special kind of texture called a “flat”, which is always 64×64 and always aligned to the same 64×64 grid SLADE shows you. Alas, there are no wood flats that fit really well with WOOD9.
Luckily, ZDoom has long since relaxed some restrictions here — you can use wall textures on floors/ceilings, and flats on walls! Just click the “Textures” section in the sidebar of SLADE’s texture browser, and you can pick whatever texture you want. They’re still aligned to the grid by default, but ZDoom also allows you to specify offsets for floor/ceiling textures, and even rotate them. (You can’t rotate wall textures, alas. But you can flip them, and all textures can be scaled.)
So I can use WOOD9 for the floor and ceiling, too. If your window isn’t oriented the same way mine is, you might need to move the texture around using the numpad, or switch to sector mode and set the floor/ceiling rotation to 90 using the props panel. I ended up with this:
Progression and hazards
So far, my map doesn’t have anything that really threatens the player in any way, which is out of character for Doom. I could sprinkle some monsters around, but first I want to think about progression a little.
See, there’s not actually any reason for the player to go outside. That’s not necessarily a bad thing! Optional areas are great, and plenty of stock Doom levels only require you to visit about a third of what they have to offer. But this map is tiny, and the player ought to have something to do.
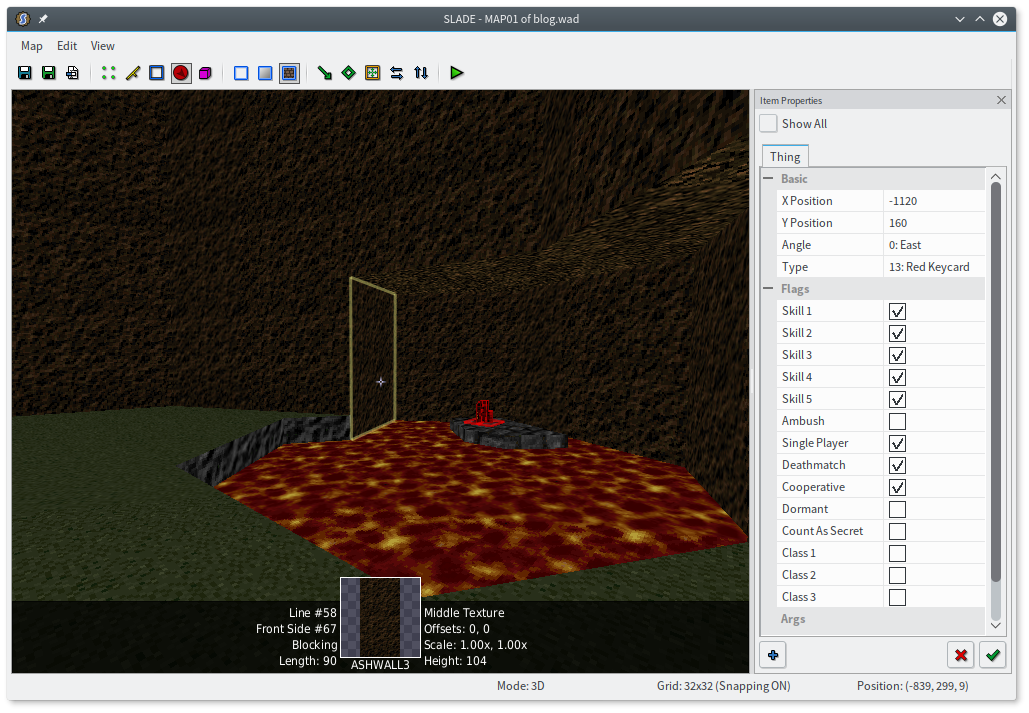
Keys are an easy go-to in Doom. I’ll switch to things mode, insert a new thing in the outdoors area, and use ctrlT to turn it into a red keycard.
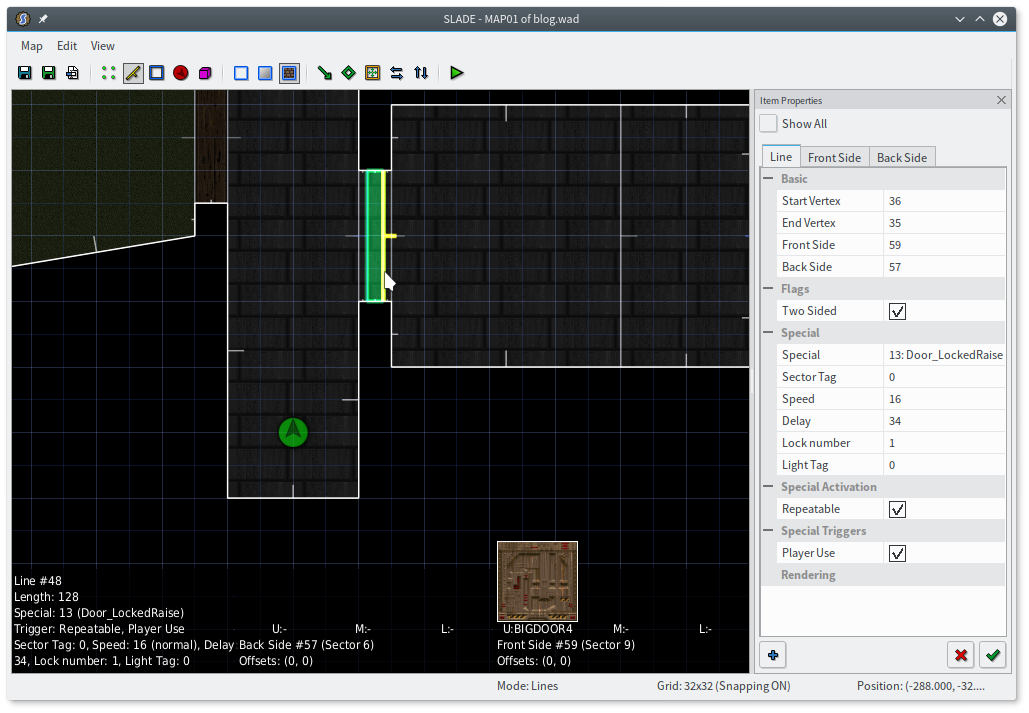
A key needs a lock, so let’s finally create that second door. This is the same as for the other door: make sure the door faces outwards, make sure the track is lower unpegged, and texture everything. This time, though, I’m going to use DOORRED for the trim, so the player knows that the door needs a red key. The hallway is also taller than any door texture, so I lowered the door trim ceiling a bit (and made it upper unpegged).
Now to add the special. This time I’m going to use Door_LockedRaise, which is like Door_Raise except… I’m sure you can see where this is going. The first three arguments have the same meanings as before, but now the fourth argument is a “lock number”. SLADE unfortunately doesn’t tell you what these are yet (I’m working on it!), so you have to consult the ZDoom wiki’s article on key types. You can see that for Doom, a red keycard is lock number 1. (You could also use 129 to mean “any red key”, which will get you the vanilla message when you don’t have the key.)
One last crucial touch is to actually move the player out of the exit room and into the hallway!
We’re getting somewhere, but this still isn’t too much of a challenge. When I think challenge, I think lava. I’ll add some lava around the key and a little island for it to sit on.
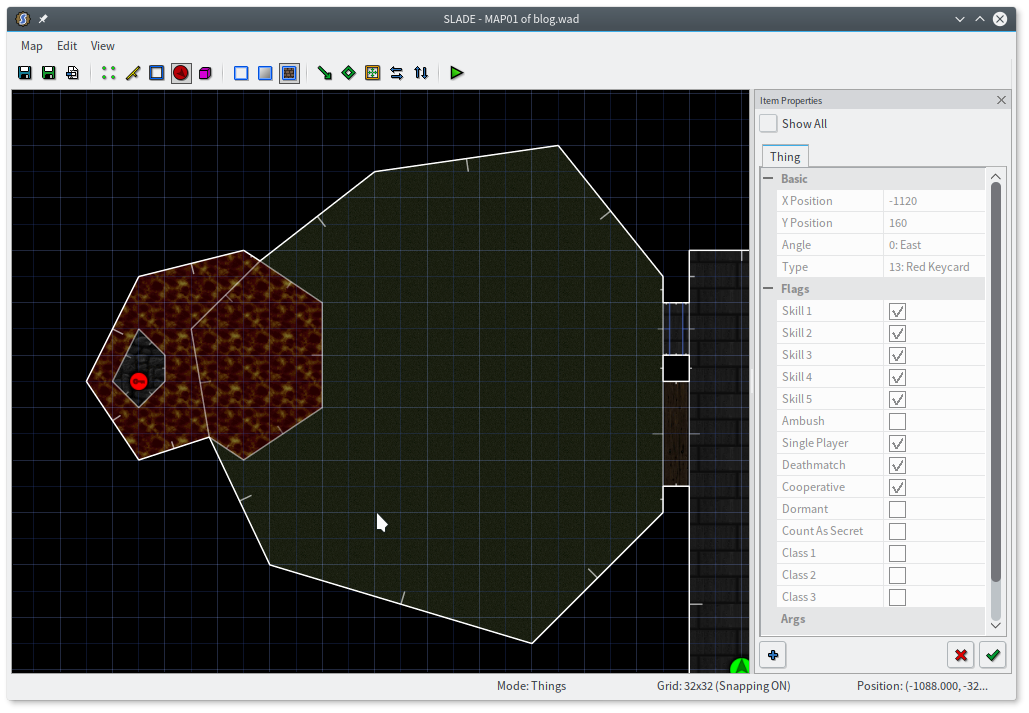
Nothing new here. I drew a squiggly shape that overlapped with the existing room, turned the outer part into a cave, and drew a little island on it. (The lava flat is, unsurprisingly, LAVA1.)
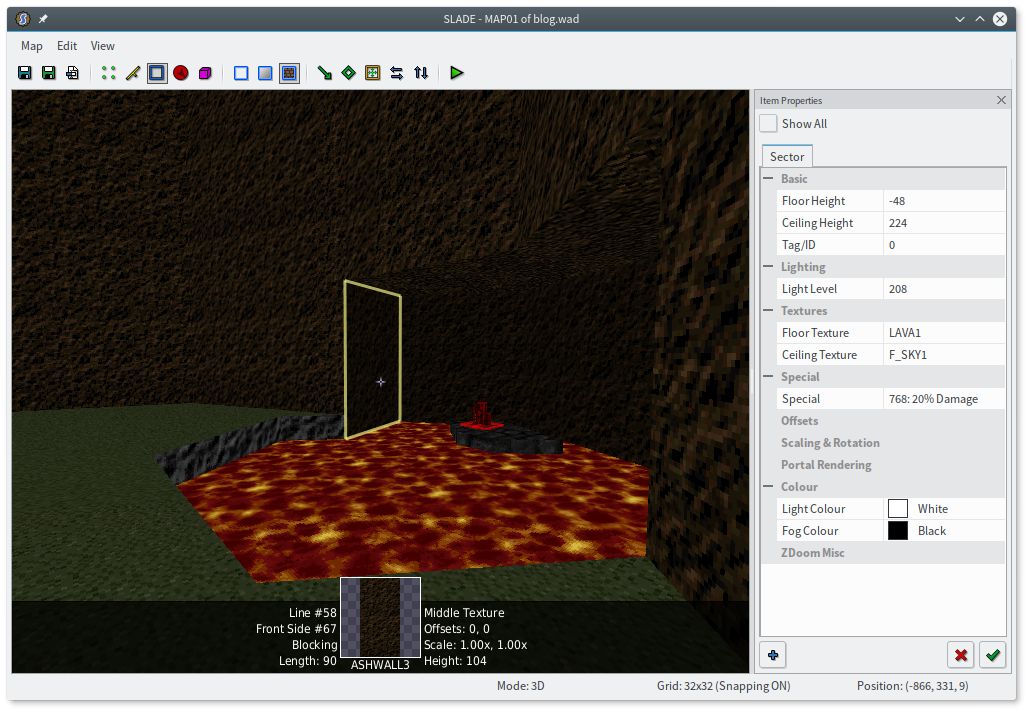
Now, for this to be a hazard, it should damage the player. This is done with a sector type, sometimes called a sector special, which naturally has nothing at all to do with a line special. Select both (all?) of your lava sectors, visit their properties, and find the “Special” tab. There is a lot of stuff here, inherited from half a dozen different games, and it’s a bit of a mess. All we want is damage, so it’s easiest to pick 20% from the “damage” dropdown at the bottom. (You might also notice that there’s a “secret” checkbox, and this is how (most) secrets work in Doom: the number of secrets is the number of sectors marked secret, and a secret is “found” when the player steps into the sector.)
There’s an even nicer way to handle this — ZDoom lets you create a special file for giving properties to certain floor textures that apply anywhere they’re used. In my own work I use this to enforce that lava always does 20% damage. It’s a wee bit beyond the scope of this part, though.
I have a minor aesthetic objection here. Lava should be bright, and the cave should be dark. But light is only a property of sectors and applies to both the floor and ceiling, right? What can we do about this?
Here’s one of the reasons to use UDMF: you can set the brightness of floors, ceilings, and walls independently. (The sector light level is still used for lighting objects inside the sector, including the player.) SLADE even helps you out! Press ctrlL in 3D mode to “unlink” flat light levels, meaning SLADE will only adjust the brightness of the plane you’re pointing at, rather than the whole sector. (Be sure to toggle it back when you’re done, or you’ll be in for some fun surprises later.) I’ll make the cavern dark, “unlink”, and make the lava very bright:
Population
It’s not much of a Doom map without some monsters. I like imps as a generic monster, so I’ll put a few in the outdoor area. Now the player will have to fight (or avoid) them to get the red key.
However! Doom has skill levels, and it’s polite to respect them. There are five built in.
- I’m too young to die.
- Hey, not too rough.
- Hurt me plenty.
- Ultra-Violence.
- Nightmare!
Things have flags for which skill levels they appear in. In vanilla Doom, there were only three flags: easy (for ITYTD and HNTR), medium (HMP), and hard (UV and NM). ITYTD was distinguished by giving double the usual amount of ammo from pickups, and also halving the damage the player took; Nightmare also had double ammo, but fast and respawning monsters. ZDoom lets you toggle all five skill levels independently, though I prefer to keep 1/2 and 4/5 the same to match the vanilla behavior (and make my life easier). There are also flags for whether things appear in single-player, coop, or deathmatch. A couple other tidbits about the skill flags:
-
ZDoom’s skill flags go all the way up to 16, because ZDoom lets you define custom skill levels. With the default skill levels, flags 6 and up won’t do anything and can be safely ignored.
-
Skill flags work on any thing, not just monsters. You could add more ammo, change weapons, block a hallway with decorations, move keys, or even rearrange teleporter destinations and spawn points. Doom 2’s MAP06: The Crusher places the blue keycard in a different part of the big crusher room depending on skill.
-
If a thing has no skill flags at all, it will never appear in-game. The original Doom has a lot of innocuous items like this, mostly small ammo pickups and decorations. The secret map of TNT: Evilution (one half of Final Doom) had a pretty bad related instance: the yellow key, necessary for completing the map, was flagged as multiplayer-only!
Right, so, about the map. I’m going to have three imps on hard (4 and 5), two on medium (3), and one on easy (1 and 2). That roughly matches the monster ratio of the original games, 1:2:3. I’m also going to add a former human on easy, which ups the firepower a little, but also allows for some infighting. (Monsters in Doom will turn on each other if they happen to hit one another while coming after you. However, monsters are immune to projectiles from their own species, so a group of imps won’t infight.) I’ll also give the player a shotgun on easy. And some health is always nice, so I’ll provide a medikit on easy and medium, and a stimpack on hard. The original games generally kept items the same across skill levels, but we don’t have to. It’s a little hard to see all of this from the map, but here’s what I end up with. (I went into Map Editor → Display → Things in the preferences, and changed “Thing style” to “Framed Sprite” so I can tell the monsters apart.) (I also have some ideas for giving SLADE ways to visualize stuff like what appears on what skill levels, but for now you have to check manually or just play the game.) (This paragraph has a lot of asides.)

Onwards
And… that’s it! A full and complete Doom level. It’s not very exciting yet, but it’s a little world you built, and that’s pretty cool. You can check mine out, if you like. (You can play maps with zdoom foo.wad, or just drag the file onto ZDoom.)
There’s a lot more you can do here. You can discover a lot of it by poking around the various properties to see what they do, or by browsing the list of line and sector specials. I’ll try to cover the rest of the classic Doom stuff and some general design advice in part 2, and then part 3 can be all about breaking the rules, my favorite pastime.
‘Til then, build some stuff and show it to me! I will even give your level a cool shout-out right here:
- “There’s technically only 3 rooms, Eevee” by @wilkieii
- “Inspired me to make 4 rooms” by @gremblor
- “My 1st DOOM level, made at @ICTGameJam” by @BenBlankley
- “I did a thing!” by @orbicube
- “First Doom Map” by @hokazenoflames
- “I was inspired and I made this” by @HihiDanni
- “My Doom map inspired by @eevee’s blog posts” by @Reedbeta (nb: map slot is
eevee, run aszdoom -file eevee.wad +map eeveeor typemap eeveein the zdoom console)
